创建菜单与游戏界面
先把”面子工程做好“ 先写前端再写后端
分析页面
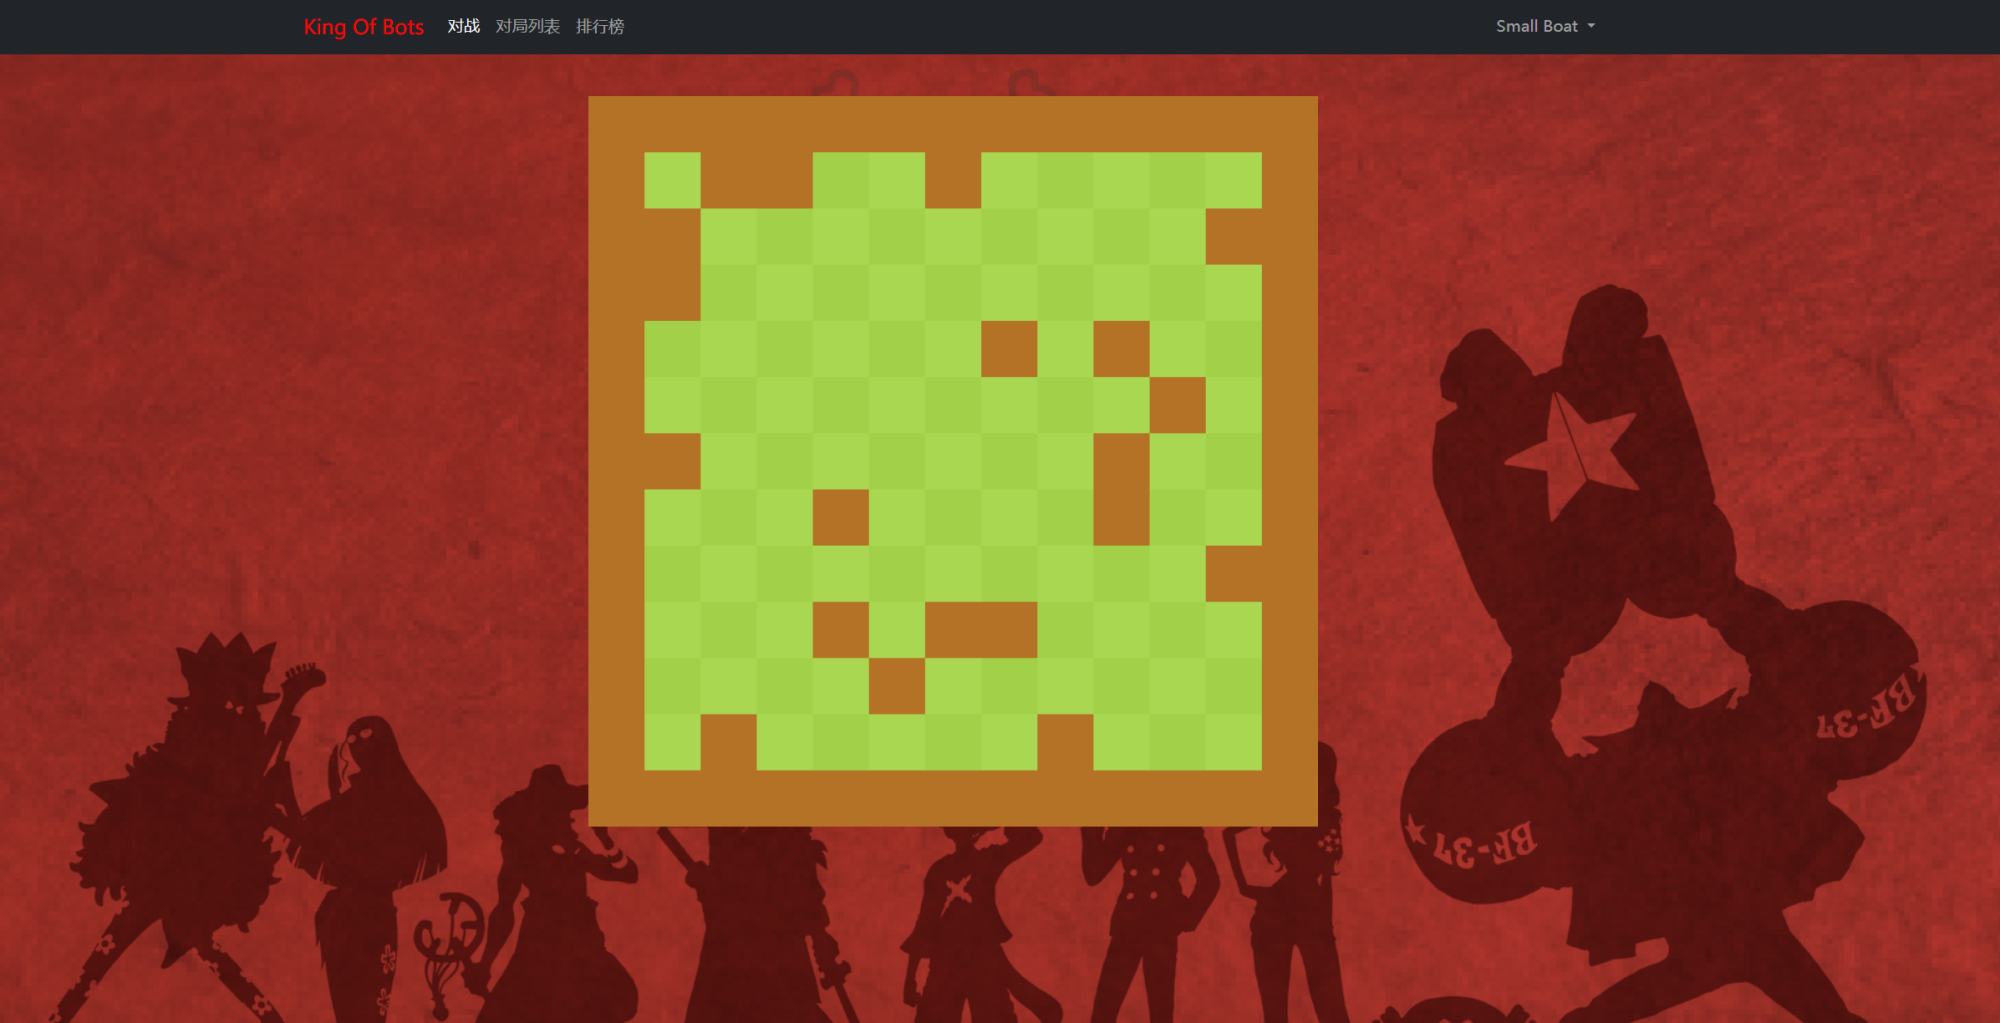
不外乎分为两个部分 导航栏和中心内容板块
而每个页面的导航栏都是一样的(大部分网站都差不多)
变化的区域(跟随链接变化)主要是在内容区
所以可以把导航栏专门提炼出来 在vue中做一个组件
创建导航栏组件
关于组件
组件一般在web\src\components下创建
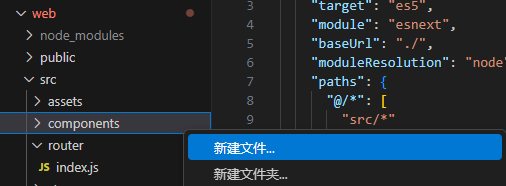
一个知识点:在vue中 给组件命名 必须要有两个字母大写 否则报错
这里我们命名成NavBar.vue
每个vue里的组件都分三个部分 html、js、css
html写在template里 js写在script里 css写在style里
style最好加个scoped 使得css生成时会加上随机字符串 从而不会影响到组件以外的部分
<template>

</template>
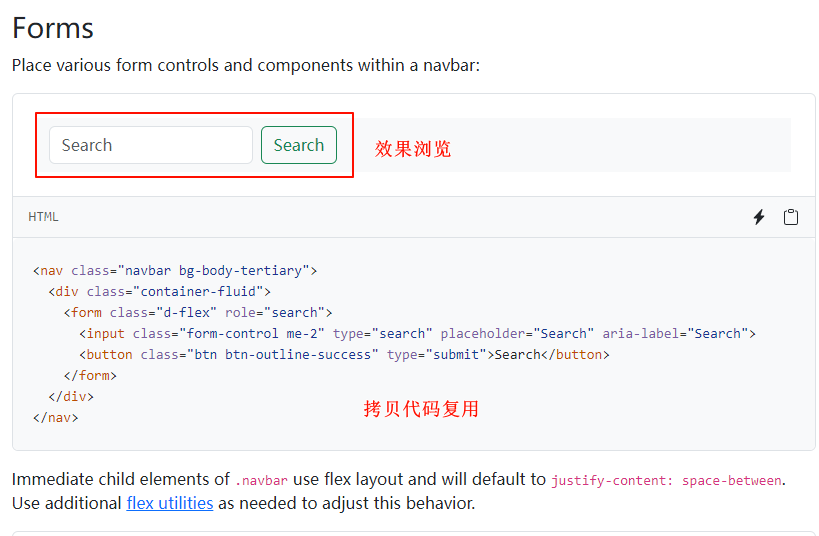
tip: 一个搜索样式的网站https://v5.bootcss.com/ 比如这里要实现导航栏 直接去里面搜Navbar就有n种选择给你 无需自己设计
导入组件
在App.vue中修改如下:
<template>
  <NavBar></NavBar>
  <router-view></router-view>
</template>


  import NavBar from '@/components/NavBar.vue'

  export default{
    components:{
      NavBar
    }
  }
即可发现成功引入了刚刚的组件
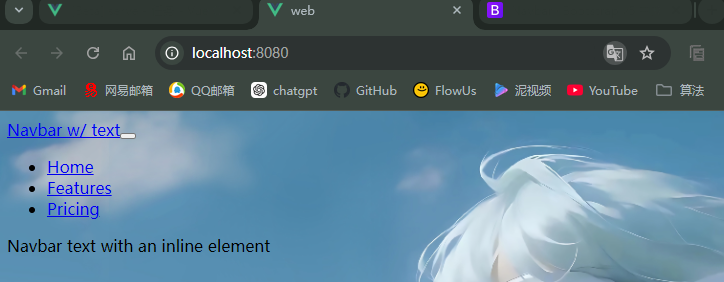
但样式没有成功用上
这里需要用到bootstrap
再在App.vue中引入两行
import "bootstrap/dist/css/bootstrap.min.css"
import "bootstrap/dist/js/bootstrap"
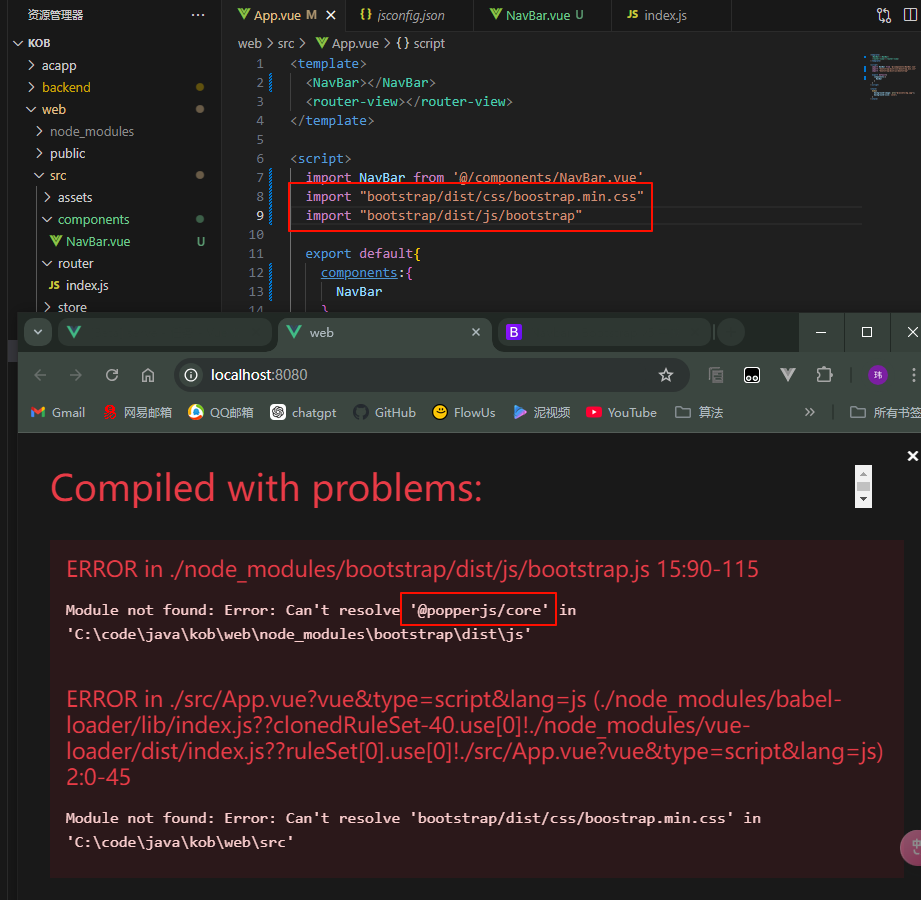
发现报错 缺少@popperjs/core依赖
直接去vue ui里面下载该依赖
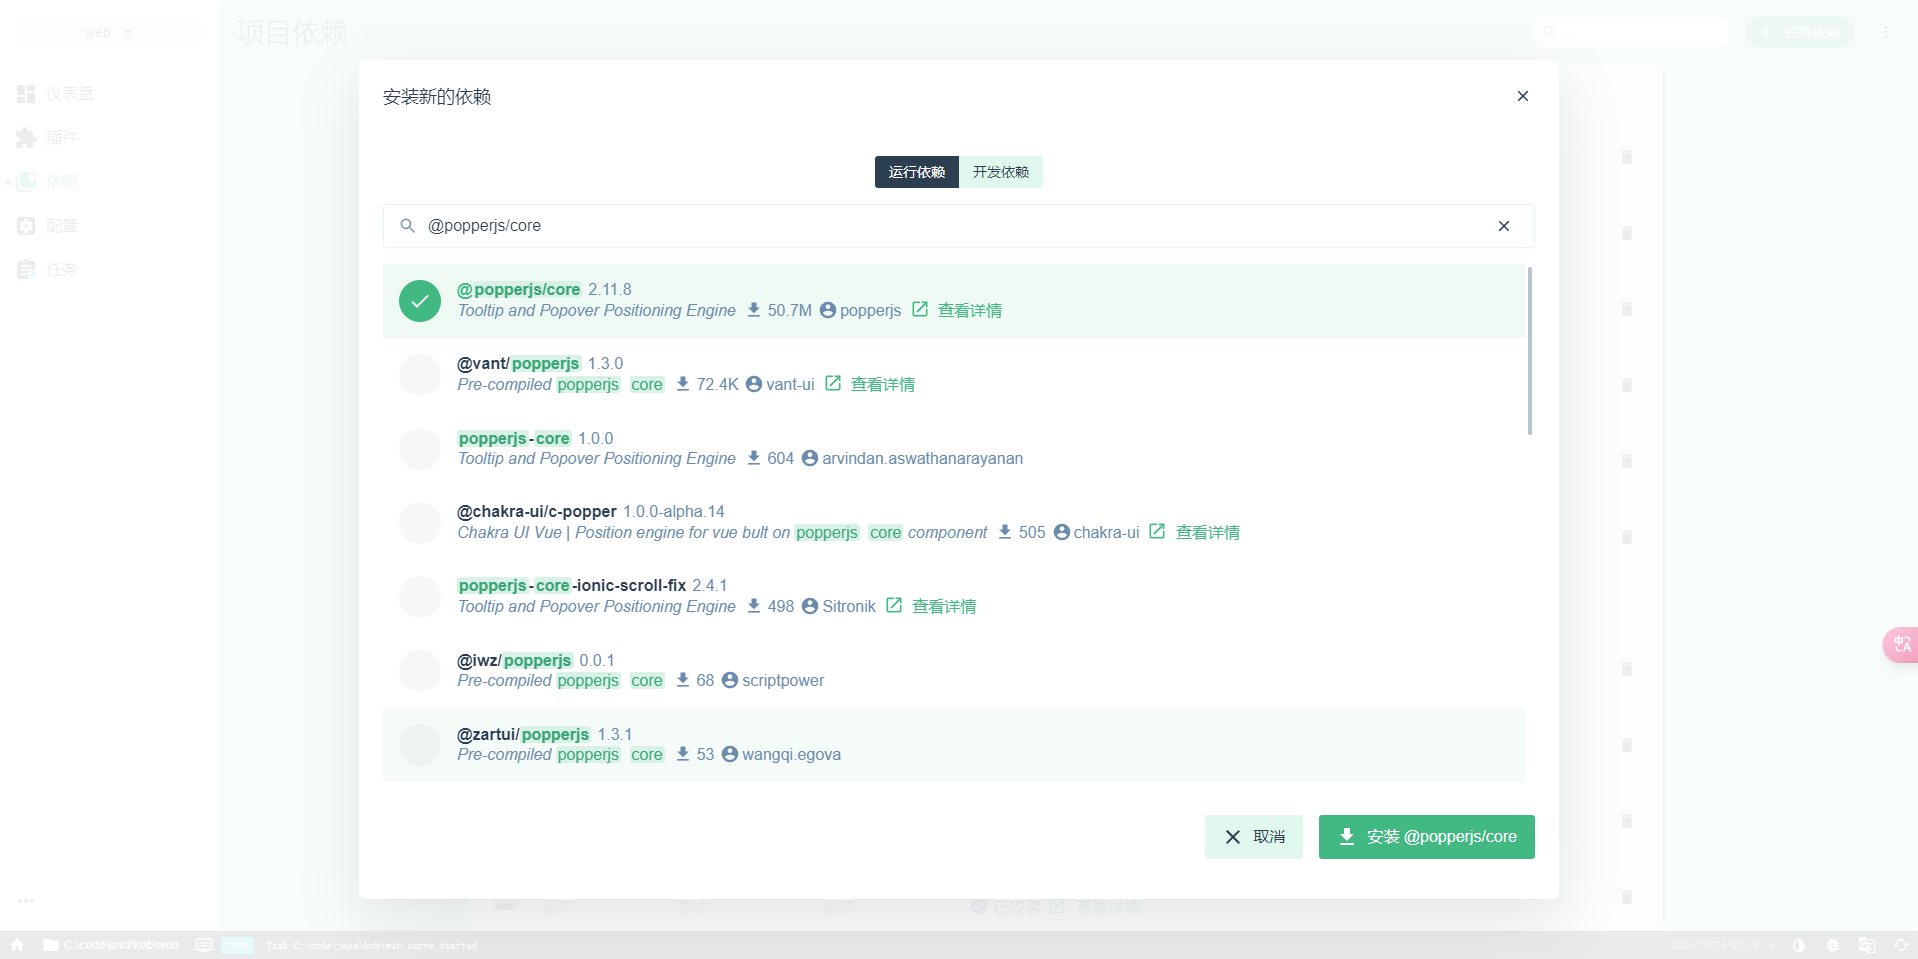
刷新一下就解决了

成功做好了标题栏 再稍微改一下就好了
导航实现
大概改了一下 NavBar,vue如下:(button那一块别删 我这里删掉了 后面又加回来了 是缩小页面变更导航栏样式为三杠样式的功能)
<template>
    <nav class="navbar navbar-expand-lg  bg-body-tertiary">
        <div class="container">
            <a class="navbar-brand" href="#">King Of Bots</a>

            <div class="collapse navbar-collapse" id="navbarText">
                <ul class="navbar-nav me-auto mb-2 mb-lg-0">
                    <li class="nav-item">
                    <a class="nav-link active" aria-current="page" href="#">对战</a>
                    </li>
                    <li class="nav-item">
                    <a class="nav-link" href="#">对局列表</a>
                    </li>
                    <li class="nav-item">
                    <a class="nav-link" href="#">排行榜</a>
                    </li>
                </ul>
                <ul class="navbar-nav">
                    <li class="nav-item dropdown">
                        <a class="nav-link dropdown-toggle" href="#" role="button" data-bs-toggle="dropdown" aria-expanded="false">
                            Zwww
                        </a>
                        <ul class="dropdown-menu">
                            <li><a class="dropdown-item" href="#">我的Bot</a></li>
                            <li><hr class="dropdown-divider"></li>
                            <li><a class="dropdown-item" href="#">退出</a></li>
                        </ul>
                    </li>
                </ul>
            </div>
        </div>
    </nav>
</template>
App.vue如下:
<template>
  <NavBar></NavBar>
  <router-view></router-view>
</template>


  import NavBar from '@/components/NavBar.vue'
  import "bootstrap/dist/css/bootstrap.min.css"
  import "bootstrap/dist/js/bootstrap"

  export default{
    components:{
      NavBar
    }
  }


  body{
    background-image: url("@/assets/bg.jpg");
    background-size: cover;
  }
效果如下:

页面实现
接下来就是要实现
输入http://localhost:8080/pk/ 跳转到对战列表 输入http://localhost:8080/record/ 跳转到对战记录列表 输入http://localhost:8080/ranklist/ 跳转到排行榜 输入http://localhost:8080/userBots/ 跳转到用户下myBot界面
先抛开后端不说 后端大概就是做几个函数用注解对应上
前端总要做出几个不同的页面来吧
每个页面一般也是写一个自己单独的组件
要写几个页面呢
pk、record、ranklist、userBots、404(不合法页面自动跳到404)
页面的组件 一般放在view目录下 (放前面说的components也可以)
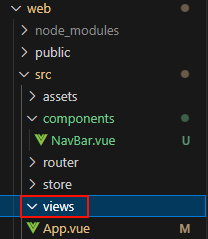
然后 每个页面可能又包含很多组件 所以不要单纯一个页面建一个组件 而是建一个文件夹
而每个组件肯定都要有一个主页
由此得到以下层级
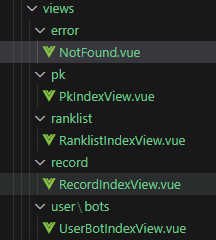
再把每个组件的三个框架写好 对应描述一下该页面是什么
如:
<template>
    <div>对战</div>
</template>
测试链接/页面对应
vue里面的路径是怎么一回事
我们可以观察到 主页现在就两个东西
一个导航栏 一个router-view
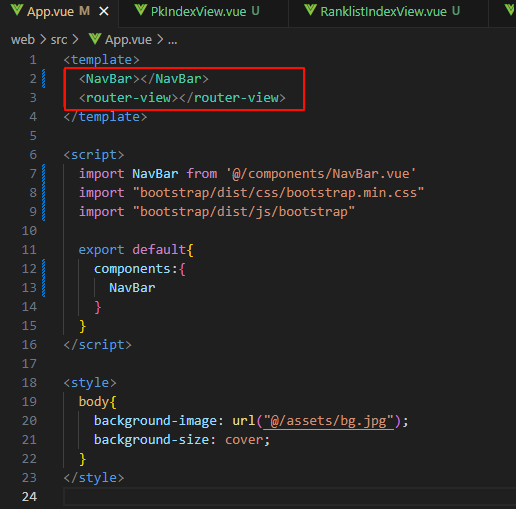
路由会自动根据我们的网址来变
而他的变化方式在web\src\router\index.js中定义
先把刚创建的几个组件都引入进去
import PkIndexView from '../views/pk/PkIndexView.vue'
import RecordIndexView from '../views/record/RecordIndexView.vue'
import RanklistIndexView from '../views/ranklist/RanklistIndexView.vue'
import UserBotIndexView from '../views/user/bots/UserBotIndexView.vue'
import NotFound from '../views/error/NotFound.vue'
在const routes = [] 中写映射关系
const routes = [
  {
    path:"/pk/",//把http://localhost:8080/pk/
    name:"pk_index",
    component:PkIndexView,//映射到PkIndexView组件
  },
  {
    path:"/record/",
    name:"record_index",
    component:RecordIndexView,
  },
  {
    path:"/ranklist/",
    name:"ranklist_index",
    component:RanklistIndexView,
  },
  {
    path:"/user/bot/",
    name:"user_bot_index",
    component:UserBotIndexView,
  },
  {
    path:"/404/",
    name:"404",
    component:NotFound,
  },
]
router/index.js如下:
import { createRouter, createWebHistory } from 'vue-router'
import PkIndexView from '../views/pk/PkIndexView.vue'
import RecordIndexView from '../views/record/RecordIndexView.vue'
import RanklistIndexView from '../views/ranklist/RanklistIndexView.vue'
import UserBotIndexView from '../views/user/bots/UserBotIndexView.vue'
import NotFound from '../views/error/NotFound.vue'

const routes = [
  {
    path:"/pk/",//把http://localhost:8080/pk/
    name:"pk_index",
    component:PkIndexView,//映射到PkIndexView组件
  },
  {
    path:"/record/",
    name:"record_index",
    component:RecordIndexView,
  },
  {
    path:"/ranklist/",
    name:"ranklist_index",
    component:RanklistIndexView,
  },
  {
    path:"/user/bot/",
    name:"user_bot_index",
    component:UserBotIndexView,
  },
  {
    path:"/404/",
    name:"404",
    component:NotFound,
  },
]

const router = createRouter({
  history: createWebHistory(),
  routes
})

export default router
成功:
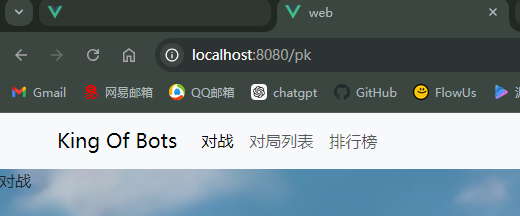

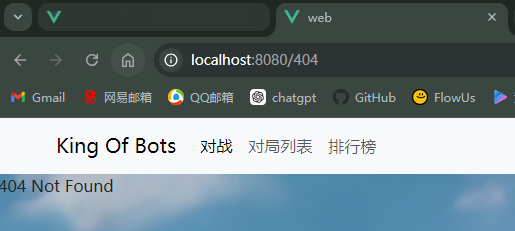
……
然后还有一个问题 当直接输入localhost:8080是什么都没有的
我们需要把他重定向到localhost:8080/pk
 {
    path:"/",
    name:"home",
    redirect:"/pk/",
  },
另外 如果输入乱七八糟的地址的话 需要跳转到404界面
直接匹配所有字符就行 因为是从上到下执行 所有到这里匹配任何都直接跳到404
 {
    path:"/:catchAll(.*)",
    redirect:"/404/",
  },
完整路由:
import { createRouter, createWebHistory } from 'vue-router'
import PkIndexView from '../views/pk/PkIndexView.vue'
import RecordIndexView from '../views/record/RecordIndexView.vue'
import RanklistIndexView from '../views/ranklist/RanklistIndexView.vue'
import UserBotIndexView from '../views/user/bots/UserBotIndexView.vue'
import NotFound from '../views/error/NotFound.vue'

const routes = [
  {
    path:"/",
    name:"home",
    redirect:"/pk/",
  },
  {
    path:"/pk/",//把http://localhost:8080/pk/
    name:"pk_index",
    component:PkIndexView,//映射到PkIndexView组件
  },
  {
    path:"/record/",
    name:"record_index",
    component:RecordIndexView,
  },
  {
    path:"/ranklist/",
    name:"ranklist_index",
    component:RanklistIndexView,
  },
  {
    path:"/user/bot/",
    name:"user_bot_index",
    component:UserBotIndexView,
  },
  {
    path:"/404/",
    name:"404",
    component:NotFound,
  },
  {
    path:"/:catchAll(.*)",
    redirect:"/404/",
  },
]

const router = createRouter({
  history: createWebHistory(),
  routes
})

export default router
全局组件
完善跳转(导航升级)
但这都是自己输入网址才跳转 要实现点击跳转 还需要更改导航栏里的超链接
web\src\components\NavBar.vue 修改为:
<template>
    <nav class="navbar navbar-expand-lg  bg-body-tertiary">
        <div class="container">
            <a class="navbar-brand" href="#root/3SVYnqcfVbzy">King Of Bots</a>

            <div class="collapse navbar-collapse" id="navbarText">
                <ul class="navbar-nav me-auto mb-2 mb-lg-0">
                    <li class="nav-item">
                    <a class="nav-link active" aria-current="page" href="#root/ahtbHm373fs1">对战</a>
                    </li>
                    <li class="nav-item">
                    <a class="nav-link" href="#root/NJAzxBXZsU9R">对局列表</a>
                    </li>
                    <li class="nav-item">
                    <a class="nav-link" href="#root/o64yaAapg7qV">排行榜</a>
                    </li>
                </ul>
                <ul class="navbar-nav">
                    <li class="nav-item dropdown">
                        <a class="nav-link dropdown-toggle" href="#" role="button" data-bs-toggle="dropdown" aria-expanded="false">
                            Zwww
                        </a>
                        <ul class="dropdown-menu">
                            <li><a class="dropdown-item" href="#root/tljkJjy1OBR0">我的Bot</a></li>
                            <li><hr class="dropdown-divider"></li>
                            <li><a class="dropdown-item" href="#">退出</a></li>
                        </ul>
                    </li>
                </ul>
            </div>
        </div>
    </nav>
</template>
我们还可以发现 每次点击 页面都要进行一遍刷新 体验不是很好
其实可以做到 点击不刷新 直接跳转
这需要我们把导航里的标签全都换成
<template>
    <nav class="navbar navbar-expand-lg  bg-body-tertiary">
        <div class="container">
            <!-- <a class="navbar-brand" href="#root/3SVYnqcfVbzy">King Of Bots</a> -->
            <router-link class="navbar-brand" :to="{name: 'home'}">King Of Bots</router-link>

            <div class="collapse navbar-collapse" id="navbarText">
                <ul class="navbar-nav me-auto mb-2 mb-lg-0">
                    <li class="nav-item">
                    <!-- <a class="nav-link active" aria-current="page" href="#root/ahtbHm373fs1">对战</a> -->
                    <router-link class="nav-link active" :to="{name: 'pk_index'}">对战</router-link>
                    </li>
                    <li class="nav-item">
                    <!-- <a class="nav-link" href="#root/NJAzxBXZsU9R">对局列表</a> -->
                    <router-link class="nav-link" :to="{name: 'record_index'}">对局列表</router-link>
                    </li>
                    <li class="nav-item">
                    <!-- <a class="nav-link" href="#root/o64yaAapg7qV">排行榜</a> -->
                    <router-link class="nav-link" :to="{name: 'ranklist_index'}">排行榜</router-link>
                    </li>
                </ul>
                <ul class="navbar-nav">
                    <li class="nav-item dropdown">
                        <a class="nav-link dropdown-toggle" href="#" role="button" data-bs-toggle="dropdown" aria-expanded="false">
                            Zwww
                        </a>
                        <ul class="dropdown-menu">
                            <li>
                                <!-- <a class="dropdown-item" href="#root/tljkJjy1OBR0">我的Bot</a> -->
                                <router-link class="dropdown-item" :to="{name: 'user_bot_index'}">我的Bot</router-link>
                            </li>
                            <li><hr class="dropdown-divider"></li>
                            <li><a class="dropdown-item" href="#">退出</a></li>
                        </ul>
                    </li>
                </ul>
            </div>
        </div>
    </nav>
</template>
页面卡片
每个页面其实有个框把主要内容凸显出来会比较合适
在网站里也有有个叫做card的东西 直接里面搜
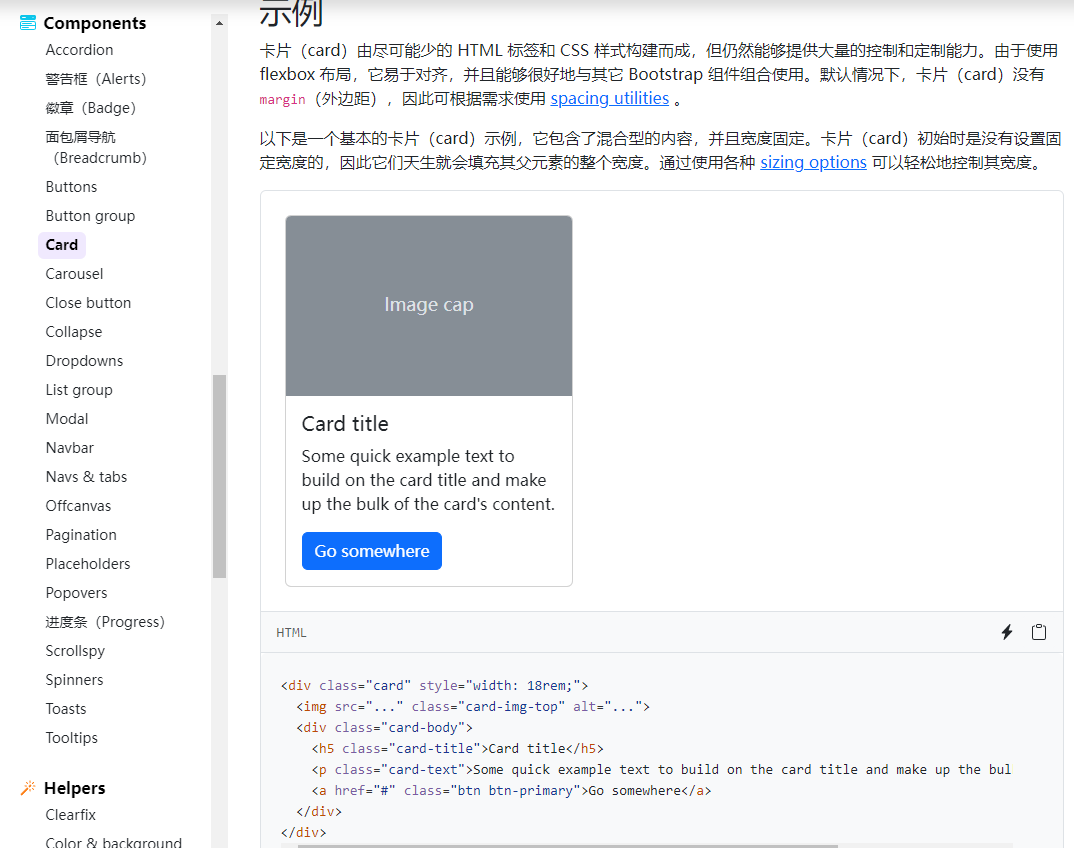
在index 的 template里 把
<template>
    <div class="container">
       <div class="card">
           <div class="card-body">
               对战
           </div>
       </div>
   </div>
</template>

可见多了个白框
我们在每页都希望有这样一个白框 所以 也可以把这个东西做成一个组件
类似于导航栏的组件
我们写在components当中
创建ContentField.vue
<template>
    <div class="container">
       <div class="card">
           <div class="card-body">

           </div>
       </div>
   </div>
</template>
在这里面的内容会被填充
填充的内容 应该放在
所以得到
<template>
    <div class="container">
       <div class="card">
           <div class="card-body">
            <slot></slot>
           </div>
       </div>
   </div>
</template>
这个组件就写完了
有了它之后 我们直接在各页面import一下
<template>
   <ContentField>
        对战
   </ContentField>
</template>


    import ContentField from '../../components/ContentField.vue'

    export default{
        components:{
            ContentField
        }
    }
(虽然这里体现意义不大 但极大的提高了可维护性 如果要修改卡片样式 只需要改一个地方就行了 还是很有意义的)
比如这里要把框加一个20px的上边距 只需要修改ContentField.vue
<template>
    <div class="container content-field">
       <div class="card">
           <div class="card-body">
            <slot></slot>
           </div>
       </div>
   </div>
</template>


    div.content-field{
        margin-top:20px;
    }

导航栏跟随高亮
web\src\components\NavBar.vue
高亮由active决定 需要哪块高亮就在哪里加active
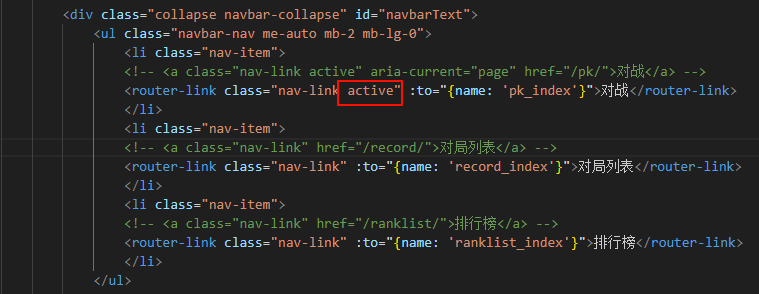
要实现自动高亮这个功能 就得取得当前在哪个页面
显然需要路由配合
在NavBar.vue 的js部分加上以下内容
// 引入 useRoute 以访问当前路由信息
import { useRoute } from 'vue-router';
// 引入 computed,用于定义计算属性
import { computed } from 'vue';

export default {
  // Vue 3 组件的 setup 函数
  setup() {
    // 通过 useRoute 获取当前路由对象
    const route = useRoute();

    // 创建一个计算属性,返回当前路由的名称
    let route_name = computed(() => route.name);

    // 返回计算属性,使其可以在模板中使用
    return {
      route_name,
    };
  },
};
怎么用这个route_name
在标签中 如果属性要用表达式 要在前面加个:(v-bind的缩写)
然后就是三元运算符的逻辑
如果router-name等于该页面的名字 就用有active的样式 否则用普通样式
对应三个也这样改就行了
得到代码:
<template>
    <nav class="navbar navbar-expand-lg  bg-body-tertiary">
        <div class="container">
            <!-- <a class="navbar-brand" href="#root/3SVYnqcfVbzy">King Of Bots</a> -->
            <router-link class="navbar-brand" :to="{name: 'home'}">King Of Bots</router-link>

            <div class="collapse navbar-collapse" id="navbarText">
                <ul class="navbar-nav me-auto mb-2 mb-lg-0">
                    <li class="nav-item">
                    <!-- <a class="nav-link active" aria-current="page" href="#root/ahtbHm373fs1">对战</a> -->
                    <router-link :class="route-name=='pk_index' ? 'nav-link active' : 'nav-link'" :to="{name: 'pk_index'}">对战</router-link>
                    </li>
                    <li class="nav-item">
                    <!-- <a class="nav-link" href="#root/NJAzxBXZsU9R">对局列表</a> -->
                    <router-link :class="route-name=='record_index' ? 'nav-link active' : 'nav-link'" :to="{name: 'record_index'}">对局列表</router-link>
                    </li>
                    <li class="nav-item">
                    <!-- <a class="nav-link" href="#root/o64yaAapg7qV">排行榜</a> -->
                    <router-link :class="route-name=='ranklist_index' ? 'nav-link active' : 'nav-link'" :to="{name: 'ranklist_index'}">排行榜</router-link>
                    </li>
                </ul>
                <ul class="navbar-nav">
                    <li class="nav-item dropdown">
                        <a class="nav-link dropdown-toggle" href="#" role="button" data-bs-toggle="dropdown" aria-expanded="false">
                            Zwww
                        </a>
                        <ul class="dropdown-menu">
                            <li>
                                <!-- <a class="dropdown-item" href="#root/tljkJjy1OBR0">我的Bot</a> -->
                                <router-link class="dropdown-item" :to="{name: 'user_bot_index'}">我的Bot</router-link>
                            </li>
                            <li><hr class="dropdown-divider"></li>
                            <li><a class="dropdown-item" href="#">退出</a></li>
                        </ul>
                    </li>
                </ul>
            </div>
        </div>
    </nav>
</template>


    import { useRoute } from 'vue-router';
    import { computed } from 'vue';
    export default{
        setup(){
            const route=useRoute();
            let route_name=computed(() =>route.name)
            return{
                route_name
            }
        }
    }
自此 大概框架就完成了
绝大部分网站都可以套用这个模板
接下来逐一实现各个页面
pk页面
这一页主要是实现 地图 以及一个双人版的贪吃蛇小游戏
贪吃蛇之前用c做过一次 原理其实就是 计算蛇在每一帧应该出现的位置 然后把它渲染出来 (每秒画一次 每画一次就把前面那张图片覆盖掉 这样在视觉上就是在移动)
那么在这个动画游戏中 每个游戏物品其实都可以抽象出来一个功能 那就是每秒钟能被刷新60次 我们就可以把它抽象成一个基类
GameObject.js 基本刷新逻辑
前面提到图片放在assets里面 我们的js也放在里面 创建以下目录 (记得更改一下的bg引用)
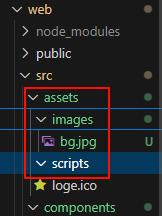
在scripts下创一个游戏基类 GameObject.js
存储游戏对象
为了能够在每秒把所有游戏对象都刷新一遍 首先就得把所有游戏对象都存下来
存在数组里面就可以了 const GAME_OBJECTS=[];
基类定义:
需要export出去 其他类引入这个文件时 其实主要是引入这个类
在构造函数时 就把游戏对象加进去
const GAME_OBJECTS=[];

export class GameObject{
   constructor(){
        GAME_OBJECTS.push(this);
    }

}
requestAnimationFrame函数
浏览器一般刷新速度为一秒钟60次 requestAnimationFrame函数会在下一次浏览器刷新前执行 在里面传一个回调函数 即可实现在下一次浏览器渲染之前执行一遍 要让他实现每一帧都执行的话 就把这个函数写成回调(迭代)函数
详细:
- 浏览器刷新速度为每秒钟60次:这是基于大多数现代显示器的刷新率(refresh rate)为60Hz,因此浏览器的渲染一般会按照60帧每秒的速率来运行。
requestAnimationFrame函数的作用:requestAnimationFrame会在浏览器下一次重绘(刷新)之前调用你传入的回调函数。这意味着,它能确保动画或其他需要刷新页面的操作与浏览器的刷新速率同步,从而使动画更加平滑。- 传入一个回调函数:
requestAnimationFrame会将你传入的回调函数安排在下一次浏览器渲染前执行一遍,从而最大限度地优化性能。 - 实现每一帧都执行:如果希望在每一帧都执行某个函数,只需将这个函数本身作为回调函数传入
requestAnimationFrame。你可以在回调函数内部再次调用requestAnimationFrame来形成递归调用(iteration),以确保每一帧都被执行。例如:
function animationLoop() {
  // 你的动画逻辑
  console.log("每一帧执行一次");

  // 递归调用,确保下一帧继续执行
  requestAnimationFrame(animationLoop);
}

// 开始动画循环
requestAnimationFrame(animationLoop);
这样,animationLoop 函数会在每次浏览器刷新前被调用一次,实现每秒60次(或刷新率指定的次数)的执行。
所以得到:
 const GAME_OBJECTS=[];

export class GameObject{
   constructor(){
        GAME_OBJECTS.push(this);
    }
}

const step = () => {

    requestAnimationFrame(step)
}
requestAnimationFrame (step)
GameObject类
游戏对象应该要执行这么几个函数 创建时的start函数 除第一帧外每帧执行一次的update函数 这帧结束后 被下一帧替代 该帧需要被销毁 实现刷新 destory函数
创建和更新因为当前还没加对象所以暂时留白 但删除现在就可以直接写了
 destroy(){

        for(let i in GAME_OBJECTS){
            const obj=GAME_OBJECTS[i];
            if(obj === this){
                GAME_OBJECTS.splice(i);
                break;
            }
        }
    }
还有一个可能会用到的操作 在删除之前可能会执行一些回调函数 on_destory() 在删除之前调用一下就可以实现这个函数的执行
由此得到:
const GAME_OBJECTS=[];

export class GameObject{
    constructor(){
        GAME_OBJECTS.push(this);
    }

    start(){//只执行一次

    }

    update(){//每一帧执行一次 除了第一帧外

    }

    on_destory(){//删除之前执行

    }

    destroy(){//删除上一个对象 重新生成新的 实现刷新
        this.on_destory();

        for(let i in GAME_OBJECTS){
            const obj=GAME_OBJECTS[i];
            if(obj === this){
                GAME_OBJECTS.splice(i);
                break;
            }
        }
    }
}

const step = () => {

    requestAnimationFrame(step)
}
requestAnimationFrame (step)
start/update准备工作
需要记录一下有没有执行过 开一个变量 has_called_start 执行过为true否则false
另外 要让物品移动就会涉及到一个速度的概念 一般以秒为单位(一秒移动几个像素)这就涉及到时间间隔 移动的距离就是速度*时间间隔 使用timedelta变量来存储这一帧执行的时刻距离上一帧执行的时刻的时间间隔
构造函数变为:
constructor(){
        GAME_OBJECTS.push(this);

        this.timedelta=0;
        this.has_called_start=false;
    }
那么start和update该怎么被执行(setp回调函数中)
开一个辅助变量 last_timestamp 来记录上一次执行的时刻
setp函数传入一个参数(当前的执行时刻)
遍历所有的游戏物品 (js中 循环 用of表示遍历值 用in表示遍历下标)
如果发现该物品没执行过start函数 就执行start 并更改状态
否则就执行update函数 并且计算时间间隔(当前时刻-上一时刻)
let last_timestamp;

const step = timestamp => {
    for(let obj of GAME_OBJECTS){
        if(!obj.has_called_start){
            obj.has_called_start=true;
            obj.start();
        }else{
            obj.timedelta=timestamp-last_timestamp;
            obj.update();
        }
    }

    last_timestamp=timestamp;
    requestAnimationFrame(step)
}
初代代码
// 定义全局游戏对象数组
const GAME_OBJECTS = [];

export class GameObject {
    constructor() {
        GAME_OBJECTS.push(this);
        this.timedelta = 0; // 记录时间间隔
        this.has_called_start = false; // 标记是否调用过 start
    }

    start() {
        // 只执行一次的初始化逻辑
    }

    update() {
        // 每一帧执行的逻辑,除了第一帧外
    }

    on_destroy() {
        // 在对象销毁之前执行的回调
    }

    destroy() {
        this.on_destroy(); // 执行销毁前的回调

        // 删除对象
        for (let i = 0; i < GAME_OBJECTS.length; i++) {
            if (GAME_OBJECTS[i] === this) {
                GAME_OBJECTS.splice(i, 1); // 删除当前对象,删除一个元素
                break;
            }
        }
    }
}

// 用于记录上一次时间戳
let last_timestamp;

// 定义 step 函数
const step = (timestamp) => {
    // 计算每个对象的更新时间
    for (let obj of GAME_OBJECTS) {
        if (!obj.has_called_start) {
            obj.has_called_start = true;
            obj.start();
        } else {
            obj.timedelta = timestamp - last_timestamp;
            obj.update();
        }
    }

    // 更新 last_timestamp
    last_timestamp = timestamp;

    // 继续下一帧调用
    requestAnimationFrame(step);
}

// 开始执行动画循环
requestAnimationFrame(step);
地图
GameMap.js
web\src\assets\scripts下建立GameMap.js
首先引入基类 import {GameObject} from “./GameObject”
这里import需要加上{} 是因为export class GameObject 这里仅为export 如果是export default 就无需括 每一个文件最多只有一个export default 相当于java中的public
(default引入不用括号 非default引入要括号)
创建GameMap类 继承于基类 构造函数需要传入两个参数 一个是画布(游戏都是在画布标签里画) 另一个是画布的父元素 用于动态修改长宽比 (因为浏览器的框可以调整大小 对应的我们的画布棋盘也要变化) 在这里也可以猜到 写的时候不能用绝对距离 而是用相对位置
这里我们设计成13*13的地图 每一个格子长度为单位1 那么在构造时存一下每一个格子的绝对距离 未来所有的坐标存的都是相对距离
也就是说 13*13是绝对的 但每个格子的大小是相对的
另外 肯定需要重载一下开始绘制的start 每帧更新的update 以及渲染函数render
由此得到GameMap.js
import { GameObject } from "./GameObject";

export class GameMap extends GameObject{
    constructor(ctx,parent){
        super(); //先执行基类的构造函数

        this.ctx=ctx;
        this.parent=parent;
        this.L=0;//L表示一个单位的长度
    }

    start(){

    }

    update(){

        this.render();
    }

    render(){//渲染 将当前游戏对象画在地图上

    }

}
绘制地图区域
做地图的话之前的ContentField组件的白框就没必要了 可以删掉
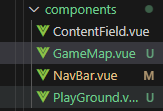
重新创一个组件 PlayGround 用于设置主要的游戏区域
新建个组件GameMap负责实际的游戏地图显示和绘制
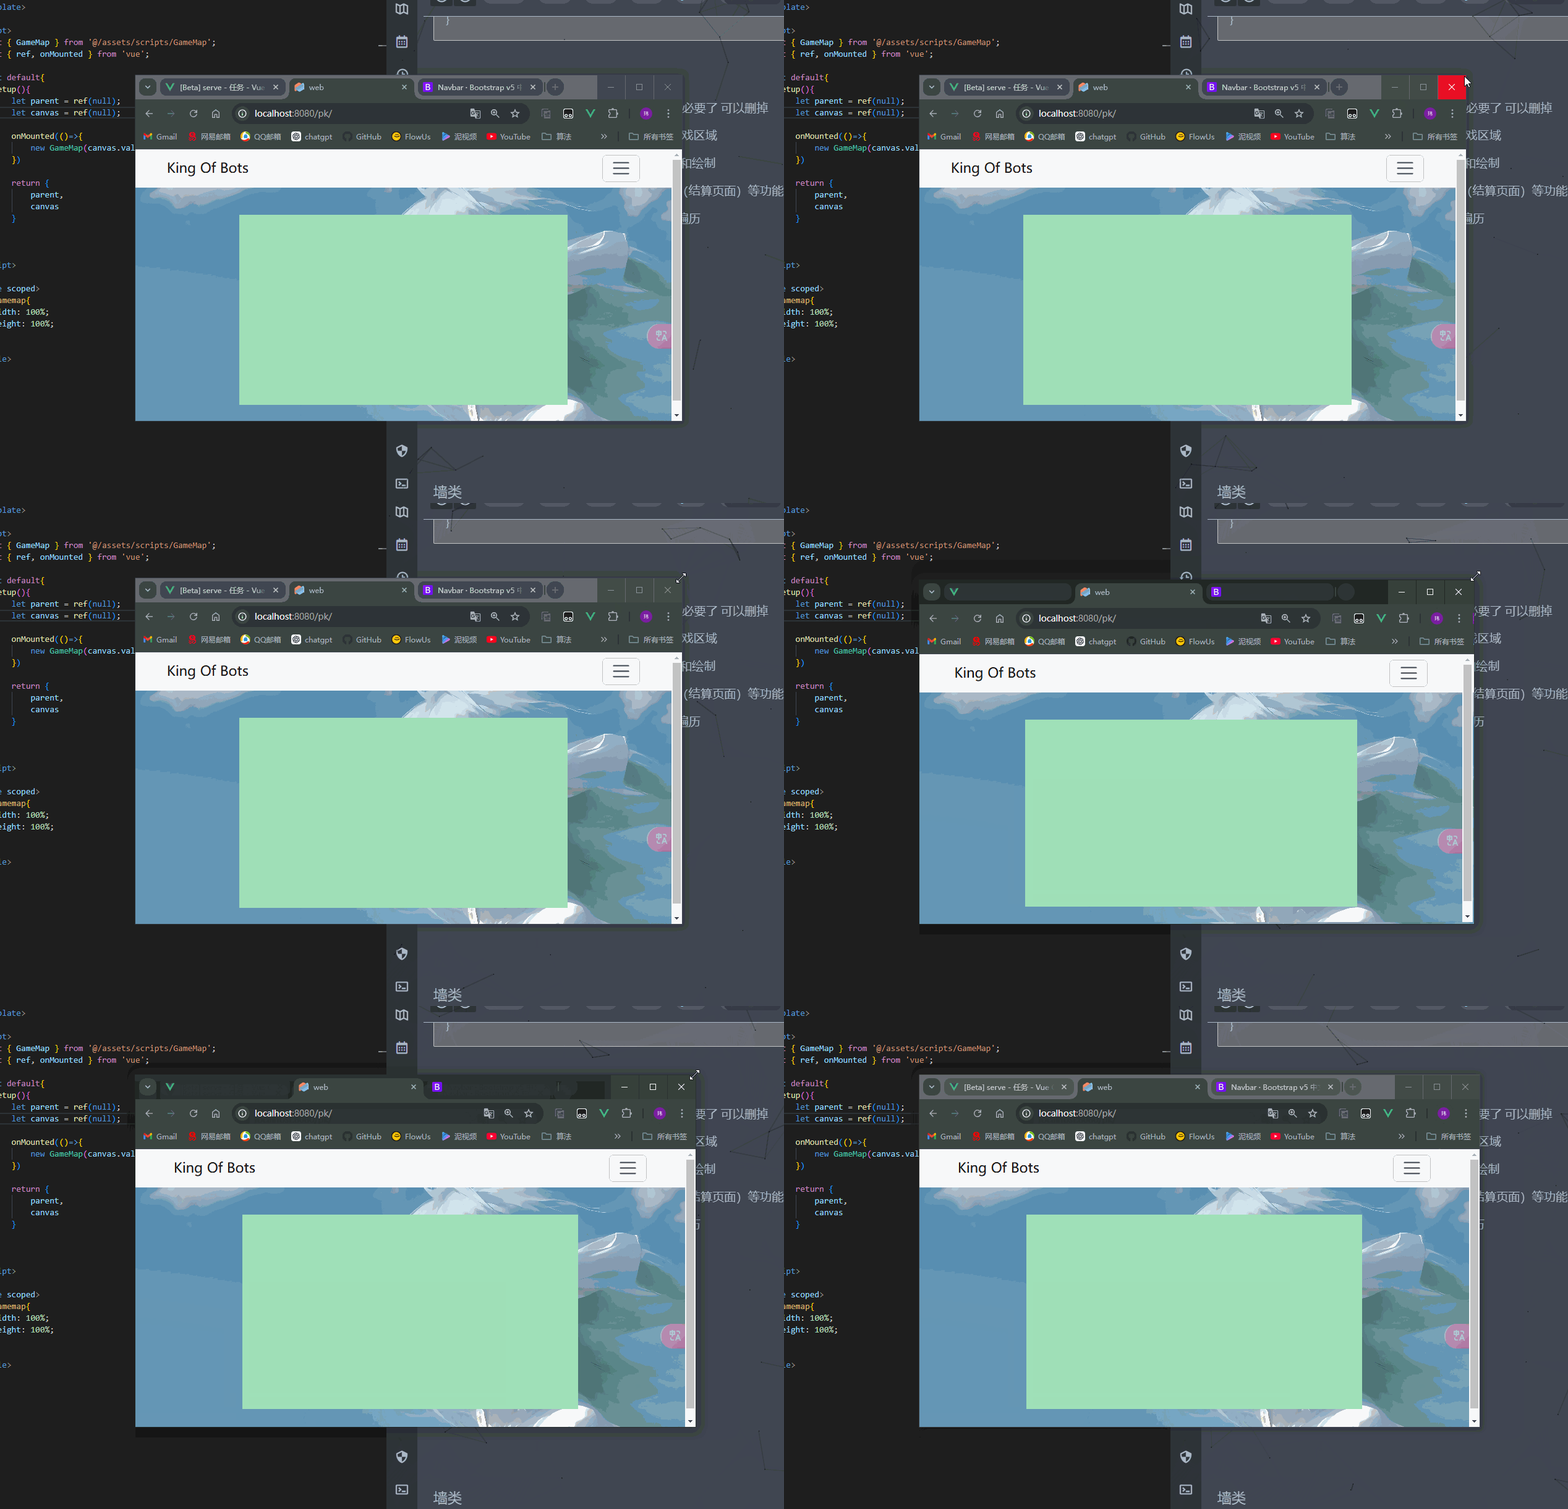
PlayGround就相当于那个绿色框 它会随页面的变化而不断变化
而我们的地图是在这个绿色块里面的 是一个正方形区域 现在希望能在不断变化的绿块中 始终得到面积最大的正方形 作为地图
为什么游戏地图不直接跟随页面变化而变化 还要额外弄个框?
因为游戏区里可能不光包含地图 还有些计分板(结算页面)等功能
为分别控制 得预留些空间 后续可能还会给他们设置组件 便于管理
回到如何计算正方形大小 有算法题的感觉了
转变问题成 在给定长宽中 求出最大的有rows行cols列的矩形
已知宽w高h rows行 cols列
纵方向上每一个单位的高度最大为 h/rows
横方向上每一个单位的宽度最大为 w/cols
那么小正方形的最大边长就是 min{ h/rows , w/cols }
由此得出内部每个小正方形的边长
效果及代码
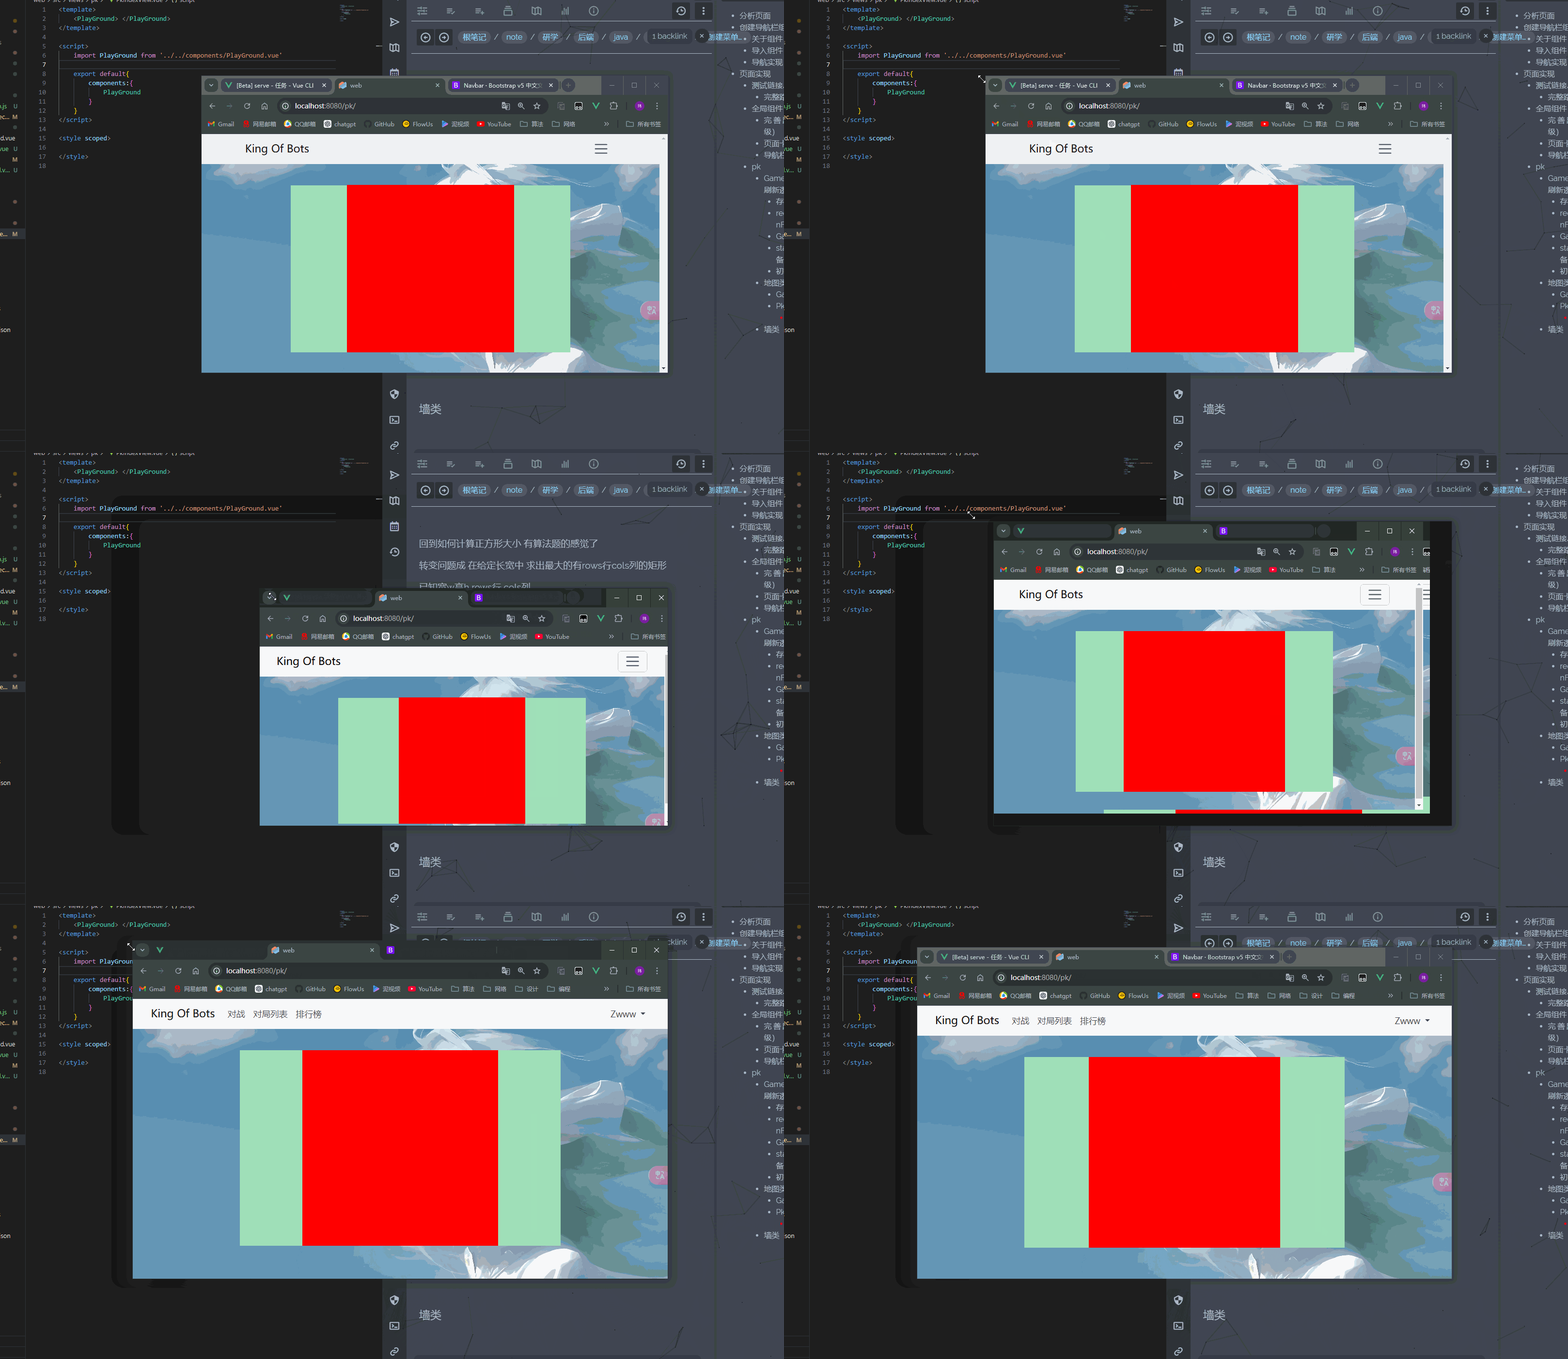
PkIndexView.vue:
<template>
    <PlayGround> </PlayGround>
</template>


    import PlayGround from '../../components/PlayGround.vue'

    export default{
        components:{
            PlayGround
        }
    }
GameMap.js
import { GameObject } from "./GameObject";

export class GameMap extends GameObject{
    constructor(ctx,parent){
        super(); //先执行基类的构造函数

        this.ctx=ctx;
        this.parent=parent;
        this.L=0;//L表示一个单位的长度

        this.rows=13;
        this.cols=13;
    }

    start(){

    }

    update_size(){
        this.L=Math.min(this.parent.clientWidth / this.cols, this.parent.clientHeight / this.rows);
        this.ctx.canvas.width=this.L*this.cols;
        this.ctx.canvas.height=this.L*this.rows;
    }

    update(){
        this.update_size();
        this.render();
    }

    render(){//渲染 将当前游戏对象画在地图上
        this.ctx.fillStyle='red';
        this.ctx.fillRect(0,0,this.ctx.canvas.width,this.ctx.canvas.height);
    }

}
PlayGround.vue:
<template>
    <div class="playground">
        <GameMap>
        </GameMap>
    </div>
</template>


import GameMap from './GameMap.vue'

export default {
    components:{
        GameMap,
    }
}


    div.playground{
        width: 60vw;
        height: 70vh;
        background-color: rgb(159, 224, 184);
        margin: 40px auto;
    }
GameMap.vue:
<template>
    <div ref="parent" class="gamemap">
        <canvas ref="canvas"></canvas>
    </div>
</template>


import { GameMap } from '@/assets/scripts/GameMap';
import { ref, onMounted } from 'vue';

export default{
    setup(){
        let parent = ref(null);
        let canvas = ref(null);

        onMounted(()=>{
            new GameMap(canvas.value.getContext('2d'),parent.value)
        });

        return {
            parent,
            canvas
        }
    }
}


div.gamemap{
    width: 100%;
    height: 100%;
    display: flex;
    justify-content: center;
    align-items: center;
}
绘制地图
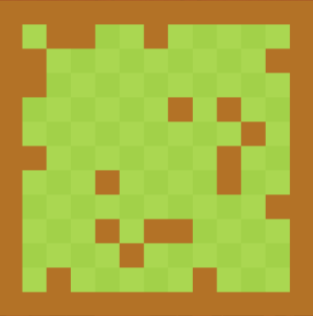
先不看障碍物 只管地图 可以发现草坪是一深一浅间隔分布的
角落是浅色 然后一浅一深间隔分布
可以分成奇格偶格 看它横纵坐标之和是奇数还是偶数 是奇数画深色 偶数画浅色
web\src\assets\scripts\GameMap.js render渲染部分修改成
render(){
        const color_even = "#aad751",color_odd = "#a2d149";
        for(let r=0;r<this.rows;r++){
            for(let c=0;c<this.cols;c++){
                if((r+c)%2==0){
                    this.ctx.fillStyle=color_even;
                }
                else{
                    this.ctx.fillStyle=color_odd;
                }
                this.ctx.fillRect(c*this.L,r*this.L,this.L,this.L);
            }
        }
    }
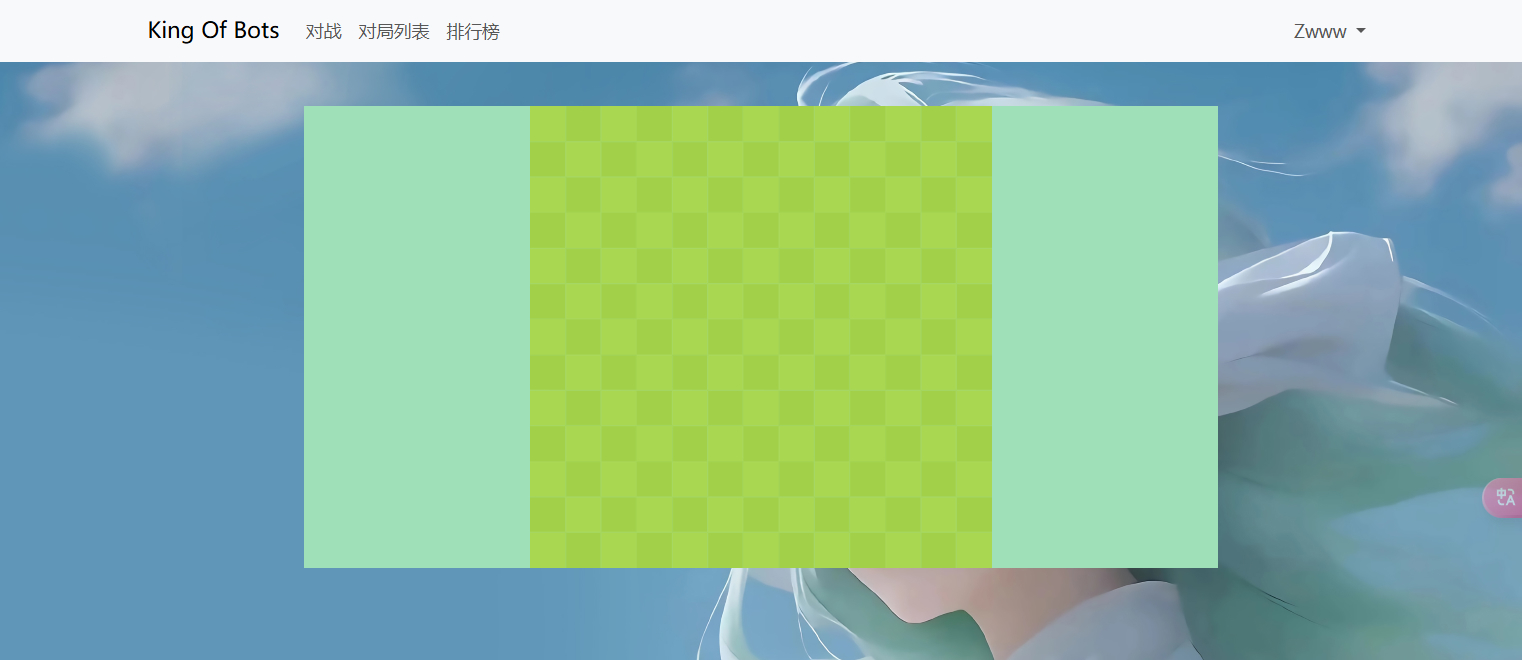
得到效果
障碍物
因为它也是一个游戏对象 可能随机变化位置什么的 逻辑其实还算复杂 应该是和地图同级的 作为一个基类的派生类出现
在web\src\assets\scripts 新建 墙类 Wall.js
首先构造函数需要传入墙的坐标 以及当前的游戏地图的状态
然后 它需要渲染 自然要重载update、render等函数
Wall.js:
import { GameObject } from "./GameObject";

export class wall extends GameObject{
    constructor(r,c,gamemap){
        super();

        this.r=r;
        this.c=c;
        this.gamemap=gamemap;
        this.color="#b37226";
    }

    update(){
        this.render();
    }

    render(){
        const L=this.gamemap.L;
        const ctx=this.gamemap.ctx;

        ctx.fillStyle=this.color;
        ctx.fillRect(this.c*L,this.r*L,L,L);
    }
}
绘制墙
然后需要把墙绘制出来 在GameMap,js中开一个数组存储所有的墙
测试绘制
然后创一个测试函数 并在start中调用
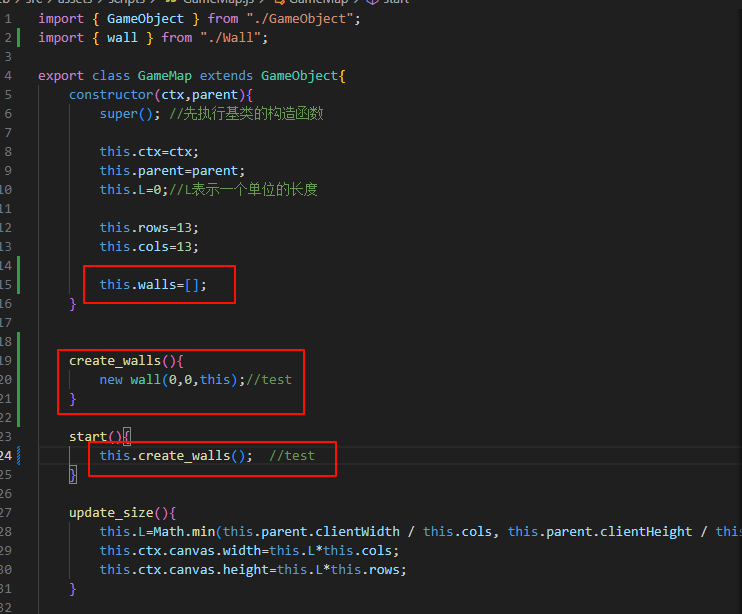
成功绘制
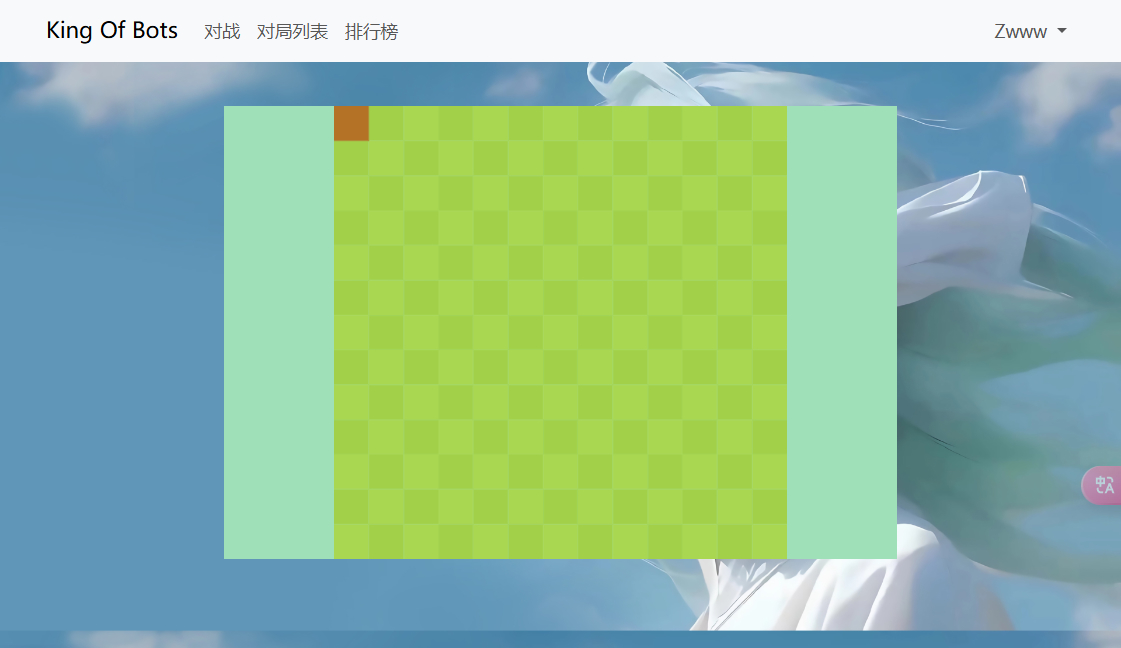
还有一个问题 这里是怎么保证墙能覆盖草的? 首先看基类我们的游戏对象的构造
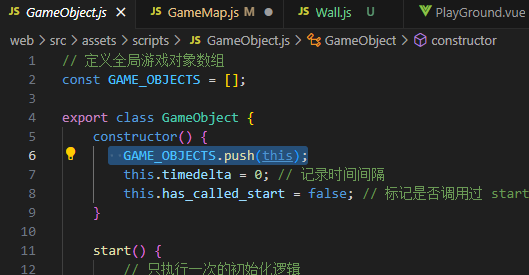 我们是创建一个对象 就push到对象列表 先创建先渲染先销毁 后创建后渲染 自然覆盖了前面方格
而GameMap中
我们是创建一个对象 就push到对象列表 先创建先渲染先销毁 后创建后渲染 自然覆盖了前面方格
而GameMap中
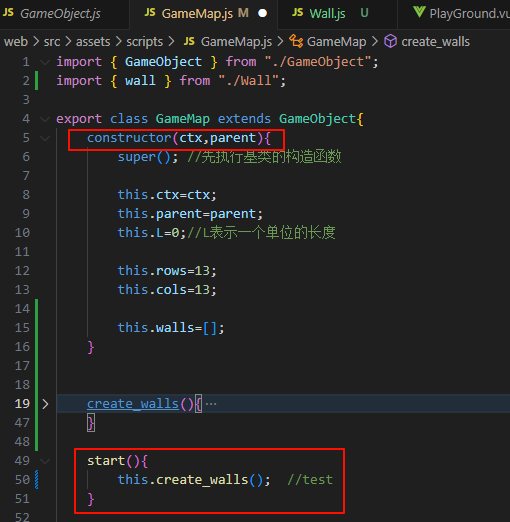
构造函数自然是优先于start函数的 构造函数就已经把地图渲染出来了 而墙是在start函数才执行的 这里还没有涉及到按时间刷新 只是最初的构造 自然墙后渲染 覆盖草
那么创建墙的具体逻辑应该是怎么样的呢 首先怎么判断一个位置是否应该有墙 我才能绘制 我们可以开一个bool数组 若一个位置有墙则为true 否则为false 遍历整个地图 将为true的加入到wall数组中 并进行渲染
边框墙
首先周围有一圈墙作为边界 这其实跟之前写图的题很像了
   //给四周加上墙
        //左右边界
        for(let r=0;r<this.rows;r++){
            g[r][0]=g[r][this.cols-1]=true;
        }
        //上下边界
        for(let c=0;c<this.cols;c++){
            g[0][c]=g[this.rows-1][c]=true;
        }
实现渲染 就只需要遍历整个地图 发现一个true就new一个墙对象 进行渲染即可
    create_walls(){
        // new wall(0,0,this);//test
        const g = [];
        for(let r=0;r<this.rows;r++){
            g[r]=[];
            for(let c=0;c<this.cols;c++){
                g[r][c]=false;
            }
        }

        //给四周加上墙
        //左右边界
        for(let r=0;r<this.rows;r++){
            g[r][0]=g[r][this.cols-1]=true;
        }
        //上下边界
        for(let c=0;c<this.cols;c++){
            g[0][c]=g[this.rows-1][c]=true;
        }

        //遍历 渲染墙
        for(let r=0;r<this.rows;r++){
            for(let c=0;c<this.cols;c++){
                if(g[r][c]){
                    this.walls.push(new wall(r,c,this));
                }
            }
        }

    }

    start(){
        this.create_walls();  //test
    }
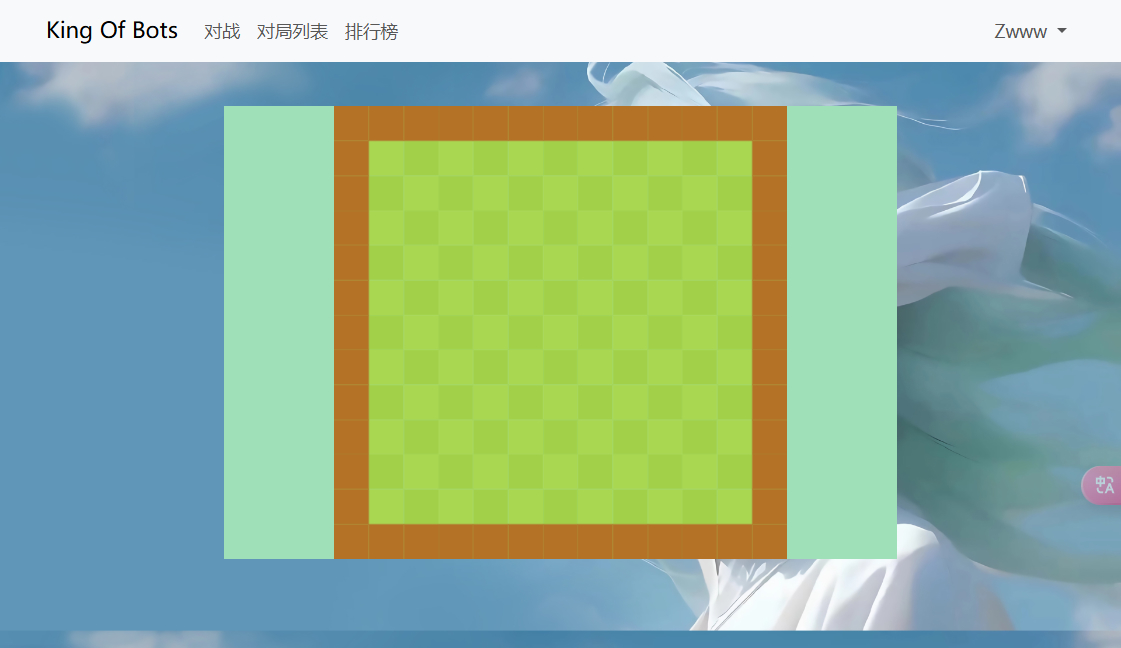
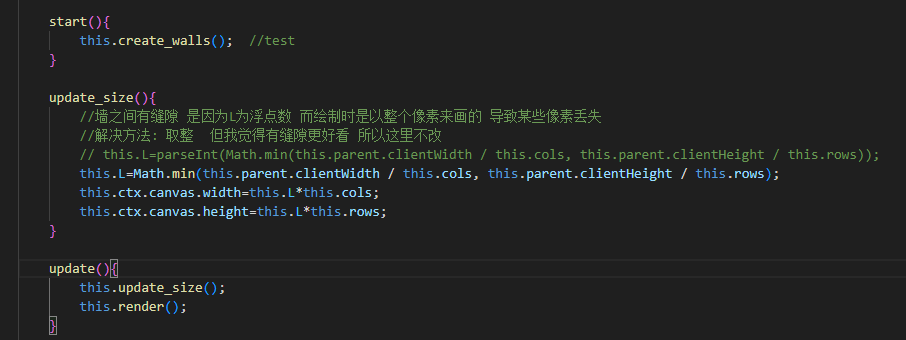
另外还有一个问题 可以发现墙之间是有点缝隙的
是因为L为浮点数 而绘制时是以整个像素来画的 导致某些像素丢失
解决方法: 取整 但我觉得有缝隙更好看 所以这里不改
this.L=parseInt(Math.min(this.parent.clientWidth / this.cols, this.parent.clientHeight / this.rows));
地图内随机出现墙
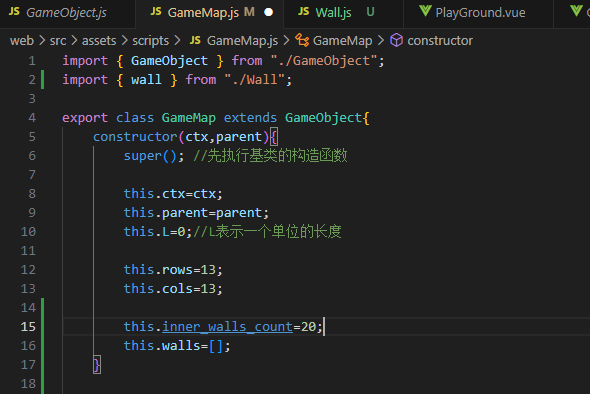
定义一个变量 表示内部存在多少个墙
为了公平(因为双人对战 地形应该是一样的) 我们的墙应该关于主对角线对称 所以所谓随机 其实只要随机一半就行了 另一半对应绘制
还有一个问题 随机的位置 可能会已经有墙了 解决也很简单 再重新随机就好了 这里有种写图论的既视感
//创建随机墙
        for(let i=0;i<this.inner_walls_count;i++){
            for(let j=0;j<1000;j++){
                let r=parseInt(Math.random()*this.rows);
                let c=parseInt(Math.random()*this.cols);
                if(g[r][c] || g[c][r]) continue;

                g[r][c]=g[c][r]=true;
                break;
            }
        }
当前代码和效果:
GameMap.js:
import { GameObject } from "./GameObject";
import { wall } from "./Wall";

export class GameMap extends GameObject{
    constructor(ctx,parent){
        super(); //先执行基类的构造函数

        this.ctx=ctx;
        this.parent=parent;
        this.L=0;//L表示一个单位的长度

        this.rows=13;
        this.cols=13;

        this.inner_walls_count=20;
        this.walls=[];
    }

    create_walls(){
        // new wall(0,0,this);//test
        const g = [];
        for(let r=0;r<this.rows;r++){
            g[r]=[];
            for(let c=0;c<this.cols;c++){
                g[r][c]=false;
            }
        }

        //给四周加上墙
        //左右边界
        for(let r=0;r<this.rows;r++){
            g[r][0]=g[r][this.cols-1]=true;
        }
        //上下边界
        for(let c=0;c<this.cols;c++){
            g[0][c]=g[this.rows-1][c]=true;
        }

        //创建随机墙
        for(let i=0;i<this.inner_walls_count;i++){
            for(let j=0;j<1000;j++){
                let r=parseInt(Math.random()*this.rows);
                let c=parseInt(Math.random()*this.cols);
                if(g[r][c] || g[c][r]) continue;

                g[r][c]=g[c][r]=true;
                break;
            }
        }

        //遍历 渲染墙
        for(let r=0;r<this.rows;r++){
            for(let c=0;c<this.cols;c++){
                if(g[r][c]){
                    this.walls.push(new wall(r,c,this));
                }
            }
        }

    }

    start(){
        this.create_walls();  //test
    }

    update_size(){
        //墙之间有缝隙 是因为L为浮点数 而绘制时是以整个像素来画的 导致某些像素丢失
        //解决方法: 取整  但我觉得有缝隙更好看 所以这里不改
        // this.L=parseInt(Math.min(this.parent.clientWidth / this.cols, this.parent.clientHeight / this.rows));
        this.L=Math.min(this.parent.clientWidth / this.cols, this.parent.clientHeight / this.rows);
        this.ctx.canvas.width=this.L*this.cols;
        this.ctx.canvas.height=this.L*this.rows;
    }

    update(){
        this.update_size();
        this.render();
    }

    render(){//渲染 将当前游戏对象画在地图上
        const color_even = "#aad751",color_odd = "#a2d149";
        for(let r=0;r<this.rows;r++){
            for(let c=0;c<this.cols;c++){
                if((r+c)%2==0){
                    this.ctx.fillStyle=color_even;
                }
                else{
                    this.ctx.fillStyle=color_odd;
                }
                this.ctx.fillRect(c*this.L,r*this.L,this.L,this.L);
            }
        }
    }

}
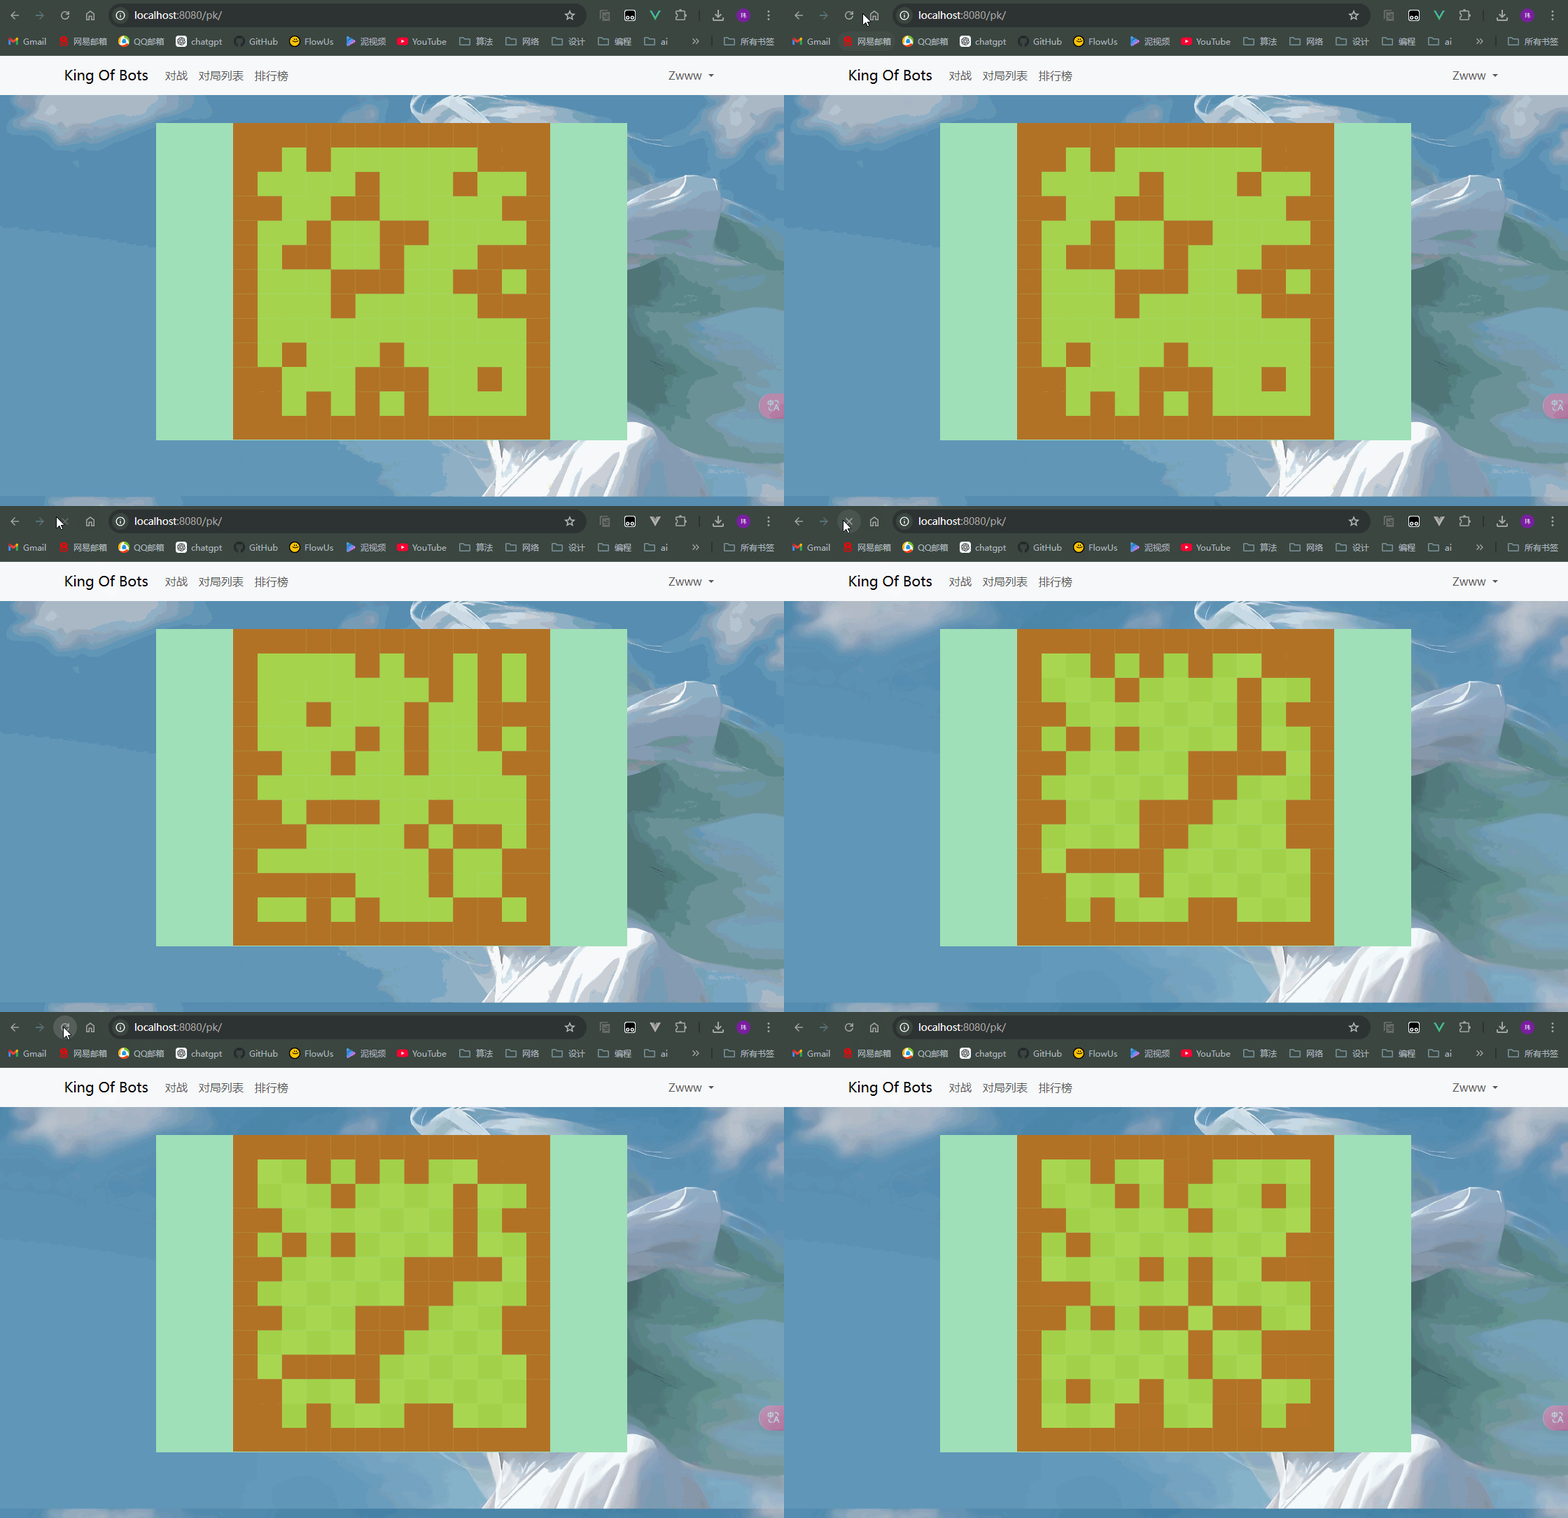
可以发现 每次刷新的地图都不一样
完善
因为我们的游戏是 左下角一条蛇 右上角一条蛇 然后走 所以 左上角和右上角的位置是不能有墙的 需要在随机生成时加个特判
 //创建随机墙
        for(let i=0;i<this.inner_walls_count;i++){
            for(let j=0;j<1000;j++){
                let r=parseInt(Math.random()*this.rows);
                let c=parseInt(Math.random()*this.cols);
                if(g[r][c] || g[c][r]) continue;

                //左上右下起始位不能为墙
                if(r==this.rows-2 && c==1 || r==1 && c==this.cols-2)
                    continue;

                g[r][c]=g[c][r]=true;
                break;
            }
        }
另外 因为是个双人游戏 我们需要对战 就得保证两条蛇是连通的 否则就没意义了 我们没必要在一开始就生成什么会连通的图 因为本身就随机 很难控制 暴力一点 如果不连通就重新生成 很简单 而测试连通性 显然 洪水灌溉算法
//flood-fill
    check_connectivity(g,sx,sy,tx,ty){
        if(sx==tx && sy==ty)    return true;
        g[sx][sy]=true;

        let dx=[-1,0,1,0],dy=[0,1,0,-1];
        for(let i=0;i<4;i++){
            let nx=sx+dx[i],ny=sy+dy[i];
            if(!g[nx][ny] && this.check_connectivity(g,nx,ny,tx,ty))
                return true;
        }

        return false;
    }
这里其实简化了 因为四周都是墙 所以不用判断越界问题
最终代码和效果展示
GameMap.js
import { GameObject } from "./GameObject";
import { wall } from "./Wall";

export class GameMap extends GameObject{
    constructor(ctx,parent){
        super(); //先执行基类的构造函数

        this.ctx=ctx;
        this.parent=parent;
        this.L=0;//L表示一个单位的长度

        this.rows=13;
        this.cols=13;

        this.inner_walls_count=20;
        this.walls=[];
    }

    //flood-fill
    check_connectivity(g,sx,sy,tx,ty){
        if(sx==tx && sy==ty)    return true;
        g[sx][sy]=true;

        let dx=[-1,0,1,0],dy=[0,1,0,-1];
        for(let i=0;i<4;i++){
            let nx=sx+dx[i],ny=sy+dy[i];
            if(!g[nx][ny] && this.check_connectivity(g,nx,ny,tx,ty))
                return true;
        }

        return false;
    }

    create_walls(){
        // new wall(0,0,this);//test
        const g = [];
        for(let r=0;r<this.rows;r++){
            g[r]=[];
            for(let c=0;c<this.cols;c++){
                g[r][c]=false;
            }
        }

        //给四周加上墙
        //左右边界
        for(let r=0;r<this.rows;r++){
            g[r][0]=g[r][this.cols-1]=true;
        }
        //上下边界
        for(let c=0;c<this.cols;c++){
            g[0][c]=g[this.rows-1][c]=true;
        }

        //创建随机墙
        for(let i=0;i<this.inner_walls_count;i++){
            for(let j=0;j<1000;j++){
                let r=parseInt(Math.random()*this.rows);
                let c=parseInt(Math.random()*this.cols);
                if(g[r][c] || g[c][r]) continue;

                //左上右下起始位不能为墙
                if(r==this.rows-2 && c==1 || r==1 && c==this.cols-2)
                    continue;

                g[r][c]=g[c][r]=true;
                break;
            }
        }

        //拷贝状态 防止丢失
        //转换为json再重新解析 就成了个全新的数组
        const copy_g = JSON.parse(JSON.stringify(g));
        if(!this.check_connectivity(copy_g,this.rows-2,1,1,this.cols-2))
                return false;

        //遍历 渲染墙
        for(let r=0;r<this.rows;r++){
            for(let c=0;c<this.cols;c++){
                if(g[r][c]){
                    this.walls.push(new wall(r,c,this));
                }
            }
        }

        return true;
    }

    start(){
        for(let i=0;i<1000;i++){//可以 但最好别写死循环 1000次足够生成连通的了
            if(this.create_walls())
                break;
        }
    }

    update_size(){
        //墙之间有缝隙 是因为L为浮点数 而绘制时是以整个像素来画的 导致某些像素丢失
        //解决方法: 取整  但我觉得有缝隙更好看 所以这里不改
        // this.L=parseInt(Math.min(this.parent.clientWidth / this.cols, this.parent.clientHeight / this.rows));
        this.L=Math.min(this.parent.clientWidth / this.cols, this.parent.clientHeight / this.rows);
        this.ctx.canvas.width=this.L*this.cols;
        this.ctx.canvas.height=this.L*this.rows;
    }

    update(){
        this.update_size();
        this.render();
    }

    render(){//渲染 将当前游戏对象画在地图上
        const color_even = "#aad751",color_odd = "#a2d149";
        for(let r=0;r<this.rows;r++){
            for(let c=0;c<this.cols;c++){
                if((r+c)%2==0){
                    this.ctx.fillStyle=color_even;
                }
                else{
                    this.ctx.fillStyle=color_odd;
                }
                this.ctx.fillRect(c*this.L,r*this.L,this.L,this.L);
            }
        }
    }

}
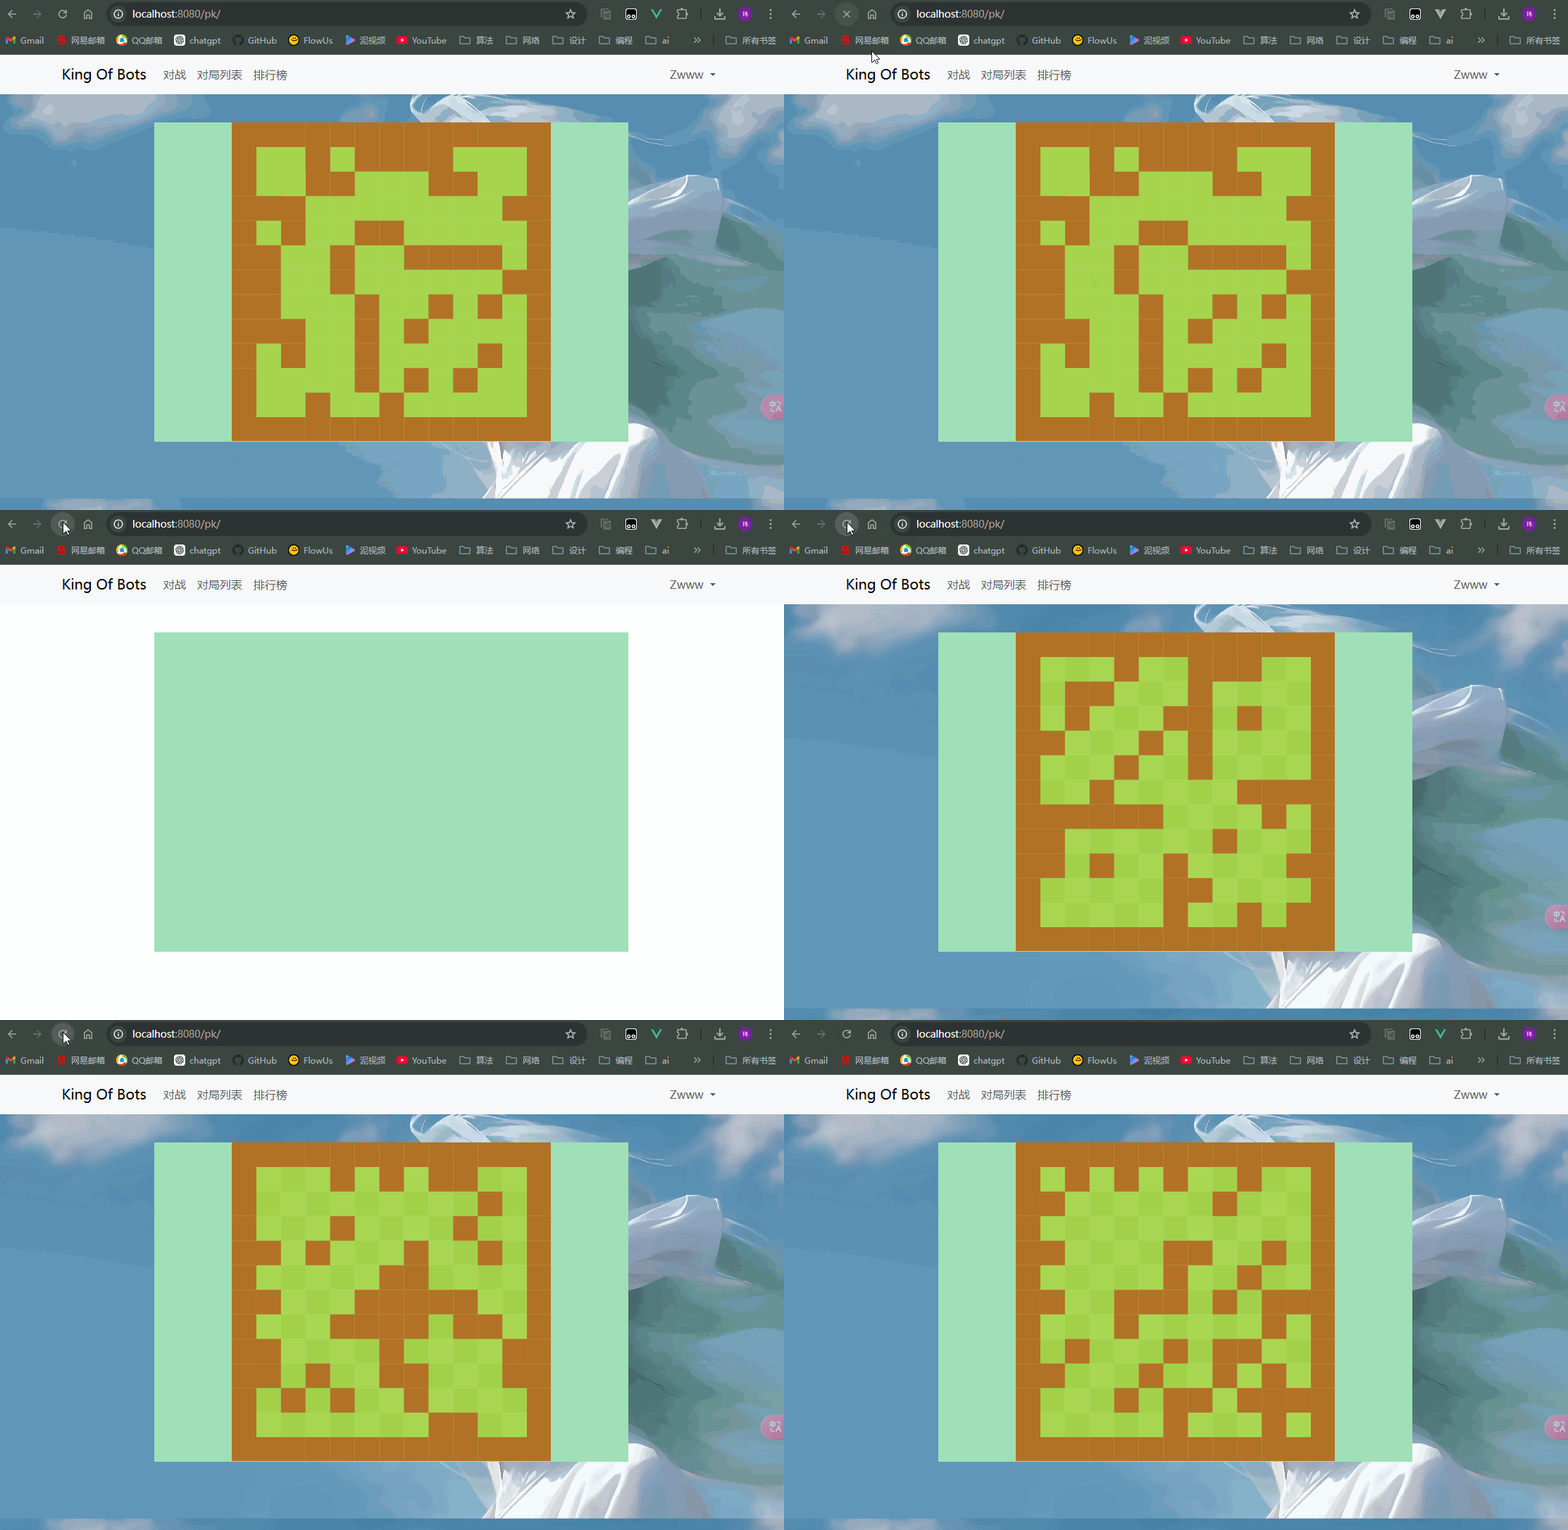
可以发现无论怎么生成 都是连通的
蛇
现在需要来实现蛇的逻辑
地图的修改
先来分析一个问题 在我们设计的地图中 长宽为13*13 蛇的初始坐标分别为(11,1)(1,11)
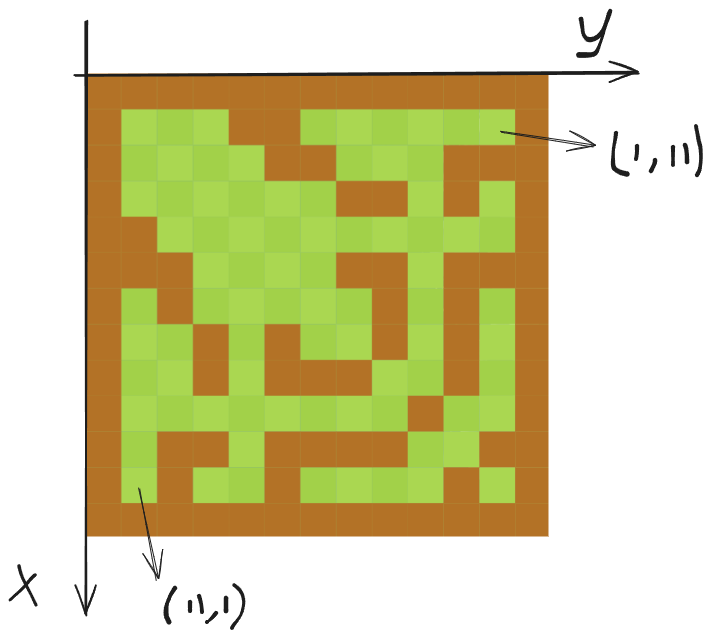
若两蛇同一时间 可能走在同一格子的情况 应该如何判决?
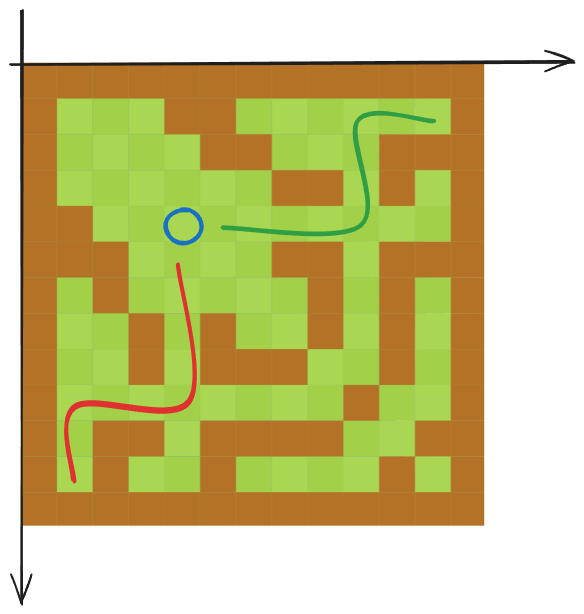
平局吗?真的公平吗 两蛇都是ai控制 若蛇a知道自己必输了 基于最优解 它一定会选择走这个位置 搏一搏平局 而蛇b知道自己可以赢 那么它就可能改变原有的策略 不走这个位置 对于b来说 实际上是不公平的 它的策略受到了影响 不纯洁了
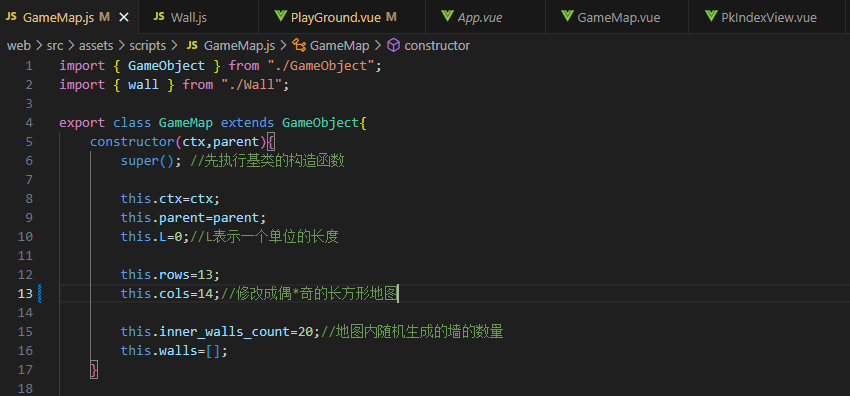
所以我们的地图需要进行调整 让两蛇在同一时间不可能走到同一个格子 怎么做? 观察到 最开始的两条蛇坐标为(11,1)(1,11)横纵坐标之和都为偶数 下一步走到的地方必然是奇数 呈现 偶奇偶奇……的规律 两条蛇在同一时刻所在格子的奇偶性相同 所以可能走到同一个格子 而要改变这一现状也很容易 只需要打破这个奇偶的规律 让一条蛇初始坐标之和为奇数就行了 对应到地图上 就只需要把原本的奇*奇的地图 改成偶*奇即可
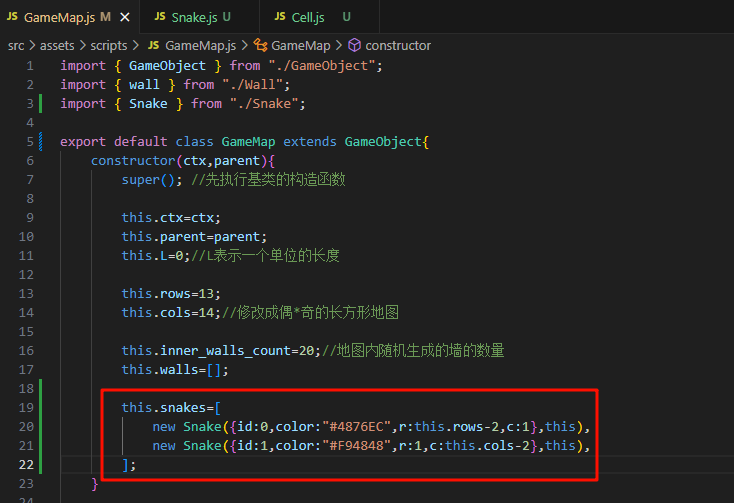
在GameMap.js中 修改cols为14即可
那么对应产生的另一个问题 为了公平性 我们的障碍物的产生是对称的 在正方形地图中 实现对角线对称即可 但长方形地图中 对角线是不对称的 所以得修改对称逻辑 将对角线对称修改为中心对称
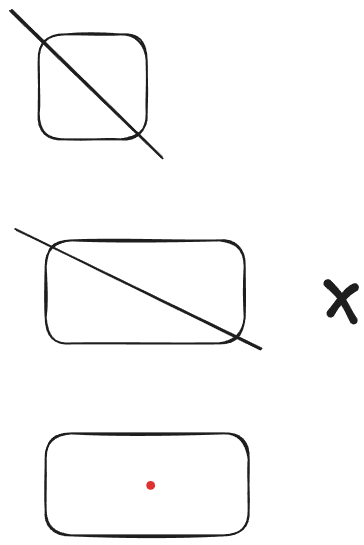
那么中心对称的坐标怎么求
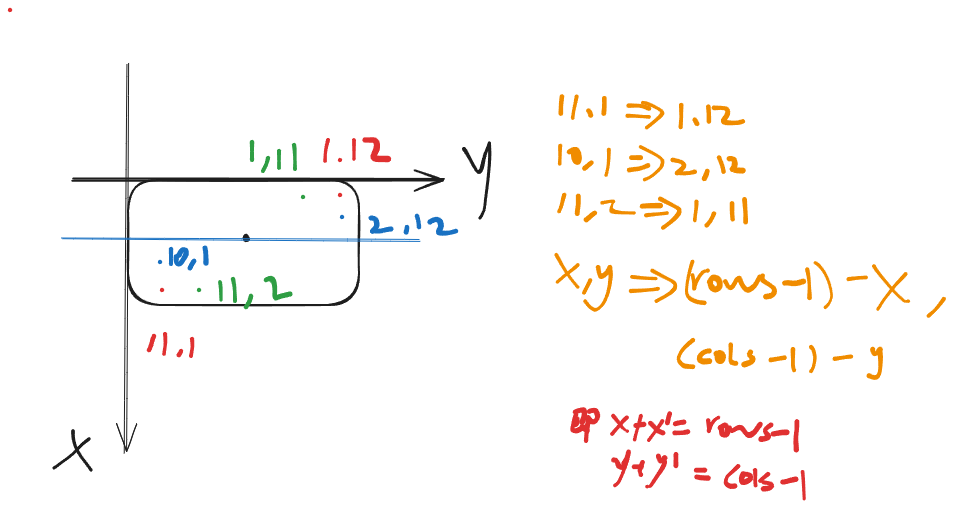
将生成随机墙的逻辑改为:
 //创建随机墙
        for(let i=0;i<this.inner_walls_count;i++){
            for(let j=0;j<1000;j++){
                let r=parseInt(Math.random()*this.rows);
                let c=parseInt(Math.random()*this.cols);
                // if(g[r][c] || g[c][r]) continue;
                //修改为中心对称
                if(g[r][c] || g[this.rows-1-r][this.cols-1-c])
                    continue;

                //左上右下起始位不能为墙
                if(r==this.rows-2 && c==1 || r==1 && c==this.cols-2)
                    continue;

                g[r][c]=g[this.rows-1-r][this.cols-1-c]=true;
                break;
            }
        }
另外 再思考几个问题
一 为什么改变了长宽 地图还能做到在PlayGround中始终取得最大面积?因为我们一开始做的逻辑是算出最大的一个小方块的边长 而不是算长方形中最大的一个大正方形的边长 小方块始终是正方形 确定的是L 变化的地方只不过是 宽方向上 渲染多少个小正方形罢了
二 玩家对战的话 两个人的浏览器都会渲染出一个随机地图 那么他们很可能会不一样 游戏到底用谁的地图呢? 并且 如果生成地图的逻辑放在前端 那么就可以通过修改前端代码的方式 生成有利于我算法的一个地图 导致游戏不公平 所以 在之后 我们生成地图的逻辑应该转移到后端 生成地图后 再传到前端 让双方玩家下载下来 进行游戏 为什么前面写一大堆在前端 主要是方便调试
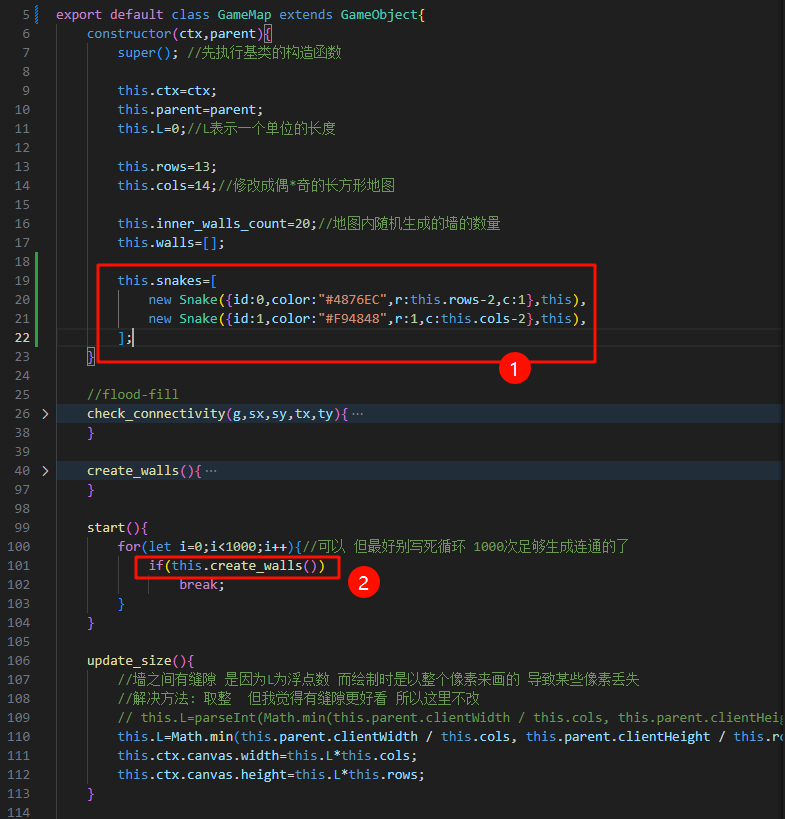
添加蛇
添加两条蛇 一个左下一个右上 初始时都只有一个圈 然后都会同时变长 (令 前十步每一步变长1 后面每三步变长1)
构造
蛇其实就是一堆圈(圈的一个序列) 为了方便 我们把单独的一个圈先定义一下
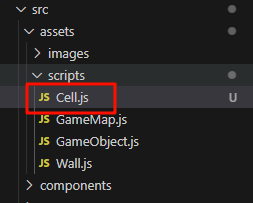
export class Cell{
    constructor(r,c){
        this.r=r;
        this.c=c;
        this.x=c+0.5;
        this.y=r+0.5;
    }
}
接着定义一个蛇对象 蛇是需要每一帧都画出来的 所以需要继承于基类 传入蛇的信息(哪条蛇、颜色等属性)以及地图信息方便调用api 另外因为要每帧绘制 所以start、update、render都得有
蛇初始的时候 只有一个圈
import { GameObject } from "./GameObject";
import { Cell } from "./Cell";

export class Snake extends GameObject{
    constructor(info,gamemap){
        super();

        this.id=info.id;
        this.color=info.color;
        this.gamemap=gamemap;

        this.cells=[new Cell(info.r,info.c)];//存放蛇的身体 cells[0]为蛇头

    }

    start(){

    }

    update(){
        this.render();
    }

     render(){
        const L=this.gamemap.L;
        const ctx=this.gamemap.ctx;

        ctx.fillStyle=this.color;
        for(const cell of this.cells){//遍历蛇的每一个身体
            ctx.beginPath();//画圆
            //圆弧 前两个参数 是圆的中点 第三个参数:半径 后两参数为起始角度和终止角度 因为画一整个圆弧 所以0,2Π
            ctx.arc(cell.x*L,cell.y*L,L/2,0,Math.PI*2);
            ctx.fill();//填充颜色
        }
    }
}
在画布中将蛇画出来看一下
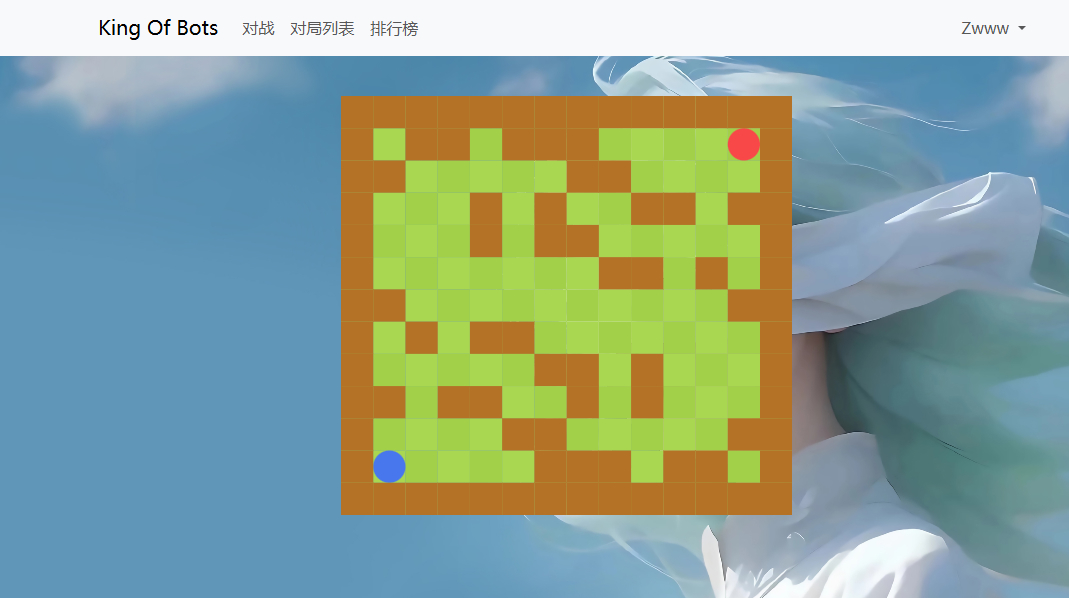
动作
蛇要怎么动起来 算每一帧蛇的位置即可
定义出蛇的速度(每秒走几个格子)
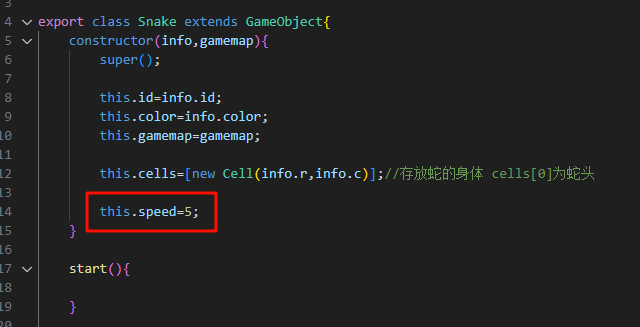
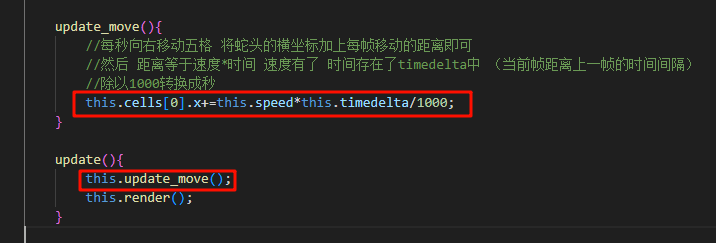
调试时实现每秒向右移动五格 将蛇头的横坐标加上每帧移动的距离即可 然后 距离等于速度*时间 速度有了 时间存在了timedelta中 (当前帧距离上一帧的时间间隔) 除以1000转换成秒
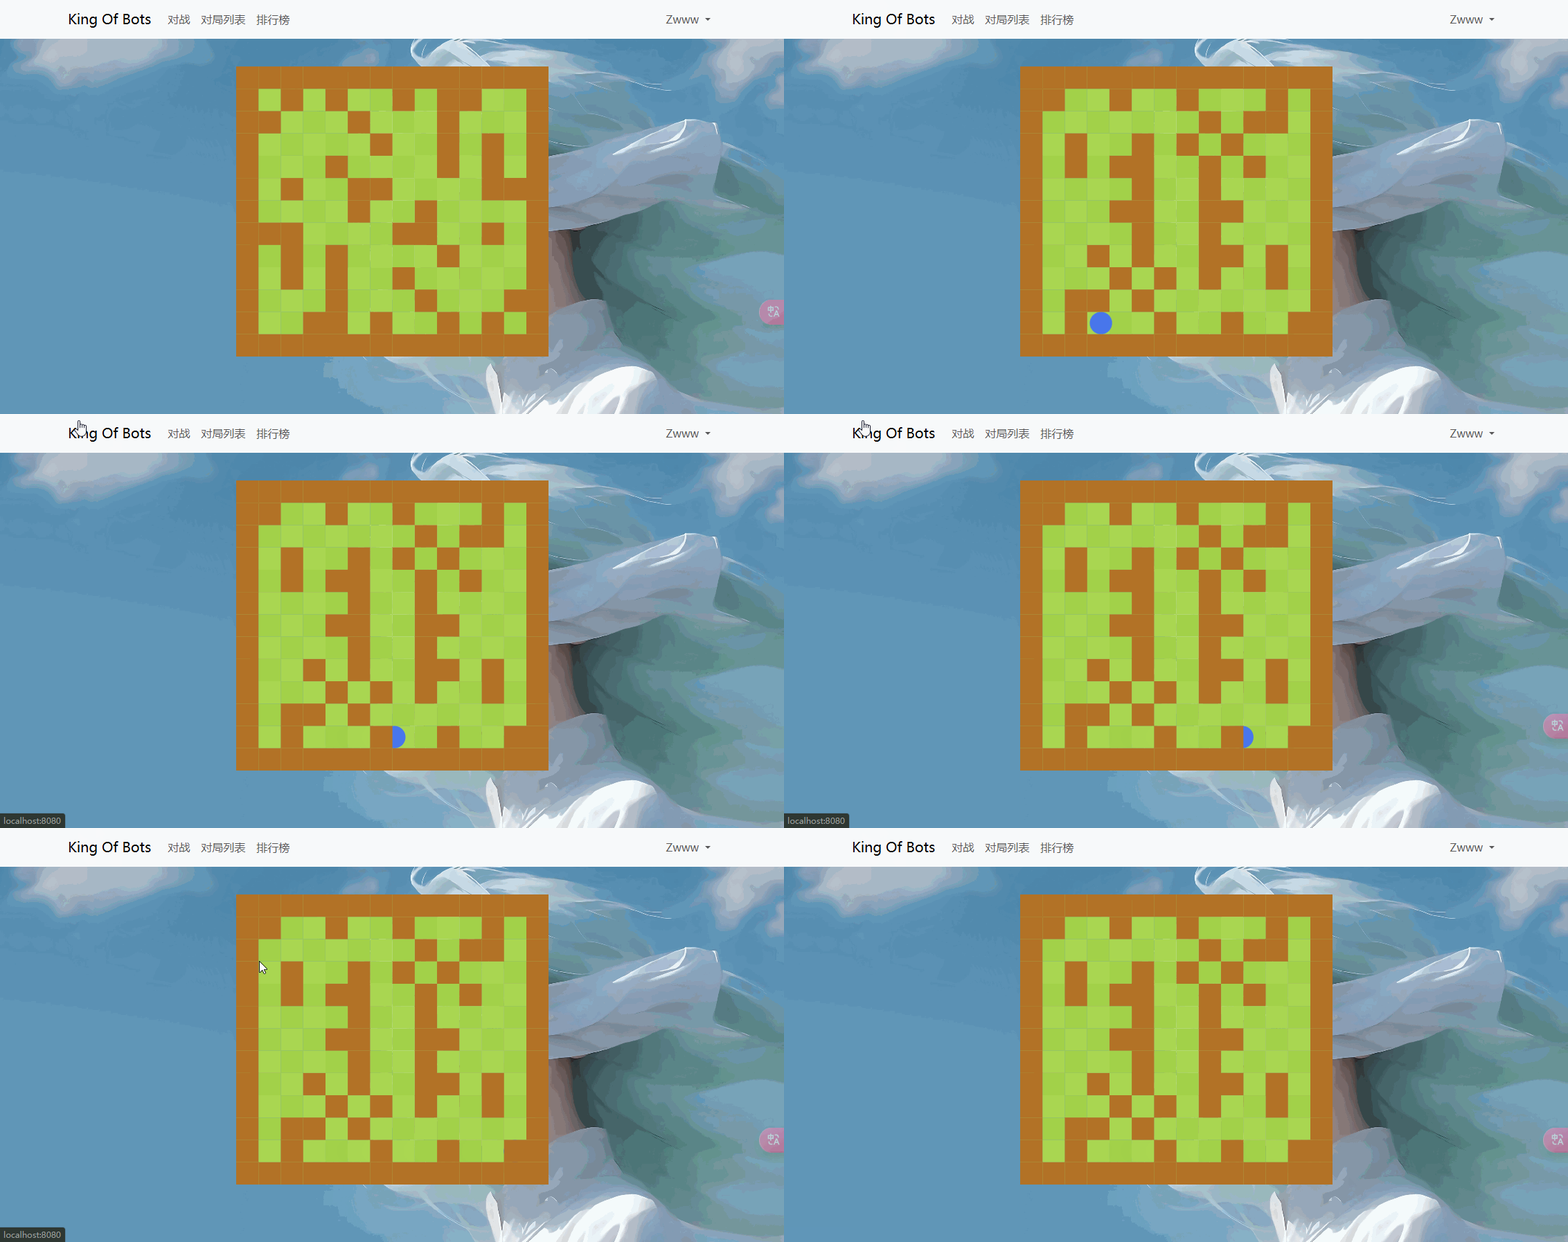
要实现向上动 把x+=改成y-=即可
观察到一个问题 蛇好像穿过墙了 那为什么蛇在墙下面?墙覆盖的蛇? 可以发现蛇是在GameMap,js的构造函数中执行的 而墙是在start中才执行的 根据之前的分析 先执行的先渲染 后执行的覆盖前面的 所以这里才会墙覆盖蛇
关于蛇怎么连续动的解决方案
每个圆为单位的移动 可能会导致一个问题 使原本蛇的形状受到改变 好像有个缺口 感觉不是很连贯
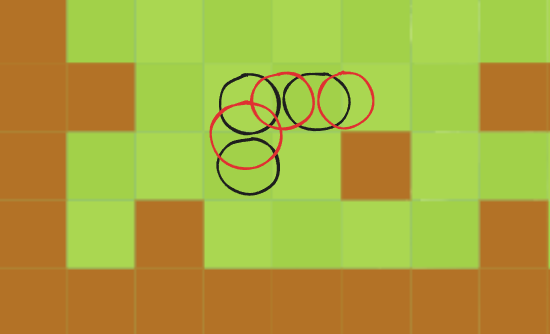
中间每个位置都不动 只动头和尾 每移动一节 就生成一个新的头 往前半个身位移动 同时尾巴也直接去下一个位置移动 中间部分都不用进行改变 这样就可以保证拐角处始终是个圆弧 而不会发生什么缺了一个角的问题
现在考虑具体怎么让它动
因为我们是对战式回合制游戏 需要等待接收到两条蛇的信号之后才能移动 所以我们需要接收存储一下两条蛇的下一步指令 以及蛇的状态 是不动还是在动或是已经死亡
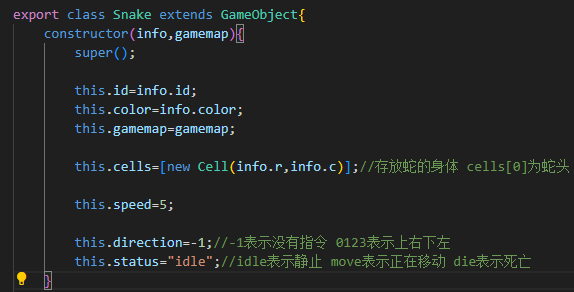
另外 判断每条蛇能不能动 不应该是由蛇它本身自己来判断 所以我们需要写在GameMap.js中
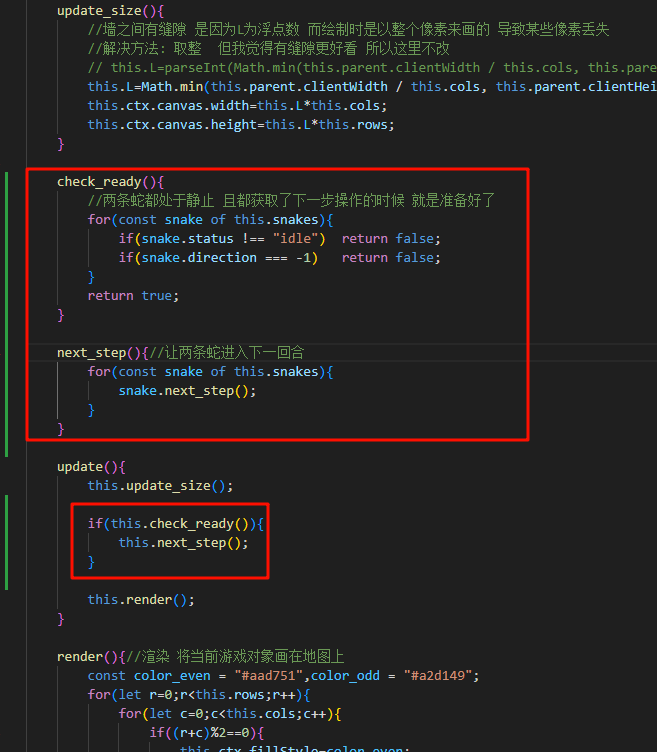
判断的依据是 若两条蛇都处于静止(没死也没在移动) 且都获取了下一步操作的时候 就是准备好了
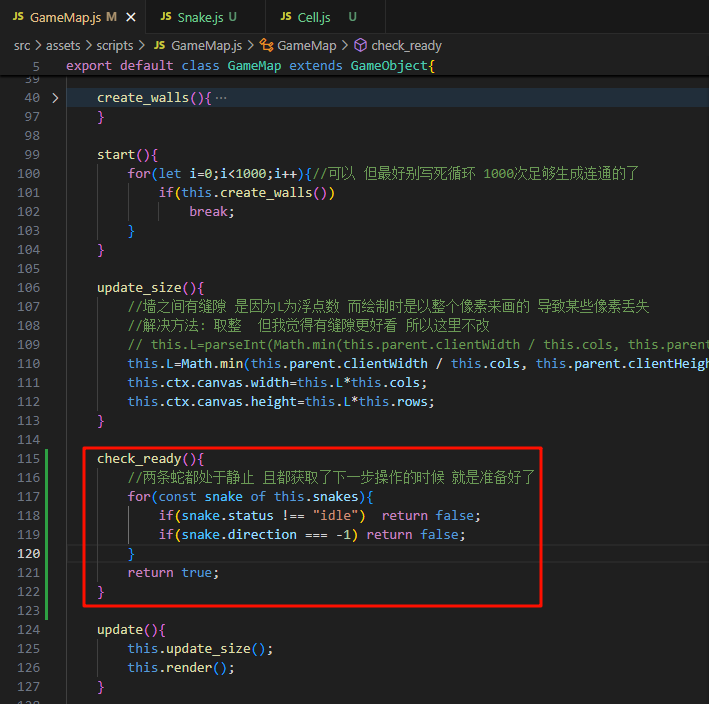
check_ready(){
        //两条蛇都处于静止 且都获取了下一步操作的时候 就是准备好了
        for(const snake of this.snakes){
            if(snake.status !== "idle")  return false;
            if(snake.direction === -1) return false;
        }
        return true;
    }
如果准备好下一步后 每条蛇都要更新状态 表示已经进入下一步了
当然下一步要走到哪里 目的地是什么 也需要定义出来
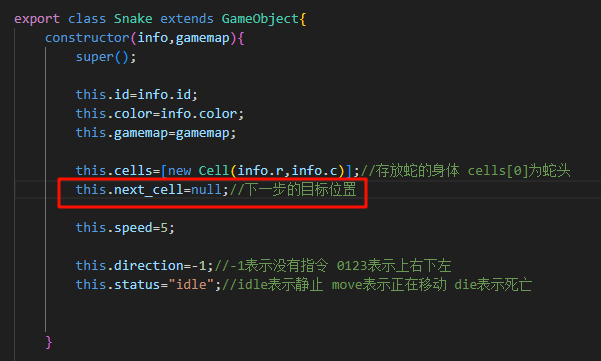
因为前面说过移动只需要改变头和尾
先解决头的问题
首先 头的位置在cells[0]中 方向由输入读取 可以先把偏移量定义出来 dr:-1,0,1,0 dc:0,1,0,-1 那蛇头的位置就等于 cells[0].r+dx[d] cells[0].c+dc[d]
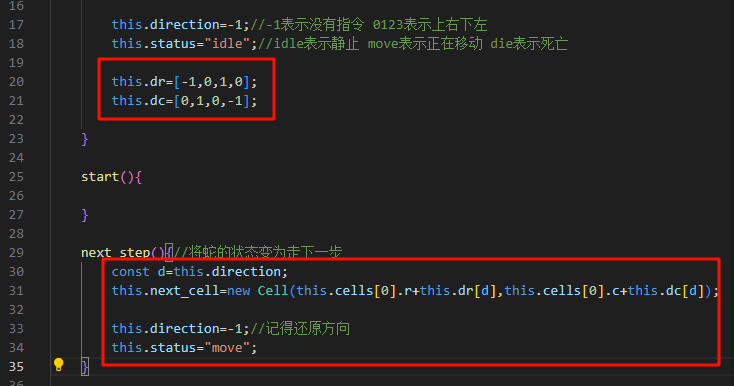
另外 我们还需要考虑 有的回合蛇会变长 有的回合蛇不会变长 (前面说 前十回合每回合变长1 后面每三回合变长1) 所以我们需要还需要维护一下当前回合数
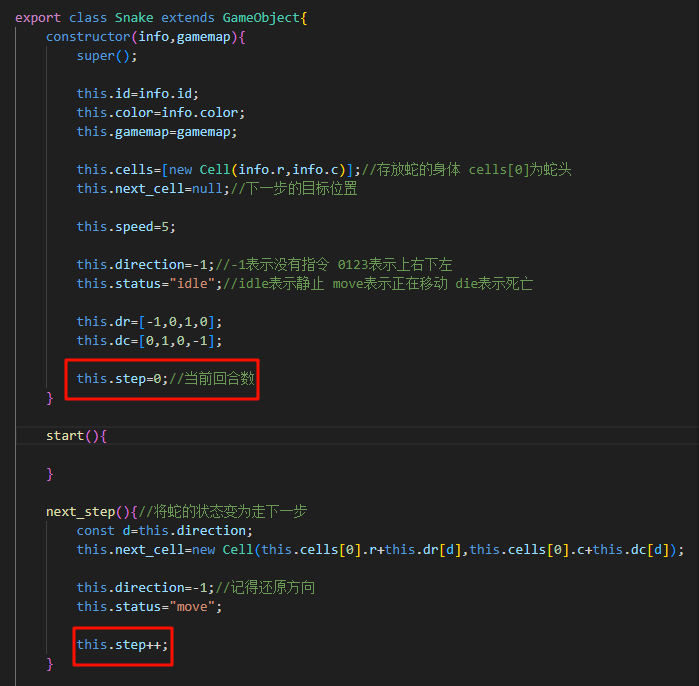
这样 我们的大概逻辑就写完了 检查两条蛇是否都准备好了 然后在update中执行next_step
这是这一阶段的代码:
GameMap.js
import { GameObject } from "./GameObject";
import { wall } from "./Wall";
import { Snake } from "./Snake";

export default class GameMap extends GameObject{
    constructor(ctx,parent){
        super(); //先执行基类的构造函数

        this.ctx=ctx;
        this.parent=parent;
        this.L=0;//L表示一个单位的长度

        this.rows=13;
        this.cols=14;//修改成偶*奇的长方形地图

        this.inner_walls_count=20;//地图内随机生成的墙的数量
        this.walls=[];

        this.snakes=[
            new Snake({id:0,color:"#4876EC",r:this.rows-2,c:1},this),
            new Snake({id:1,color:"#F94848",r:1,c:this.cols-2},this),
        ];
    }

    //flood-fill
    check_connectivity(g,sx,sy,tx,ty){
        if(sx==tx && sy==ty)    return true;
        g[sx][sy]=true;

        let dx=[-1,0,1,0],dy=[0,1,0,-1];
        for(let i=0;i<4;i++){
            let nx=sx+dx[i],ny=sy+dy[i];
            if(!g[nx][ny] && this.check_connectivity(g,nx,ny,tx,ty))
                return true;
        }

        return false;
    }

    create_walls(){
        // new wall(0,0,this);//test
        const g = [];
        for(let r=0;r<this.rows;r++){
            g[r]=[];
            for(let c=0;c<this.cols;c++){
                g[r][c]=false;
            }
        }

        //给四周加上墙
        //左右边界
        for(let r=0;r<this.rows;r++){
            g[r][0]=g[r][this.cols-1]=true;
        }
        //上下边界
        for(let c=0;c<this.cols;c++){
            g[0][c]=g[this.rows-1][c]=true;
        }

        //创建随机墙
        for(let i=0;i<this.inner_walls_count;i++){
            for(let j=0;j<1000;j++){
                let r=parseInt(Math.random()*this.rows);
                let c=parseInt(Math.random()*this.cols);
                // if(g[r][c] || g[c][r]) continue;
                //修改为中心对称
                if(g[r][c] || g[this.rows-1-r][this.cols-1-c])
                    continue;

                //左上右下起始位不能为墙
                if(r==this.rows-2 && c==1 || r==1 && c==this.cols-2)
                    continue;

                //g[r][c] = g[c][r] = true;
                g[r][c]=g[this.rows-1-r][this.cols-1-c]=true;
                break;
            }
        }

        //拷贝状态 防止丢失
        //转换为json再重新解析 就成了个全新的数组
        const copy_g = JSON.parse(JSON.stringify(g));
        if(!this.check_connectivity(copy_g,this.rows-2,1,1,this.cols-2))
                return false;

        //遍历 渲染墙
        for(let r=0;r<this.rows;r++){
            for(let c=0;c<this.cols;c++){
                if(g[r][c]){
                    this.walls.push(new wall(r,c,this));
                }
            }
        }

        return true;
    }

    start(){
        for(let i=0;i<1000;i++){//可以 但最好别写死循环 1000次足够生成连通的了
            if(this.create_walls())
                break;
        }
    }

    update_size(){
        //墙之间有缝隙 是因为L为浮点数 而绘制时是以整个像素来画的 导致某些像素丢失
        //解决方法: 取整  但我觉得有缝隙更好看 所以这里不改
        // this.L=parseInt(Math.min(this.parent.clientWidth / this.cols, this.parent.clientHeight / this.rows));
        this.L=Math.min(this.parent.clientWidth / this.cols, this.parent.clientHeight / this.rows);
        this.ctx.canvas.width=this.L*this.cols;
        this.ctx.canvas.height=this.L*this.rows;
    }

    check_ready(){
        //两条蛇都处于静止 且都获取了下一步操作的时候 就是准备好了
        for(const snake of this.snakes){
            if(snake.status !== "idle")  return false;
            if(snake.direction === -1)   return false;
        }
        return true;
    }

    next_step(){//让两条蛇进入下一回合
        for(const snake of this.snakes){
            snake.next_step();
        }
    }

    update(){
        this.update_size();

        if(this.check_ready()){
            this.next_step();
        }

        this.render();
    }

    render(){//渲染 将当前游戏对象画在地图上
        const color_even = "#aad751",color_odd = "#a2d149";
        for(let r=0;r<this.rows;r++){
            for(let c=0;c<this.cols;c++){
                if((r+c)%2==0){
                    this.ctx.fillStyle=color_even;
                }
                else{
                    this.ctx.fillStyle=color_odd;
                }
                this.ctx.fillRect(c*this.L,r*this.L,this.L,this.L);
            }
        }
    }

}
snake.js
import { GameObject } from "./GameObject";
import { Cell } from "./Cell";

export class Snake extends GameObject{
    constructor(info,gamemap){
        super();

        this.id=info.id;
        this.color=info.color;
        this.gamemap=gamemap;

        this.cells=[new Cell(info.r,info.c)];//存放蛇的身体 cells[0]为蛇头
        this.next_cell=null;//下一步的目标位置

        this.speed=5;

        this.direction=-1;//-1表示没有指令 0123表示上右下左
        this.status="idle";//idle表示静止 move表示正在移动 die表示死亡

        this.dr=[-1,0,1,0];
        this.dc=[0,1,0,-1];

        this.step=0;//当前回合数
    }

    start(){

    }

    next_step(){//将蛇的状态变为走下一步
        const d=this.direction;
        this.next_cell=new Cell(this.cells[0].r+this.dr[d],this.cells[0].c+this.dc[d]);

        this.direction=-1;//记得还原方向
        this.status="move";

        this.step++;
    }

    update_move(){
        // //每秒向右移动五格 将蛇头的横坐标加上每帧移动的距离即可
        // //然后 距离等于速度*时间 速度有了 时间存在了timedelta中 (当前帧距离上一帧的时间间隔)
        // //除以1000转换成秒
        // this.cells[0].x+=this.speed*this.timedelta/1000;

    }

    update(){
        this.update_move();
        this.render();
    }

    render(){
        const L=this.gamemap.L;
        const ctx=this.gamemap.ctx;

        ctx.fillStyle=this.color;
        for(const cell of this.cells){//遍历蛇的每一个身体
            ctx.beginPath();//画圆
            //圆弧 前两个参数 是圆的中点 第三个参数:半径 后两参数为起始角度和终止角度 因为画一整个圆弧 所以0,2Π
            ctx.arc(cell.x*L,cell.y*L,L/2,0,Math.PI*2);
            ctx.fill();//填充颜色
        }
    }
}
键盘输入(前端调试)
因为现在还没写后端 所以先在前端做个调试 梦回4399 第一条蛇用wsad控制 第二条蛇用上右下左控制
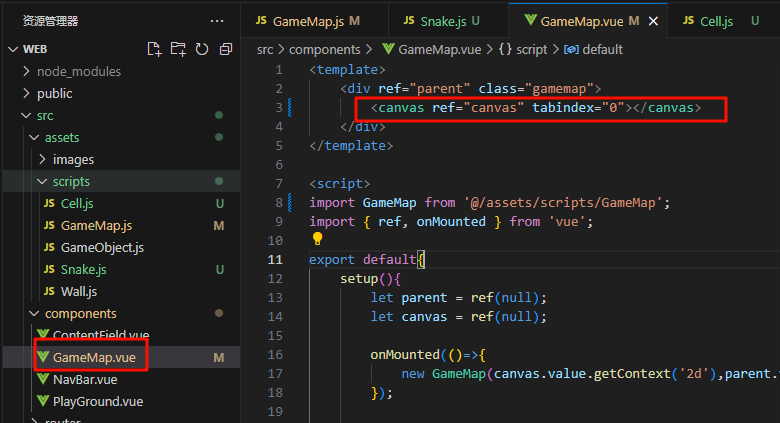
这里需要输入键盘的操作 需要在cannvs中加上个属性 tabindex="0"
另外需要给cannvs绑定一个获取用户输入的事件
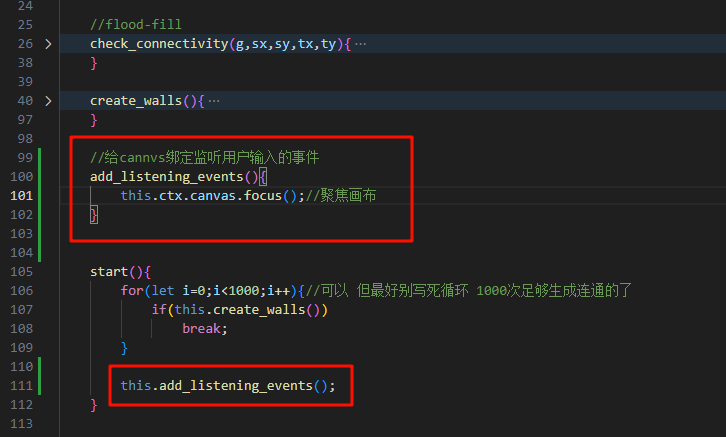
这里不理解也没关系 照着做吧 其实就是画布的一些用法 api 大概就是 要读入什么操作 首先要聚焦
测试是否聚焦 刷新页面 如果地图边出现黑框一闪而过 说明成功
然后就是调用获取用户输入的api
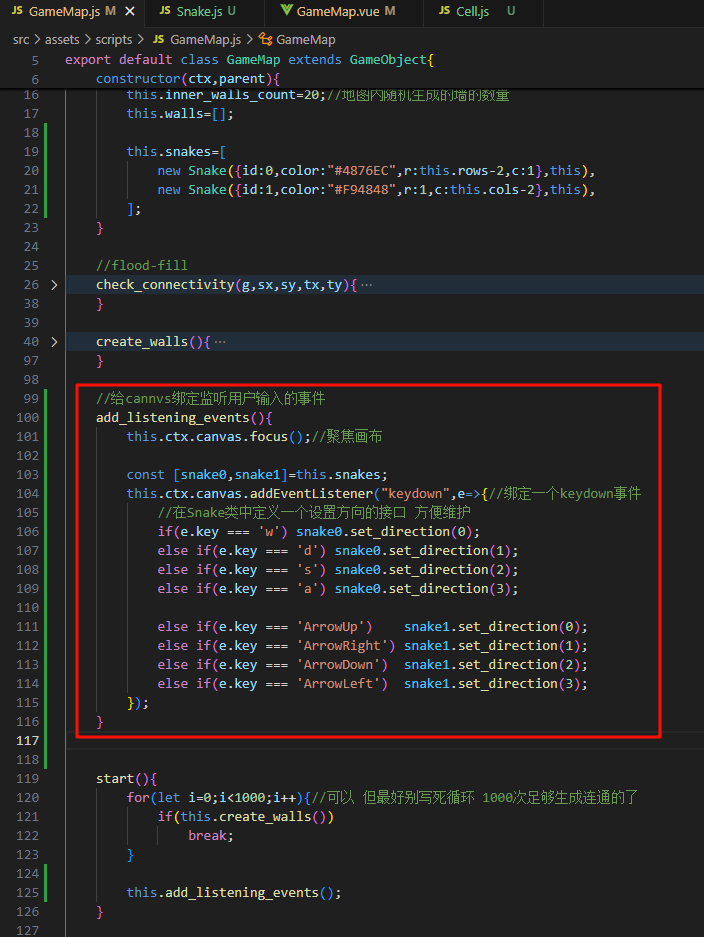
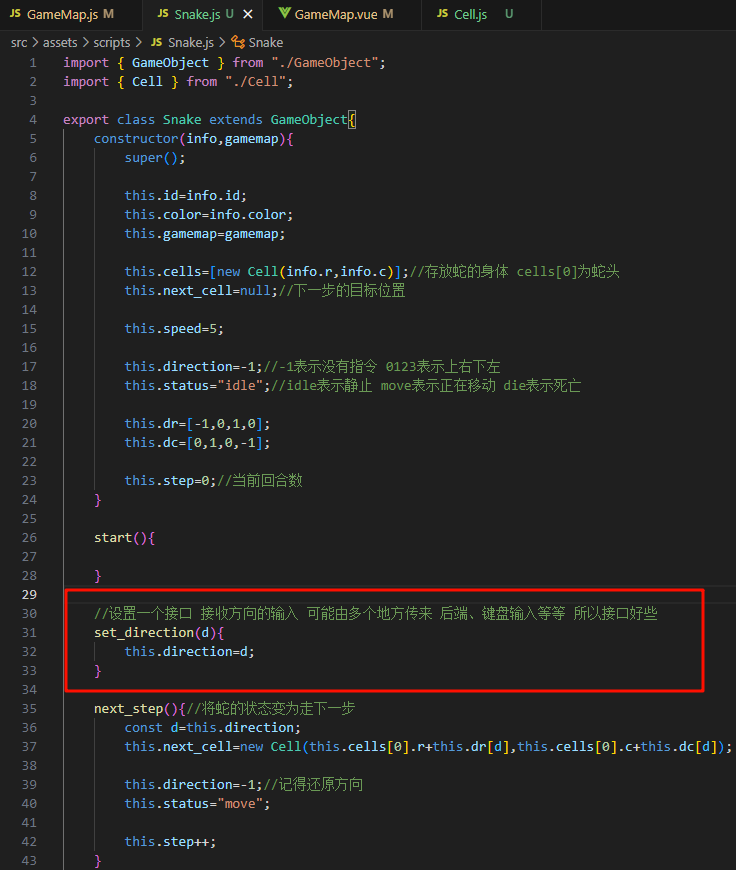
现在的这个输入其实很灵活 给了个接口 这里实现的是本地的一个键盘的两种输入 后面可以改成来自不同电脑的两个输入 或是人与机的输入 等等等等
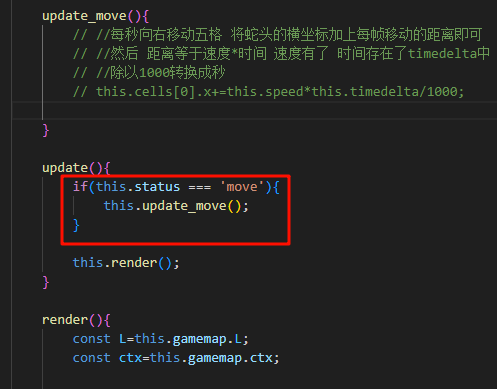
现在来实现移动的逻辑 (Snake.js)
先修改update 因为加了个状态的概念 所以 update_move的调用得是在status===‘move'时才执行
再回忆一下 移动是头部抛出一个新的球 让新的球到达目的地 实现移动
那么在蛇的数组中就需要预留出头的位置 即所有元素后移一位 这应该发生在修改状态的时候
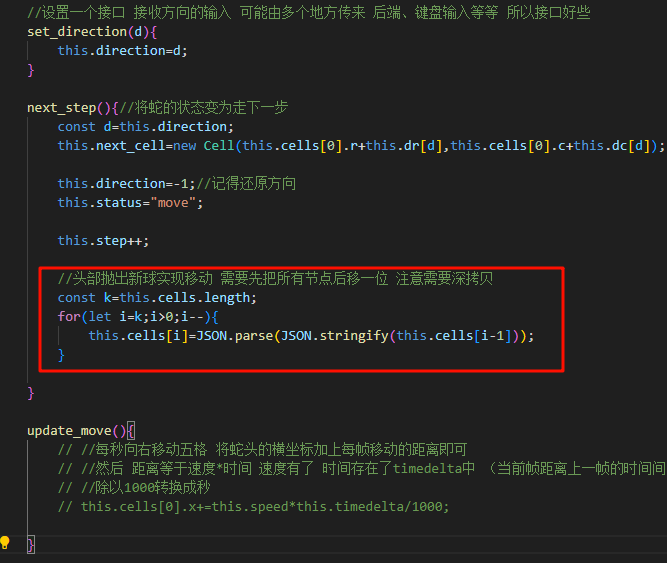
update_move中
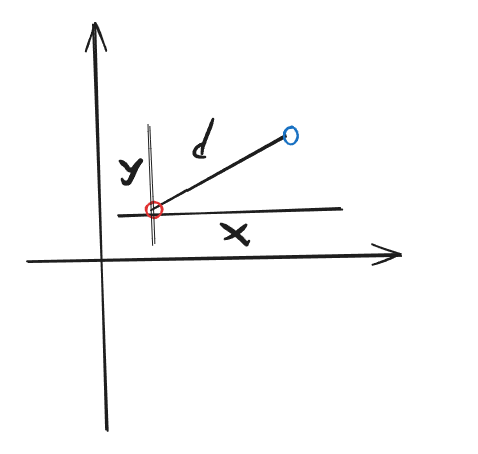
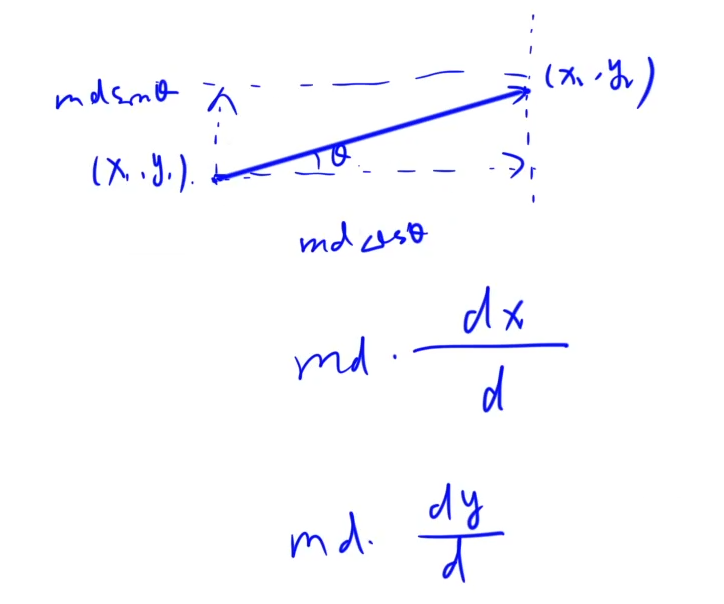
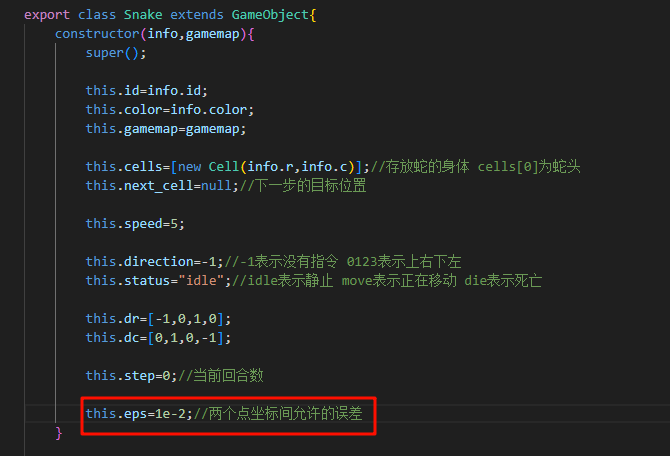
要计算出每帧移动的距离 那就是速度乘时间 speed*timedelta/1000 但是距离不一定就是xy的偏移量 虽然这里蛇只能上下左右四个方向走 但为了可拓展性 我们要以一般情况来思考(直着走只是特色的四个情况) 假设蛇是斜着走的 那么需要使用三角函数算出真正的xy的偏移量
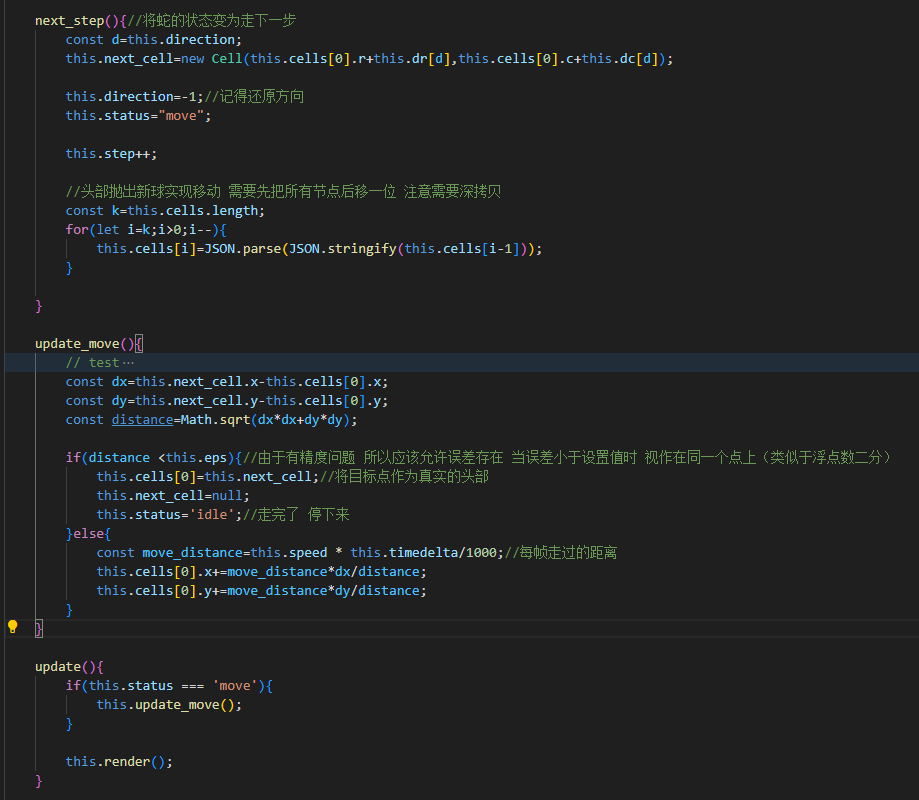
import { GameObject } from "./GameObject";
import { Cell } from "./Cell";

export class Snake extends GameObject{
    constructor(info,gamemap){
        super();

        this.id=info.id;
        this.color=info.color;
        this.gamemap=gamemap;

        this.cells=[new Cell(info.r,info.c)];//存放蛇的身体 cells[0]为蛇头
        this.next_cell=null;//下一步的目标位置

        this.speed=5;

        this.direction=-1;//-1表示没有指令 0123表示上右下左
        this.status="idle";//idle表示静止 move表示正在移动 die表示死亡

        this.dr=[-1,0,1,0];
        this.dc=[0,1,0,-1];

        this.step=0;//当前回合数

        this.eps=1e-2;//两个点坐标间允许的误差
    }

    start(){

    }

    //设置一个接口 接收方向的输入 可能由多个地方传来 后端、键盘输入等等 所以接口好些
    set_direction(d){
        this.direction=d;
    }

    next_step(){//将蛇的状态变为走下一步
        const d=this.direction;
        this.next_cell=new Cell(this.cells[0].r+this.dr[d],this.cells[0].c+this.dc[d]);

        this.direction=-1;//记得还原方向
        this.status="move";

        this.step++;

        //头部抛出新球实现移动 需要先把所有节点后移一位 注意需要深拷贝
        const k=this.cells.length;
        for(let i=k;i>0;i--){
            this.cells[i]=JSON.parse(JSON.stringify(this.cells[i-1]));
        }

    }

    update_move(){
        // test
        // //每秒向右移动五格 将蛇头的横坐标加上每帧移动的距离即可
        // //然后 距离等于速度*时间 速度有了 时间存在了timedelta中 (当前帧距离上一帧的时间间隔)
        // //除以1000转换成秒
        // this.cells[0].x+=this.speed*this.timedelta/1000;
        const dx=this.next_cell.x-this.cells[0].x;
        const dy=this.next_cell.y-this.cells[0].y;
        const distance=Math.sqrt(dx*dx+dy*dy);

        if(distance <this.eps){//由于有精度问题 所以应该允许误差存在 当误差小于设置值时 视作在同一个点上(类似于浮点数二分)
            this.cells[0]=this.next_cell;//将目标点作为真实的头部
            this.next_cell=null;
            this.status='idle';//走完了 停下来
        }else{
            const move_distance=this.speed * this.timedelta/1000;//每帧走过的距离
            this.cells[0].x+=move_distance*dx/distance;
            this.cells[0].y+=move_distance*dy/distance;
        }
    }

    update(){
        if(this.status === 'move'){
            this.update_move();
        }

        this.render();
    }

    render(){
        const L=this.gamemap.L;
        const ctx=this.gamemap.ctx;

        ctx.fillStyle=this.color;
        for(const cell of this.cells){//遍历蛇的每一个身体
            ctx.beginPath();//画圆
            //圆弧 前两个参数 是圆的中点 第三个参数:半径 后两参数为起始角度和终止角度 因为画一整个圆弧 所以0,2Π
            ctx.arc(cell.x*L,cell.y*L,L/2,0,Math.PI*2);
            ctx.fill();//填充颜色
        }
    }
}
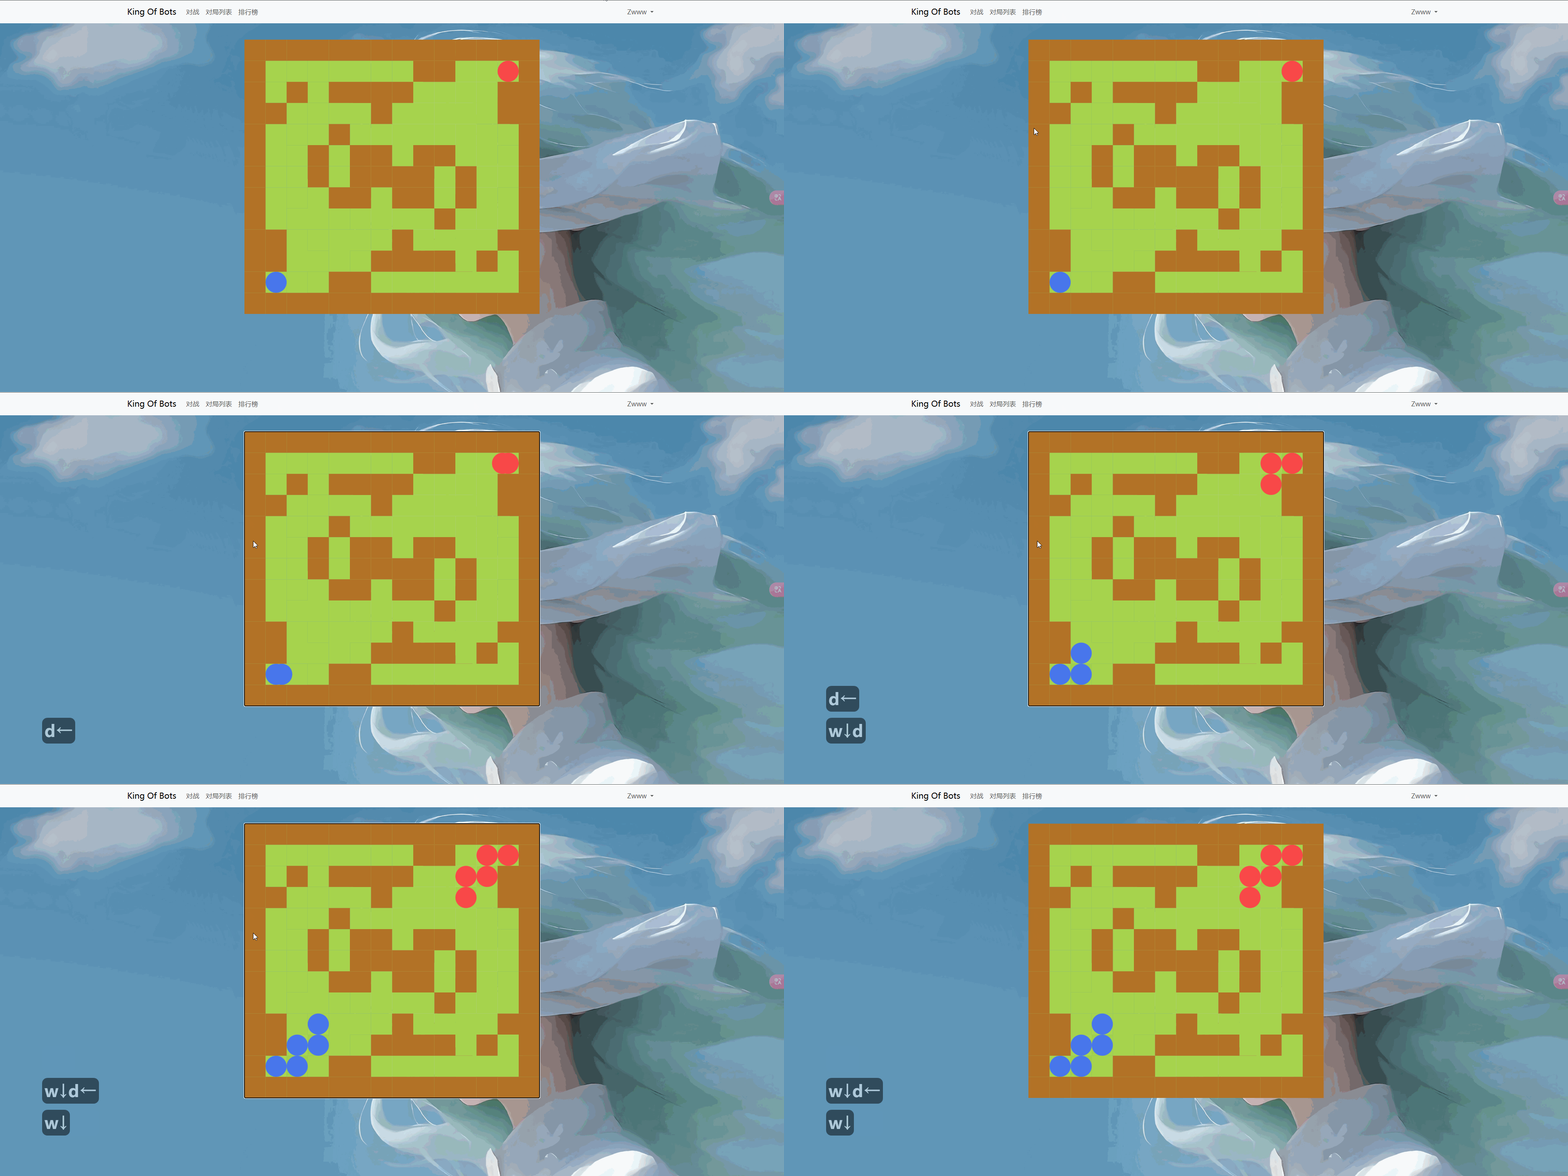
完善逻辑 蛇尾动
首先需要判断当前要不要动蛇尾(有没有变长)
前十回合 要动 后面每%3===1的回合 要动
check_tail_increasing(){//检测当前回合 蛇的长度是否增加
        if(this.step<=10)   return true;
        if(this.step % 3 === 1) return true;
        return false;
   }
对于变长的情况 就无所谓蛇尾了 因为头一直在加 尾巴并不需要移动
对于不变长的情况 还没走到目的地时 我们就不断的向上一位置挪 等到了目的地 实际上最后一节和倒数第二节的位置重叠了 我们可以直接删掉最后一节(砍掉蛇尾)
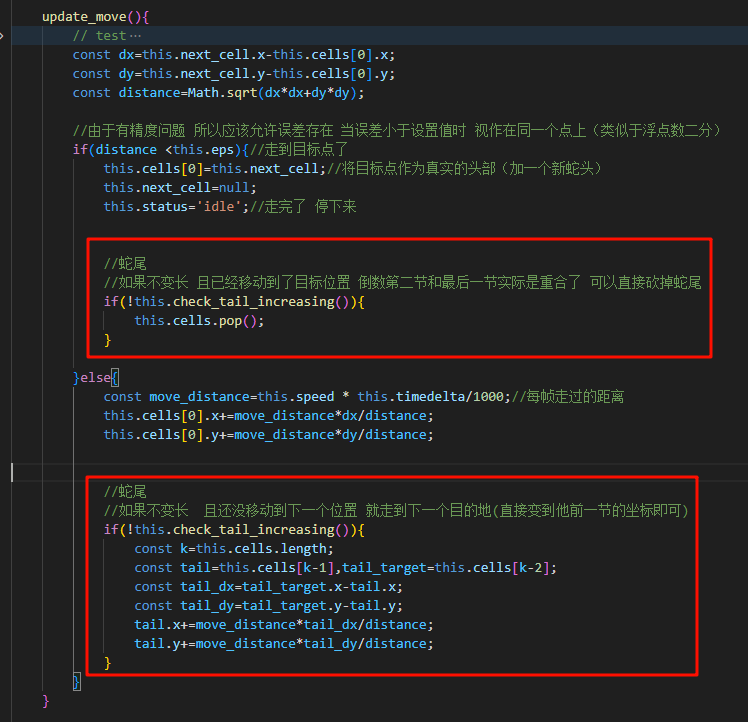
import { GameObject } from "./GameObject";
import { Cell } from "./Cell";

export class Snake extends GameObject{
    constructor(info,gamemap){
        super();

        this.id=info.id;
        this.color=info.color;
        this.gamemap=gamemap;

        this.cells=[new Cell(info.r,info.c)];//存放蛇的身体 cells[0]为蛇头
        this.next_cell=null;//下一步的目标位置

        this.speed=5;

        this.direction=-1;//-1表示没有指令 0123表示上右下左
        this.status="idle";//idle表示静止 move表示正在移动 die表示死亡

        this.dr=[-1,0,1,0];
        this.dc=[0,1,0,-1];

        this.step=0;//当前回合数

        this.eps=1e-2;//两个点坐标间允许的误差
    }

    start(){

    }

    //设置一个接口 接收方向的输入 可能由多个地方传来 后端、键盘输入等等 所以接口好些
    set_direction(d){
        this.direction=d;
    }

   check_tail_increasing(){//检测当前回合 蛇的长度是否增加
        if(this.step<=10)   return true;
        if(this.step % 3 === 1) return true;
        return false;
   }

    next_step(){//将蛇的状态变为走下一步
        const d=this.direction;
        this.next_cell=new Cell(this.cells[0].r+this.dr[d],this.cells[0].c+this.dc[d]);

        this.direction=-1;//记得还原方向
        this.status="move";

        this.step++;

        //头部抛出新球实现移动 需要先把所有节点后移一位 注意需要深拷贝
        const k=this.cells.length;
        for(let i=k;i>0;i--){
            this.cells[i]=JSON.parse(JSON.stringify(this.cells[i-1]));
        }

    }

    update_move(){
        // test
        // //每秒向右移动五格 将蛇头的横坐标加上每帧移动的距离即可
        // //然后 距离等于速度*时间 速度有了 时间存在了timedelta中 (当前帧距离上一帧的时间间隔)
        // //除以1000转换成秒
        // this.cells[0].x+=this.speed*this.timedelta/1000;
        const dx=this.next_cell.x-this.cells[0].x;
        const dy=this.next_cell.y-this.cells[0].y;
        const distance=Math.sqrt(dx*dx+dy*dy);

        //由于有精度问题 所以应该允许误差存在 当误差小于设置值时 视作在同一个点上(类似于浮点数二分)
        if(distance <this.eps){//走到目标点了
            this.cells[0]=this.next_cell;//将目标点作为真实的头部(加一个新蛇头)
            this.next_cell=null;
            this.status='idle';//走完了 停下来

            //蛇尾
            //如果不变长 且已经移动到了目标位置 倒数第二节和最后一节实际是重合了 可以直接砍掉蛇尾
            if(!this.check_tail_increasing()){
                this.cells.pop();
            }

        }else{
            const move_distance=this.speed * this.timedelta/1000;//每帧走过的距离
            this.cells[0].x+=move_distance*dx/distance;
            this.cells[0].y+=move_distance*dy/distance;

            //蛇尾
            //如果不变长  且还没移动到下一个位置 就走到下一个目的地(直接变到他前一节的坐标即可)
            if(!this.check_tail_increasing()){
                const k=this.cells.length;
                const tail=this.cells[k-1],tail_target=this.cells[k-2];
                const tail_dx=tail_target.x-tail.x;
                const tail_dy=tail_target.y-tail.y;
                tail.x+=move_distance*tail_dx/distance;
                tail.y+=move_distance*tail_dy/distance;
            }
        }
    }

    update(){
        if(this.status === 'move'){
            this.update_move();
        }

        this.render();
    }

    render(){
        const L=this.gamemap.L;
        const ctx=this.gamemap.ctx;

        ctx.fillStyle=this.color;
        for(const cell of this.cells){//遍历蛇的每一个身体
            ctx.beginPath();//画圆
            //圆弧 前两个参数 是圆的中点 第三个参数:半径 后两参数为起始角度和终止角度 因为画一整个圆弧 所以0,2Π
            ctx.arc(cell.x*L,cell.y*L,L/2,0,Math.PI*2);
            ctx.fill();//填充颜色
        }
    }
}
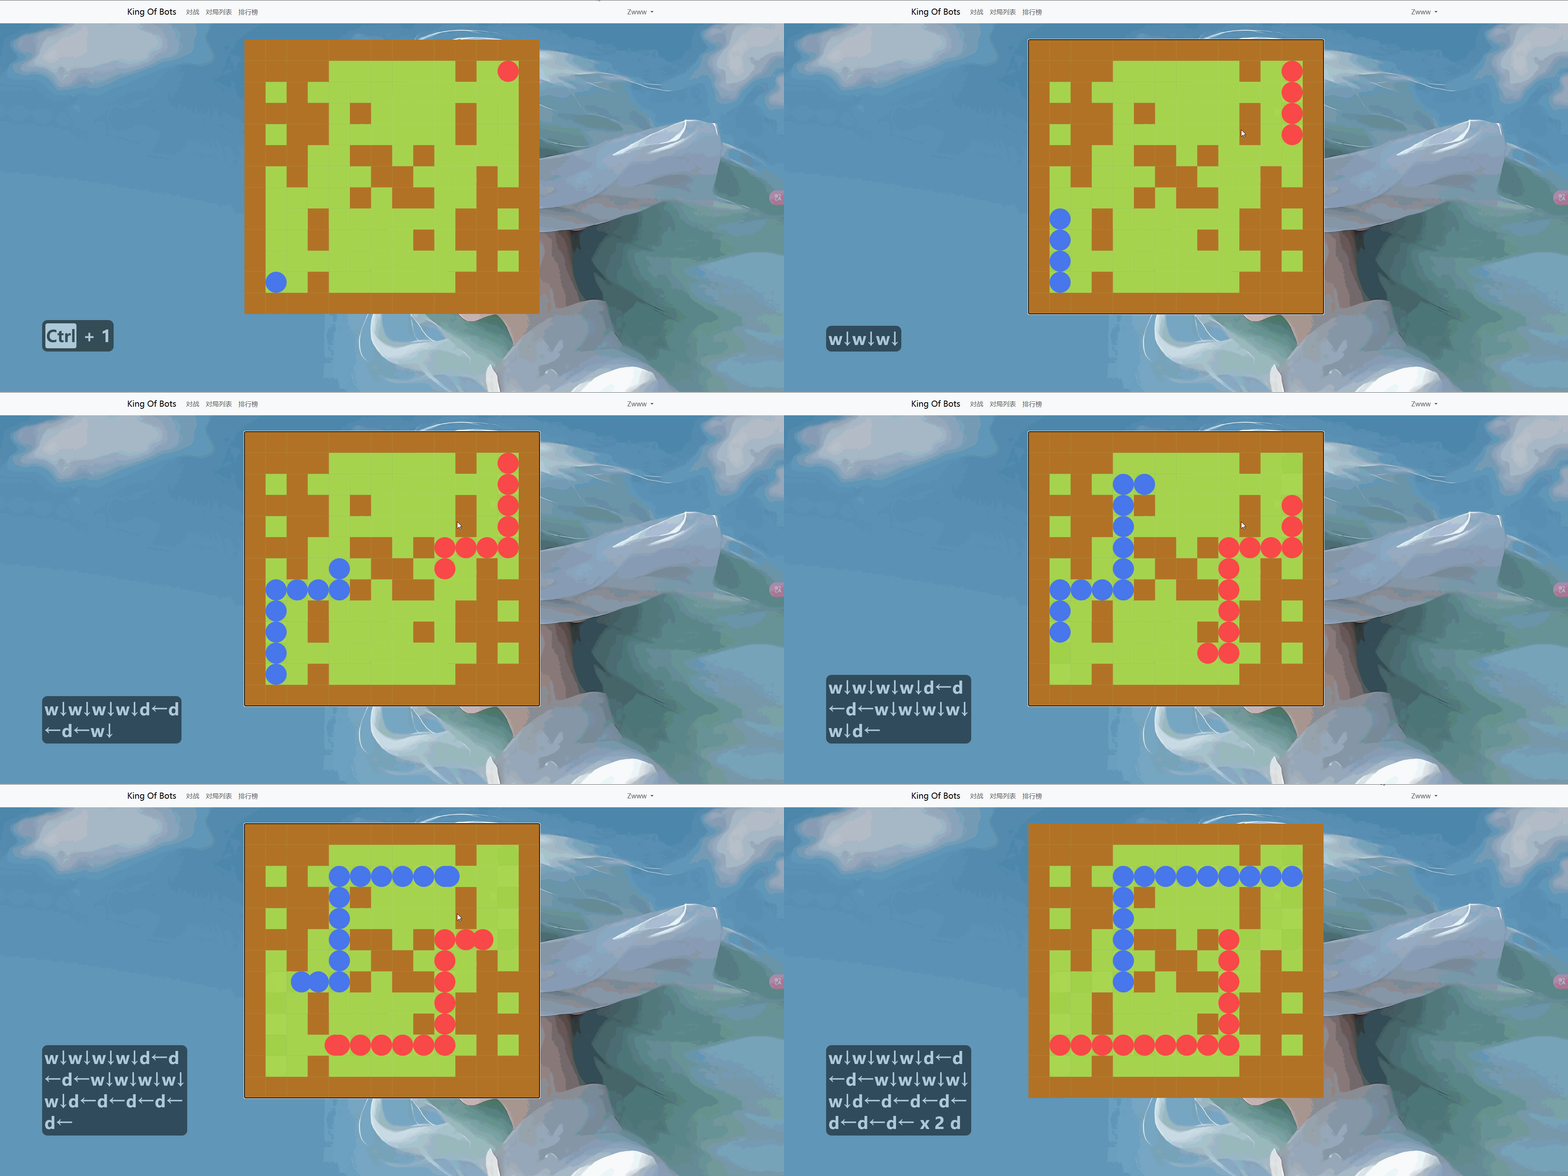
连续性美化
现在的蛇还是很丑 一个一个圈 能不能把圈填满(走过的路径填满 成真正的蛇形)
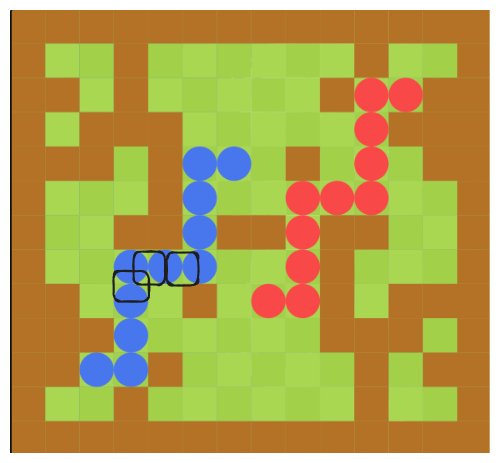
在相邻的两节身体间 用一个矩形覆盖住 (两个圆的切点和两个半径组成的矩形染色)就可以执行移动路径为直线 且拐角还是圆弧 美观性解决
render(){
        const L=this.gamemap.L;
        const ctx=this.gamemap.ctx;

        ctx.fillStyle=this.color;
        for(const cell of this.cells){//遍历蛇的每一个身体
            ctx.beginPath();//画圆
            //圆弧 前两个参数 是圆的中点 第三个参数:半径 后两参数为起始角度和终止角度 因为画一整个圆弧 所以0,2Π
            ctx.arc(cell.x*L,cell.y*L,L/2,0,Math.PI*2);
            ctx.fill();//填充颜色
        }

        //填充路径 圆滑
        for(let i=1;i<this.cells.length;i++){
            const a=this.cells[i-1],b=this.cells[i];
            if(Math.abs(a.x-b.x)<this.eps && Math.abs(a.y-b.y)<this.eps)    continue;
            if(Math.abs(a.x-b.x)<this.eps){
                ctx.fillRect((a.x-0.5)*L,Math.min(a.y,b.y)*L,L,Math.abs(a.y-b.y)*L);
            }else{
                ctx.fillRect(Math.min(a.x,b.x)*L,(a.y-0.5)*L,Math.abs(a.x-b.x)*L,L);
            }
        }
    }
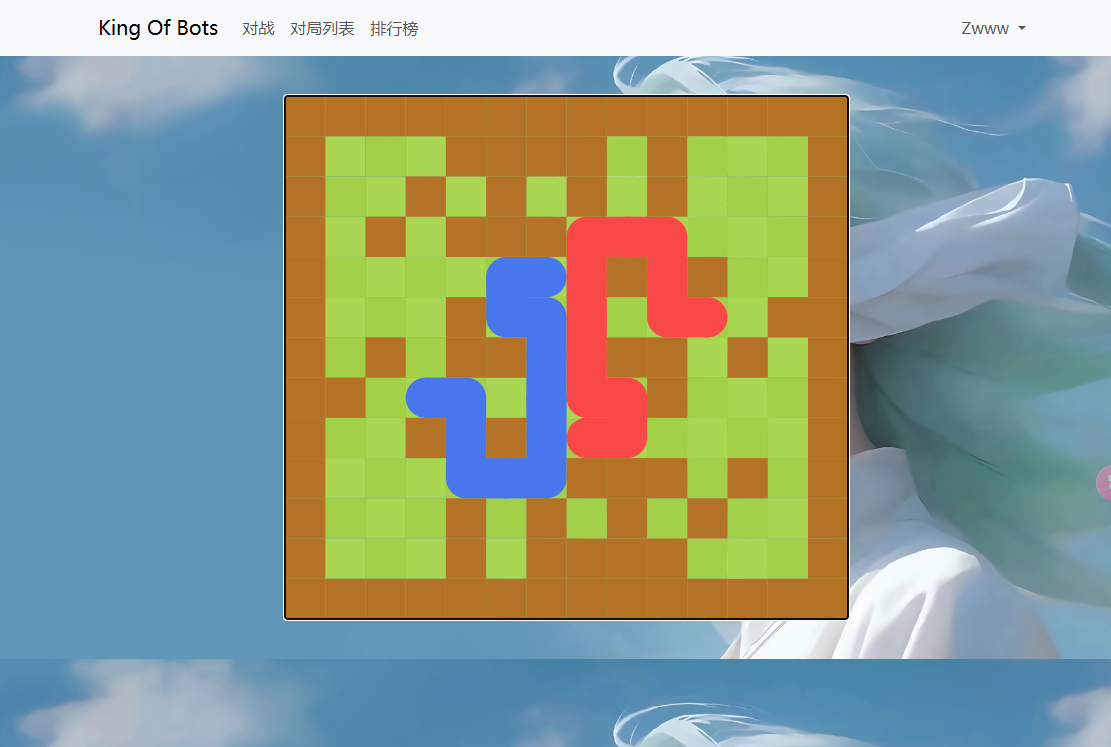
发现成功了 但是有点胖
把整个圆缩小 所有的L*0.8 另外补一下矩形变长的偏移量 +0.1
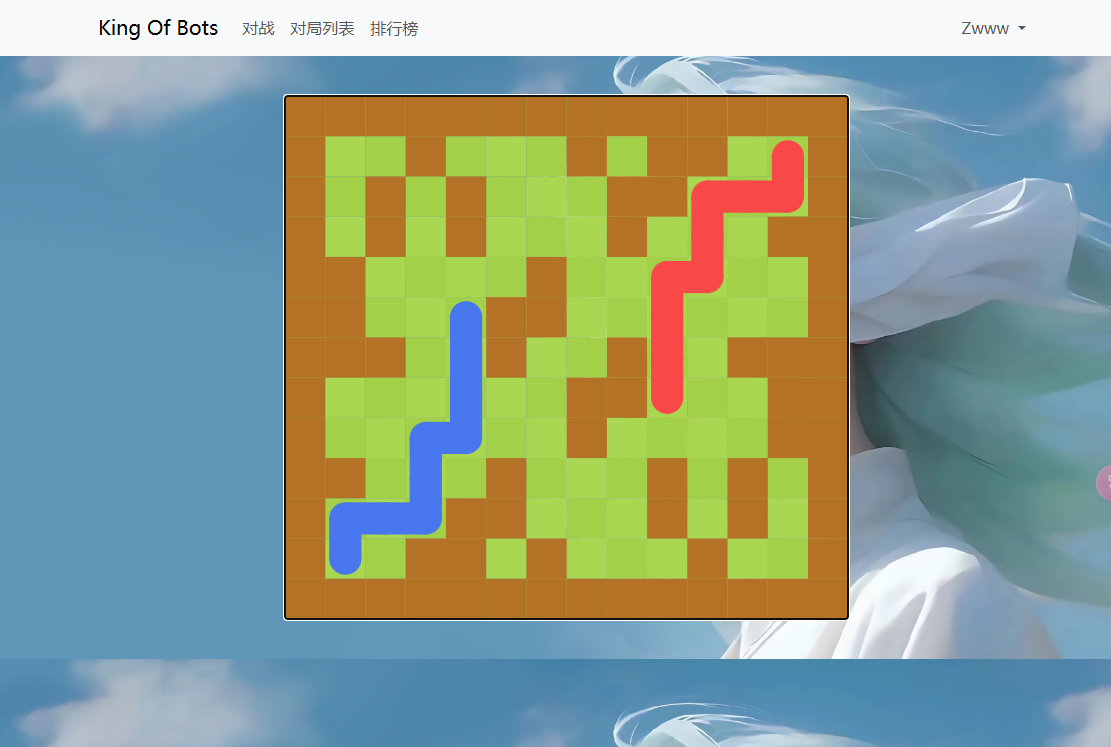
Snack.js
 import { GameObject } from "./GameObject";
import { Cell } from "./Cell";

export class Snake extends GameObject{
    constructor(info,gamemap){
        super();

        this.id=info.id;
        this.color=info.color;
        this.gamemap=gamemap;

        this.cells=[new Cell(info.r,info.c)];//存放蛇的身体 cells[0]为蛇头
        this.next_cell=null;//下一步的目标位置

        this.speed=5;

        this.direction=-1;//-1表示没有指令 0123表示上右下左
        this.status="idle";//idle表示静止 move表示正在移动 die表示死亡

        this.dr=[-1,0,1,0];
        this.dc=[0,1,0,-1];

        this.step=0;//当前回合数

        this.eps=1e-2;//两个点坐标间允许的误差
    }

    start(){

    }

    //设置一个接口 接收方向的输入 可能由多个地方传来 后端、键盘输入等等 所以接口好些
    set_direction(d){
        this.direction=d;
    }

   check_tail_increasing(){//检测当前回合 蛇的长度是否增加
        if(this.step<=10)   return true;
        if(this.step % 3 === 1) return true;
        return false;
   }

    next_step(){//将蛇的状态变为走下一步
        const d=this.direction;
        this.next_cell=new Cell(this.cells[0].r+this.dr[d],this.cells[0].c+this.dc[d]);

        this.direction=-1;//记得还原方向
        this.status="move";

        this.step++;

        //头部抛出新球实现移动 需要先把所有节点后移一位 注意需要深拷贝
        const k=this.cells.length;
        for(let i=k;i>0;i--){
            this.cells[i]=JSON.parse(JSON.stringify(this.cells[i-1]));
        }

    }

    update_move(){
        // test
        // //每秒向右移动五格 将蛇头的横坐标加上每帧移动的距离即可
        // //然后 距离等于速度*时间 速度有了 时间存在了timedelta中 (当前帧距离上一帧的时间间隔)
        // //除以1000转换成秒
        // this.cells[0].x+=this.speed*this.timedelta/1000;
        const dx=this.next_cell.x-this.cells[0].x;
        const dy=this.next_cell.y-this.cells[0].y;
        const distance=Math.sqrt(dx*dx+dy*dy);

        //由于有精度问题 所以应该允许误差存在 当误差小于设置值时 视作在同一个点上(类似于浮点数二分)
        if(distance <this.eps){//走到目标点了
            this.cells[0]=this.next_cell;//将目标点作为真实的头部(加一个新蛇头)
            this.next_cell=null;
            this.status='idle';//走完了 停下来

            //蛇尾
            //如果不变长 且已经移动到了目标位置 倒数第二节和最后一节实际是重合了 可以直接砍掉蛇尾
            if(!this.check_tail_increasing()){
                this.cells.pop();
            }

        }else{
            const move_distance=this.speed * this.timedelta/1000;//每帧走过的距离
            this.cells[0].x+=move_distance*dx/distance;
            this.cells[0].y+=move_distance*dy/distance;

            //蛇尾
            //如果不变长  且还没移动到下一个位置 就走到下一个目的地(直接变到他前一节的坐标即可)
            if(!this.check_tail_increasing()){
                const k=this.cells.length;
                const tail=this.cells[k-1],tail_target=this.cells[k-2];
                const tail_dx=tail_target.x-tail.x;
                const tail_dy=tail_target.y-tail.y;
                tail.x+=move_distance*tail_dx/distance;
                tail.y+=move_distance*tail_dy/distance;
            }
        }
    }

    update(){
        if(this.status === 'move'){
            this.update_move();
        }

        this.render();
    }

    render(){
        const L=this.gamemap.L;
        const ctx=this.gamemap.ctx;

        ctx.fillStyle=this.color;
        for(const cell of this.cells){//遍历蛇的每一个身体
            ctx.beginPath();//画圆
            //圆弧 前两个参数 是圆的中点 第三个参数:半径 后两参数为起始角度和终止角度 因为画一整个圆弧 所以0,2Π
            ctx.arc(cell.x*L,cell.y*L,L/2*0.8,0,Math.PI*2);
            ctx.fill();//填充颜色
        }

        //填充路径 圆滑
        for(let i=1;i<this.cells.length;i++){
            const a=this.cells[i-1],b=this.cells[i];
            if(Math.abs(a.x-b.x)<this.eps && Math.abs(a.y-b.y)<this.eps)    continue;
            if(Math.abs(a.x-b.x)<this.eps){
                ctx.fillRect((a.x-0.5 + 0.1)*L,Math.min(a.y,b.y)*L,L*0.8,Math.abs(a.y-b.y)*L);
            }else{
                ctx.fillRect(Math.min(a.x,b.x)*L,(a.y-0.5 + 0.1)*L,Math.abs(a.x-b.x)*L,L*0.8);
            }
        }
    }
}
蛇移动碰撞检测
判断还是一样 不能在蛇里面检查 得放GameMap.js中
关于墙的检测其实很简单 只要看身体的坐标和墙的坐标是否相等即可
而关于蛇身体 有个特别注意的点 就是
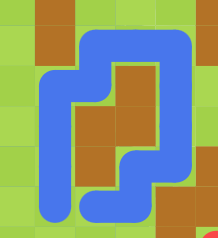
当蛇头追到蛇尾时 蛇尾可能会缩(是不是10步后的每第3步)缩了就不会撞 不缩就撞了 但这个逻辑不用重新写 我们在check_tail_increasing()就实现了
这里不外乎就是考虑要不要看蛇尾 如果缩就一定不会撞 不用那么麻烦再去检查蛇尾位置是否重合 如果不缩 就有可能撞 把蛇尾也计入蛇身 遍历检查是否重合
    check_valid(cell){//检查目标位置是否合法(没撞到两条蛇的身体和障碍物)
        for(const wall of this.walls){
            if(wall.r === cell.r && wall.c === cell.c)
                return false;
        }

        for(const snake of this.snakes){
            let k=snake.cells.length;
            if(!snake.check_tail_increasing()){//当蛇尾会前进时 蛇尾无需判断 不可能会撞
                k--;
            }
            for(let i=0;i<k;i++){//遍历蛇身 判断是否撞
                if(snake.cells[i].r === cell.r && snake.cells[i].c === cell.c){
                    return false;
                }
            }
        }
        return true;
    }
那么把这个应用到蛇的移动中去
如果把蛇的状态变为下一步时 发现不合法了 就改变蛇的状态为死亡
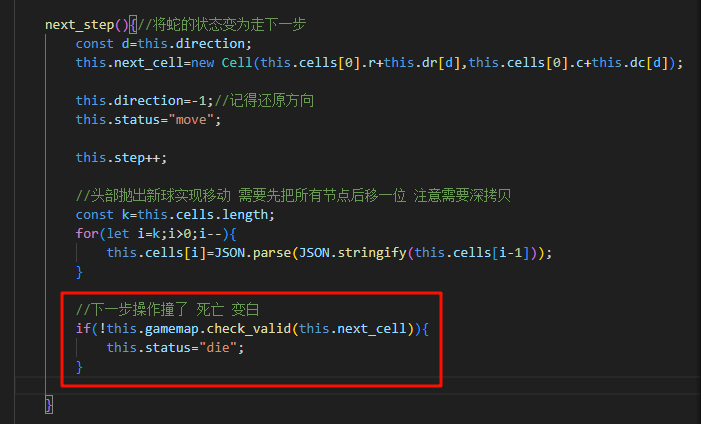
在渲染时 加上监测 如果状态为死亡 就变白
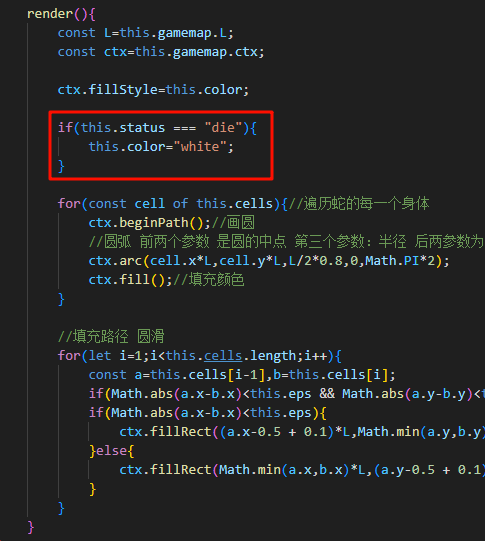
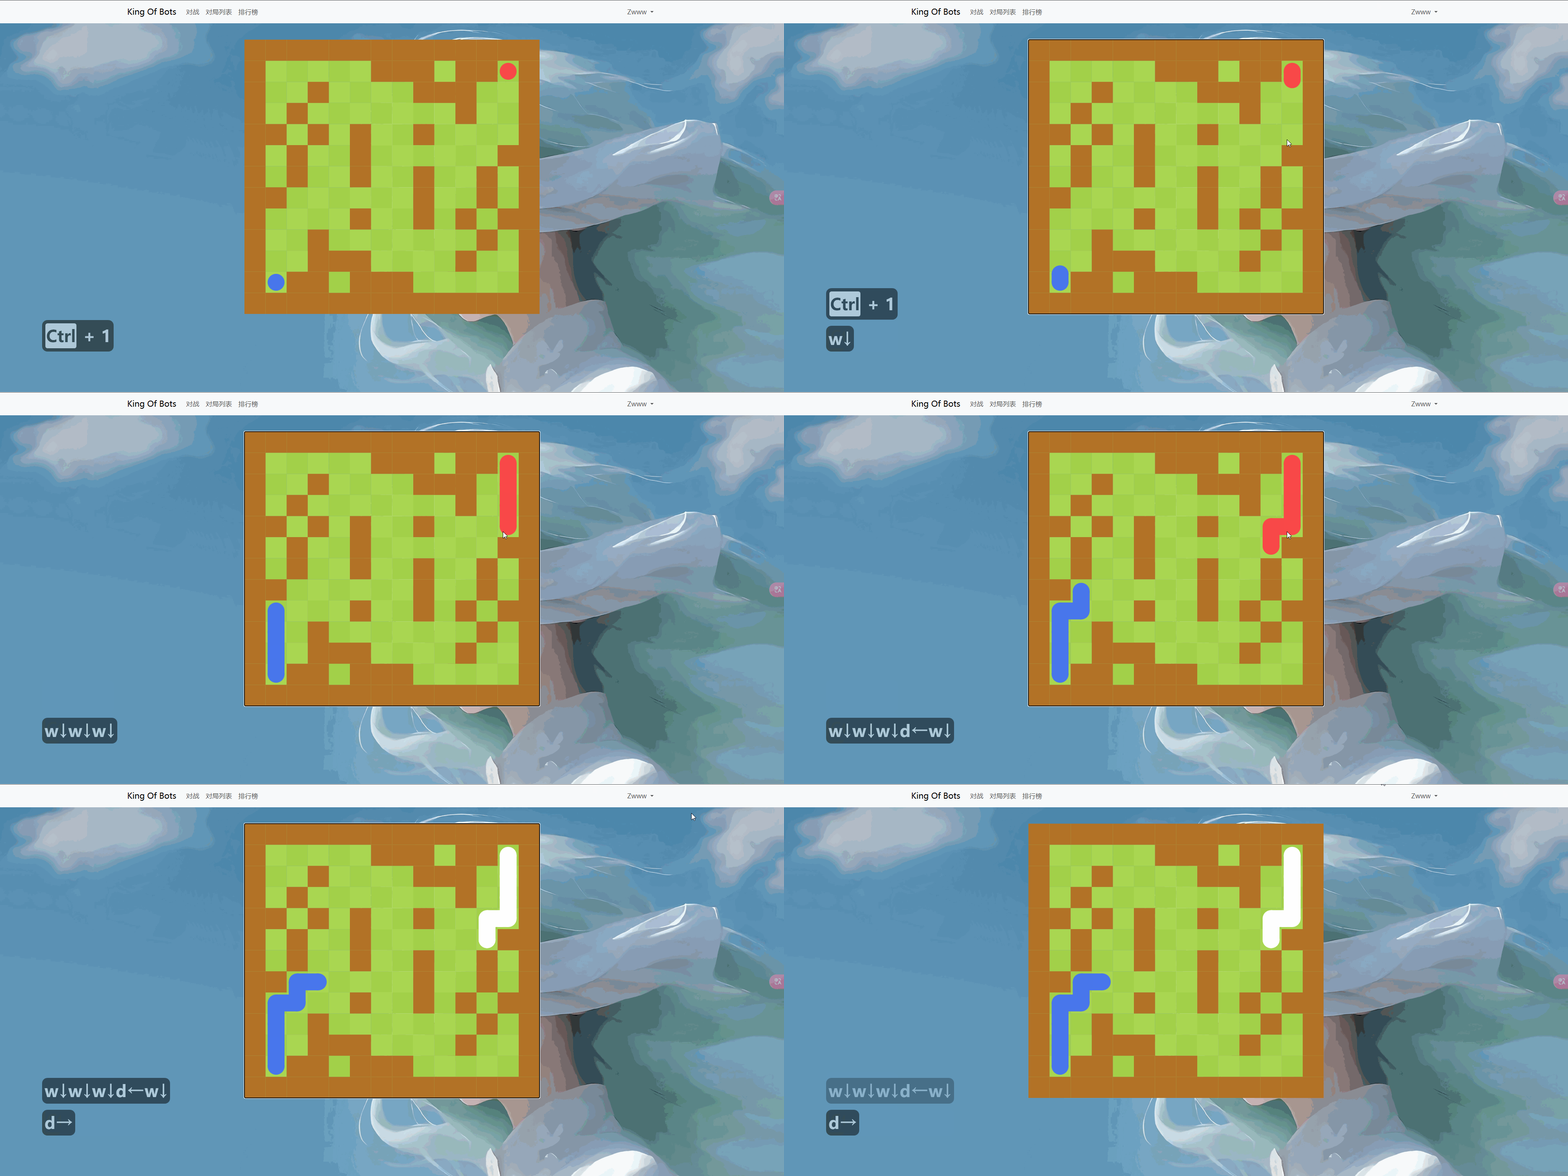
snake.js
import { GameObject } from "./GameObject";
import { Cell } from "./Cell";

export class Snake extends GameObject{
    constructor(info,gamemap){
        super();

        this.id=info.id;
        this.color=info.color;
        this.gamemap=gamemap;

        this.cells=[new Cell(info.r,info.c)];//存放蛇的身体 cells[0]为蛇头
        this.next_cell=null;//下一步的目标位置

        this.speed=5;

        this.direction=-1;//-1表示没有指令 0123表示上右下左
        this.status="idle";//idle表示静止 move表示正在移动 die表示死亡

        this.dr=[-1,0,1,0];
        this.dc=[0,1,0,-1];

        this.step=0;//当前回合数

        this.eps=1e-2;//两个点坐标间允许的误差
    }

    start(){

    }

    //设置一个接口 接收方向的输入 可能由多个地方传来 后端、键盘输入等等 所以接口好些
    set_direction(d){
        this.direction=d;
    }

   check_tail_increasing(){//检测当前回合 蛇的长度是否增加
        if(this.step<=10)   return true;
        if(this.step % 3 === 1) return true;
        return false;
   }

    next_step(){//将蛇的状态变为走下一步
        const d=this.direction;
        this.next_cell=new Cell(this.cells[0].r+this.dr[d],this.cells[0].c+this.dc[d]);

        this.direction=-1;//记得还原方向
        this.status="move";

        this.step++;

        //头部抛出新球实现移动 需要先把所有节点后移一位 注意需要深拷贝
        const k=this.cells.length;
        for(let i=k;i>0;i--){
            this.cells[i]=JSON.parse(JSON.stringify(this.cells[i-1]));
        }

        //下一步操作撞了 死亡 变白
        if(!this.gamemap.check_valid(this.next_cell)){
            this.status="die";
        }

    }

    update_move(){
        // test
        // //每秒向右移动五格 将蛇头的横坐标加上每帧移动的距离即可
        // //然后 距离等于速度*时间 速度有了 时间存在了timedelta中 (当前帧距离上一帧的时间间隔)
        // //除以1000转换成秒
        // this.cells[0].x+=this.speed*this.timedelta/1000;
        const dx=this.next_cell.x-this.cells[0].x;
        const dy=this.next_cell.y-this.cells[0].y;
        const distance=Math.sqrt(dx*dx+dy*dy);

        //由于有精度问题 所以应该允许误差存在 当误差小于设置值时 视作在同一个点上(类似于浮点数二分)
        if(distance <this.eps){//走到目标点了
            this.cells[0]=this.next_cell;//将目标点作为真实的头部(加一个新蛇头)
            this.next_cell=null;
            this.status='idle';//走完了 停下来

            //蛇尾
            //如果不变长 且已经移动到了目标位置 倒数第二节和最后一节实际是重合了 可以直接砍掉蛇尾
            if(!this.check_tail_increasing()){
                this.cells.pop();
            }

        }else{
            const move_distance=this.speed * this.timedelta/1000;//每帧走过的距离
            this.cells[0].x+=move_distance*dx/distance;
            this.cells[0].y+=move_distance*dy/distance;

            //蛇尾
            //如果不变长  且还没移动到下一个位置 就走到下一个目的地(直接变到他前一节的坐标即可)
            if(!this.check_tail_increasing()){
                const k=this.cells.length;
                const tail=this.cells[k-1],tail_target=this.cells[k-2];
                const tail_dx=tail_target.x-tail.x;
                const tail_dy=tail_target.y-tail.y;
                tail.x+=move_distance*tail_dx/distance;
                tail.y+=move_distance*tail_dy/distance;
            }
        }
    }

    update(){
        if(this.status === 'move'){
            this.update_move();
        }

        this.render();
    }

    render(){
        const L=this.gamemap.L;
        const ctx=this.gamemap.ctx;

        ctx.fillStyle=this.color;

        if(this.status === "die"){
            this.color="white";
        }

        for(const cell of this.cells){//遍历蛇的每一个身体
            ctx.beginPath();//画圆
            //圆弧 前两个参数 是圆的中点 第三个参数:半径 后两参数为起始角度和终止角度 因为画一整个圆弧 所以0,2Π
            ctx.arc(cell.x*L,cell.y*L,L/2*0.8,0,Math.PI*2);
            ctx.fill();//填充颜色
        }

        //填充路径 圆滑
        for(let i=1;i<this.cells.length;i++){
            const a=this.cells[i-1],b=this.cells[i];
            if(Math.abs(a.x-b.x)<this.eps && Math.abs(a.y-b.y)<this.eps)    continue;
            if(Math.abs(a.x-b.x)<this.eps){
                ctx.fillRect((a.x-0.5 + 0.1)*L,Math.min(a.y,b.y)*L,L*0.8,Math.abs(a.y-b.y)*L);
            }else{
                ctx.fillRect(Math.min(a.x,b.x)*L,(a.y-0.5 + 0.1)*L,Math.abs(a.x-b.x)*L,L*0.8);
            }
        }
    }
}
GameMap.js
import { GameObject } from "./GameObject";
import { wall } from "./Wall";
import { Snake } from "./Snake";

export default class GameMap extends GameObject{
    constructor(ctx,parent){
        super(); //先执行基类的构造函数

        this.ctx=ctx;
        this.parent=parent;
        this.L=0;//L表示一个单位的长度

        this.rows=13;
        this.cols=14;//修改成偶*奇的长方形地图

        this.inner_walls_count=20;//地图内随机生成的墙的数量
        this.walls=[];

        this.snakes=[
            new Snake({id:0,color:"#4876EC",r:this.rows-2,c:1},this),
            new Snake({id:1,color:"#F94848",r:1,c:this.cols-2},this),
        ];
    }

    //flood-fill
    check_connectivity(g,sx,sy,tx,ty){
        if(sx==tx && sy==ty)    return true;
        g[sx][sy]=true;

        let dx=[-1,0,1,0],dy=[0,1,0,-1];
        for(let i=0;i<4;i++){
            let nx=sx+dx[i],ny=sy+dy[i];
            if(!g[nx][ny] && this.check_connectivity(g,nx,ny,tx,ty))
                return true;
        }

        return false;
    }

    create_walls(){
        // new wall(0,0,this);//test
        const g = [];
        for(let r=0;r<this.rows;r++){
            g[r]=[];
            for(let c=0;c<this.cols;c++){
                g[r][c]=false;
            }
        }

        //给四周加上墙
        //左右边界
        for(let r=0;r<this.rows;r++){
            g[r][0]=g[r][this.cols-1]=true;
        }
        //上下边界
        for(let c=0;c<this.cols;c++){
            g[0][c]=g[this.rows-1][c]=true;
        }

        //创建随机墙
        for(let i=0;i<this.inner_walls_count;i++){
            for(let j=0;j<1000;j++){
                let r=parseInt(Math.random()*this.rows);
                let c=parseInt(Math.random()*this.cols);
                // if(g[r][c] || g[c][r]) continue;
                //修改为中心对称
                if(g[r][c] || g[this.rows-1-r][this.cols-1-c])
                    continue;

                //左上右下起始位不能为墙
                if(r==this.rows-2 && c==1 || r==1 && c==this.cols-2)
                    continue;

                //g[r][c] = g[c][r] = true;
                g[r][c]=g[this.rows-1-r][this.cols-1-c]=true;
                break;
            }
        }

        //拷贝状态 防止丢失
        //转换为json再重新解析 就成了个全新的数组
        const copy_g = JSON.parse(JSON.stringify(g));
        if(!this.check_connectivity(copy_g,this.rows-2,1,1,this.cols-2))
                return false;

        //遍历 渲染墙
        for(let r=0;r<this.rows;r++){
            for(let c=0;c<this.cols;c++){
                if(g[r][c]){
                    this.walls.push(new wall(r,c,this));
                }
            }
        }

        return true;
    }

    //给cannvs绑定监听用户输入的事件
    add_listening_events(){
        this.ctx.canvas.focus();//聚焦画布

        const [snake0,snake1]=this.snakes;
        this.ctx.canvas.addEventListener("keydown",e=>{//绑定一个keydown事件
            //在Snake类中定义一个设置方向的接口 方便维护
            if(e.key === 'w') snake0.set_direction(0);
            else if(e.key === 'd') snake0.set_direction(1);
            else if(e.key === 's') snake0.set_direction(2);
            else if(e.key === 'a') snake0.set_direction(3);

            else if(e.key === 'ArrowUp')    snake1.set_direction(0);
            else if(e.key === 'ArrowRight') snake1.set_direction(1);
            else if(e.key === 'ArrowDown')  snake1.set_direction(2);
            else if(e.key === 'ArrowLeft')  snake1.set_direction(3);
        });
    }

    start(){
        for(let i=0;i<1000;i++){//可以 但最好别写死循环 1000次足够生成连通的了
            if(this.create_walls())
                break;
        }

        this.add_listening_events();
    }

    update_size(){
        //墙之间有缝隙 是因为L为浮点数 而绘制时是以整个像素来画的 导致某些像素丢失
        //解决方法: 取整  但我觉得有缝隙更好看 所以这里不改
        // this.L=parseInt(Math.min(this.parent.clientWidth / this.cols, this.parent.clientHeight / this.rows));
        this.L=Math.min(this.parent.clientWidth / this.cols, this.parent.clientHeight / this.rows);
        this.ctx.canvas.width=this.L*this.cols;
        this.ctx.canvas.height=this.L*this.rows;
    }

    check_ready(){
        //两条蛇都处于静止 且都获取了下一步操作的时候 就是准备好了
        for(const snake of this.snakes){
            if(snake.status !== "idle")  return false;
            if(snake.direction === -1)   return false;
        }
        return true;
    }

    next_step(){//让两条蛇进入下一回合
        for(const snake of this.snakes){
            snake.next_step();
        }
    }

    check_valid(cell){//检查目标位置是否合法(没撞到两条蛇的身体和障碍物)
        for(const wall of this.walls){
            if(wall.r === cell.r && wall.c === cell.c)
                return false;
        }

        for(const snake of this.snakes){
            let k=snake.cells.length;
            if(!snake.check_tail_increasing()){//当蛇尾会前进时 蛇尾无需判断 不可能会撞
                k--;
            }
            for(let i=0;i<k;i++){//遍历蛇身 判断是否撞
                if(snake.cells[i].r === cell.r && snake.cells[i].c === cell.c){
                    return false;
                }
            }
        }
        return true;
    }

    update(){
        this.update_size();

        if(this.check_ready()){
            this.next_step();
        }

        this.render();
    }

    render(){//渲染 将当前游戏对象画在地图上
        const color_even = "#aad751",color_odd = "#a2d149";
        for(let r=0;r<this.rows;r++){
            for(let c=0;c<this.cols;c++){
                if((r+c)%2==0){
                    this.ctx.fillStyle=color_even;
                }
                else{
                    this.ctx.fillStyle=color_odd;
                }
                this.ctx.fillRect(c*this.L,r*this.L,this.L,this.L);
            }
        }
    }

}
完善 加眼睛
需要记录蛇头的朝向
左下角的蛇初始朝上 右上角的蛇初始朝下
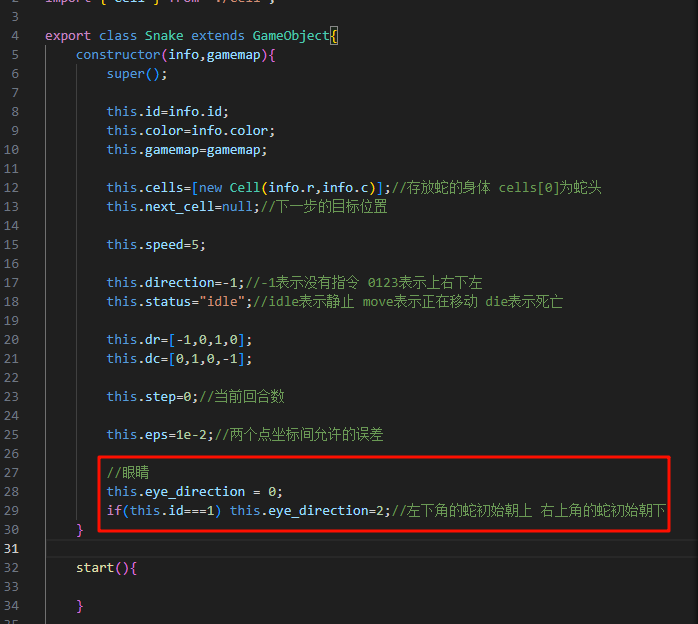
每次移动也都要更新蛇的方向
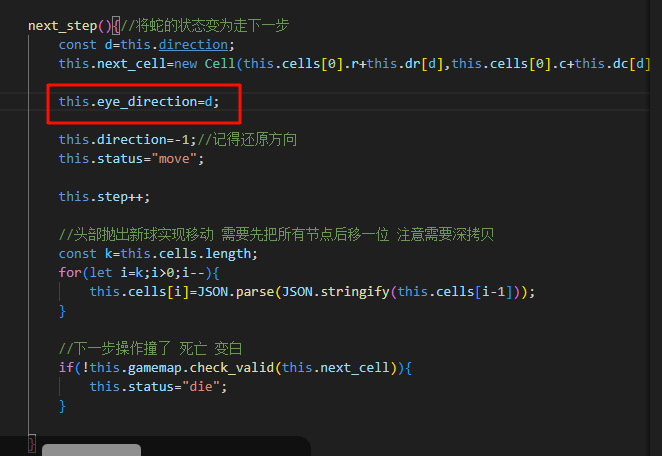
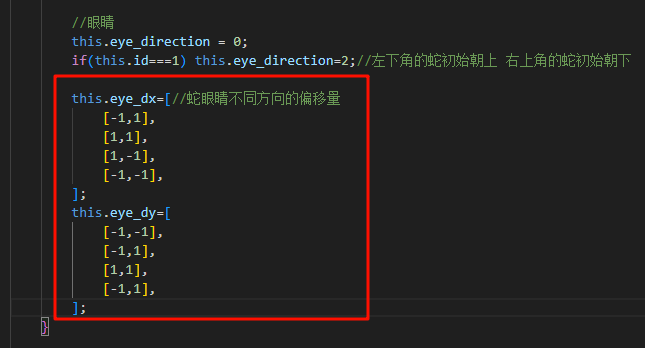
定义出四个方向 蛇眼睛的偏移量(俩只眼)
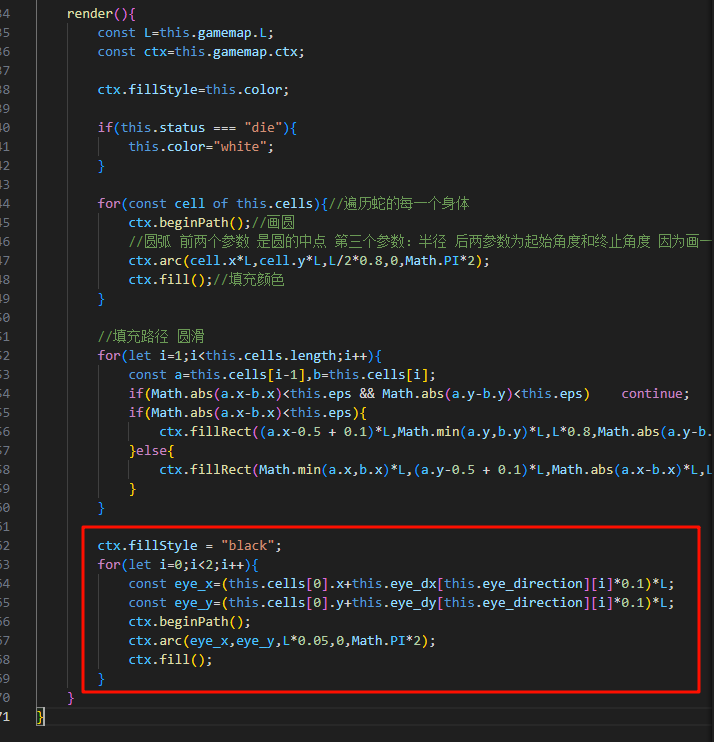
绘制蛇的眼睛 颜色黑色 偏移量
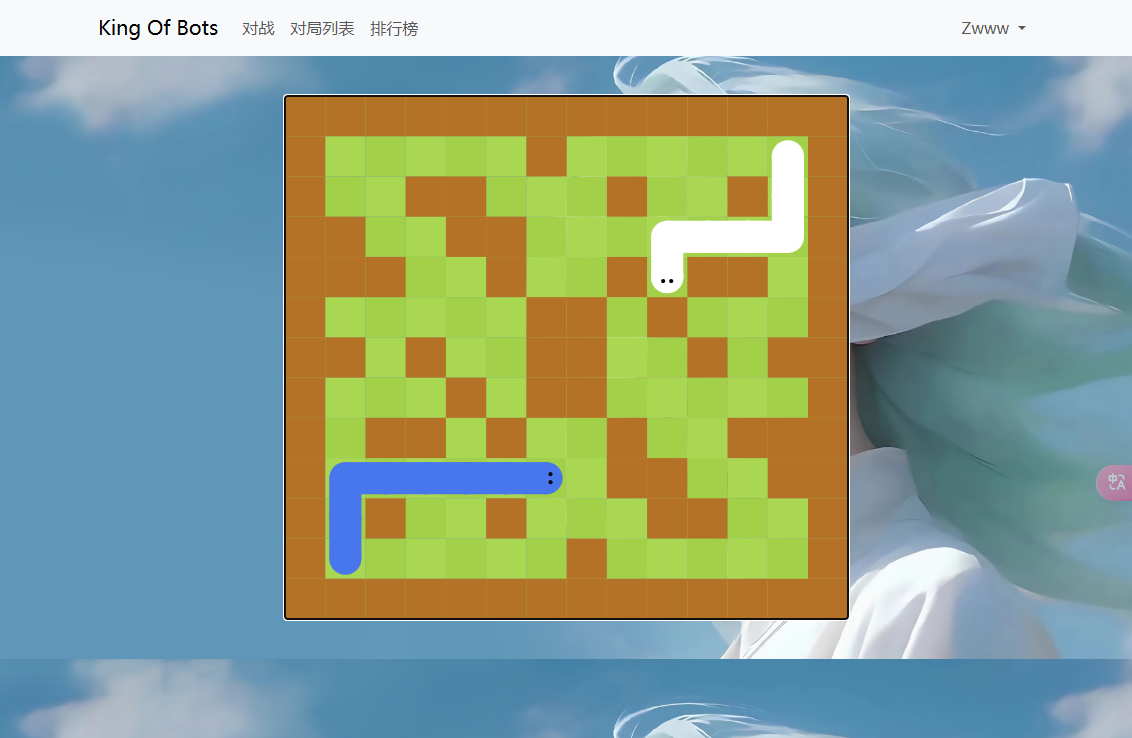
最终代码
Snack.js
import { GameObject } from "./GameObject";
import { Cell } from "./Cell";

export class Snake extends GameObject{
    constructor(info,gamemap){
        super();

        this.id=info.id;
        this.color=info.color;
        this.gamemap=gamemap;

        this.cells=[new Cell(info.r,info.c)];//存放蛇的身体 cells[0]为蛇头
        this.next_cell=null;//下一步的目标位置

        this.speed=5;

        this.direction=-1;//-1表示没有指令 0123表示上右下左
        this.status="idle";//idle表示静止 move表示正在移动 die表示死亡

        this.dr=[-1,0,1,0];
        this.dc=[0,1,0,-1];

        this.step=0;//当前回合数

        this.eps=1e-2;//两个点坐标间允许的误差

        //眼睛
        this.eye_direction = 0;
        if(this.id===1) this.eye_direction=2;//左下角的蛇初始朝上 右上角的蛇初始朝下

        this.eye_dx=[//蛇眼睛不同方向的偏移量
            [-1,1],
            [1,1],
            [1,-1],
            [-1,-1],
        ];
        this.eye_dy=[
            [-1,-1],
            [-1,1],
            [1,1],
            [-1,1],
        ];
    }

    start(){

    }

    //设置一个接口 接收方向的输入 可能由多个地方传来 后端、键盘输入等等 所以接口好些
    set_direction(d){
        this.direction=d;
    }

   check_tail_increasing(){//检测当前回合 蛇的长度是否增加
        if(this.step<=10)   return true;
        if(this.step % 3 === 1) return true;
        return false;
   }

    next_step(){//将蛇的状态变为走下一步
        const d=this.direction;
        this.next_cell=new Cell(this.cells[0].r+this.dr[d],this.cells[0].c+this.dc[d]);

        this.eye_direction=d;

        this.direction=-1;//记得还原方向
        this.status="move";

        this.step++;

        //头部抛出新球实现移动 需要先把所有节点后移一位 注意需要深拷贝
        const k=this.cells.length;
        for(let i=k;i>0;i--){
            this.cells[i]=JSON.parse(JSON.stringify(this.cells[i-1]));
        }

        //下一步操作撞了 死亡 变白
        if(!this.gamemap.check_valid(this.next_cell)){
            this.status="die";
        }

    }

    update_move(){
        // test
        // //每秒向右移动五格 将蛇头的横坐标加上每帧移动的距离即可
        // //然后 距离等于速度*时间 速度有了 时间存在了timedelta中 (当前帧距离上一帧的时间间隔)
        // //除以1000转换成秒
        // this.cells[0].x+=this.speed*this.timedelta/1000;
        const dx=this.next_cell.x-this.cells[0].x;
        const dy=this.next_cell.y-this.cells[0].y;
        const distance=Math.sqrt(dx*dx+dy*dy);

        //由于有精度问题 所以应该允许误差存在 当误差小于设置值时 视作在同一个点上(类似于浮点数二分)
        if(distance <this.eps){//走到目标点了
            this.cells[0]=this.next_cell;//将目标点作为真实的头部(加一个新蛇头)
            this.next_cell=null;
            this.status='idle';//走完了 停下来


            //蛇尾
            //如果不变长 且已经移动到了目标位置 倒数第二节和最后一节实际是重合了 可以直接砍掉蛇尾
            if(!this.check_tail_increasing()){
                this.cells.pop();
            }

        }else{
            const move_distance=this.speed * this.timedelta/1000;//每帧走过的距离
            this.cells[0].x+=move_distance*dx/distance;
            this.cells[0].y+=move_distance*dy/distance;


            //蛇尾
            //如果不变长  且还没移动到下一个位置 就走到下一个目的地(直接变到他前一节的坐标即可)
            if(!this.check_tail_increasing()){
                const k=this.cells.length;
                const tail=this.cells[k-1],tail_target=this.cells[k-2];
                const tail_dx=tail_target.x-tail.x;
                const tail_dy=tail_target.y-tail.y;
                tail.x+=move_distance*tail_dx/distance;
                tail.y+=move_distance*tail_dy/distance;
            }
        }
    }

    update(){
        if(this.status === 'move'){
            this.update_move();
        }

        this.render();
    }

    render(){
        const L=this.gamemap.L;
        const ctx=this.gamemap.ctx;

        ctx.fillStyle=this.color;

        if(this.status === "die"){
            this.color="white";
        }

        for(const cell of this.cells){//遍历蛇的每一个身体
            ctx.beginPath();//画圆
            //圆弧 前两个参数 是圆的中点 第三个参数:半径 后两参数为起始角度和终止角度 因为画一整个圆弧 所以0,2Π
            ctx.arc(cell.x*L,cell.y*L,L/2*0.8,0,Math.PI*2);
            ctx.fill();//填充颜色
        }

        //填充路径 圆滑
        for(let i=1;i<this.cells.length;i++){
            const a=this.cells[i-1],b=this.cells[i];
            if(Math.abs(a.x-b.x)<this.eps && Math.abs(a.y-b.y)<this.eps)    continue;
            if(Math.abs(a.x-b.x)<this.eps){
                ctx.fillRect((a.x-0.5 + 0.1)*L,Math.min(a.y,b.y)*L,L*0.8,Math.abs(a.y-b.y)*L);
            }else{
                ctx.fillRect(Math.min(a.x,b.x)*L,(a.y-0.5 + 0.1)*L,Math.abs(a.x-b.x)*L,L*0.8);
            }
        }

        ctx.fillStyle = "black";
        for(let i=0;i<2;i++){
            const eye_x=(this.cells[0].x+this.eye_dx[this.eye_direction][i]*0.1)*L;
            const eye_y=(this.cells[0].y+this.eye_dy[this.eye_direction][i]*0.1)*L;
            ctx.beginPath();
            ctx.arc(eye_x,eye_y,L*0.05,0,Math.PI*2);
            ctx.fill();
        }
    }
}
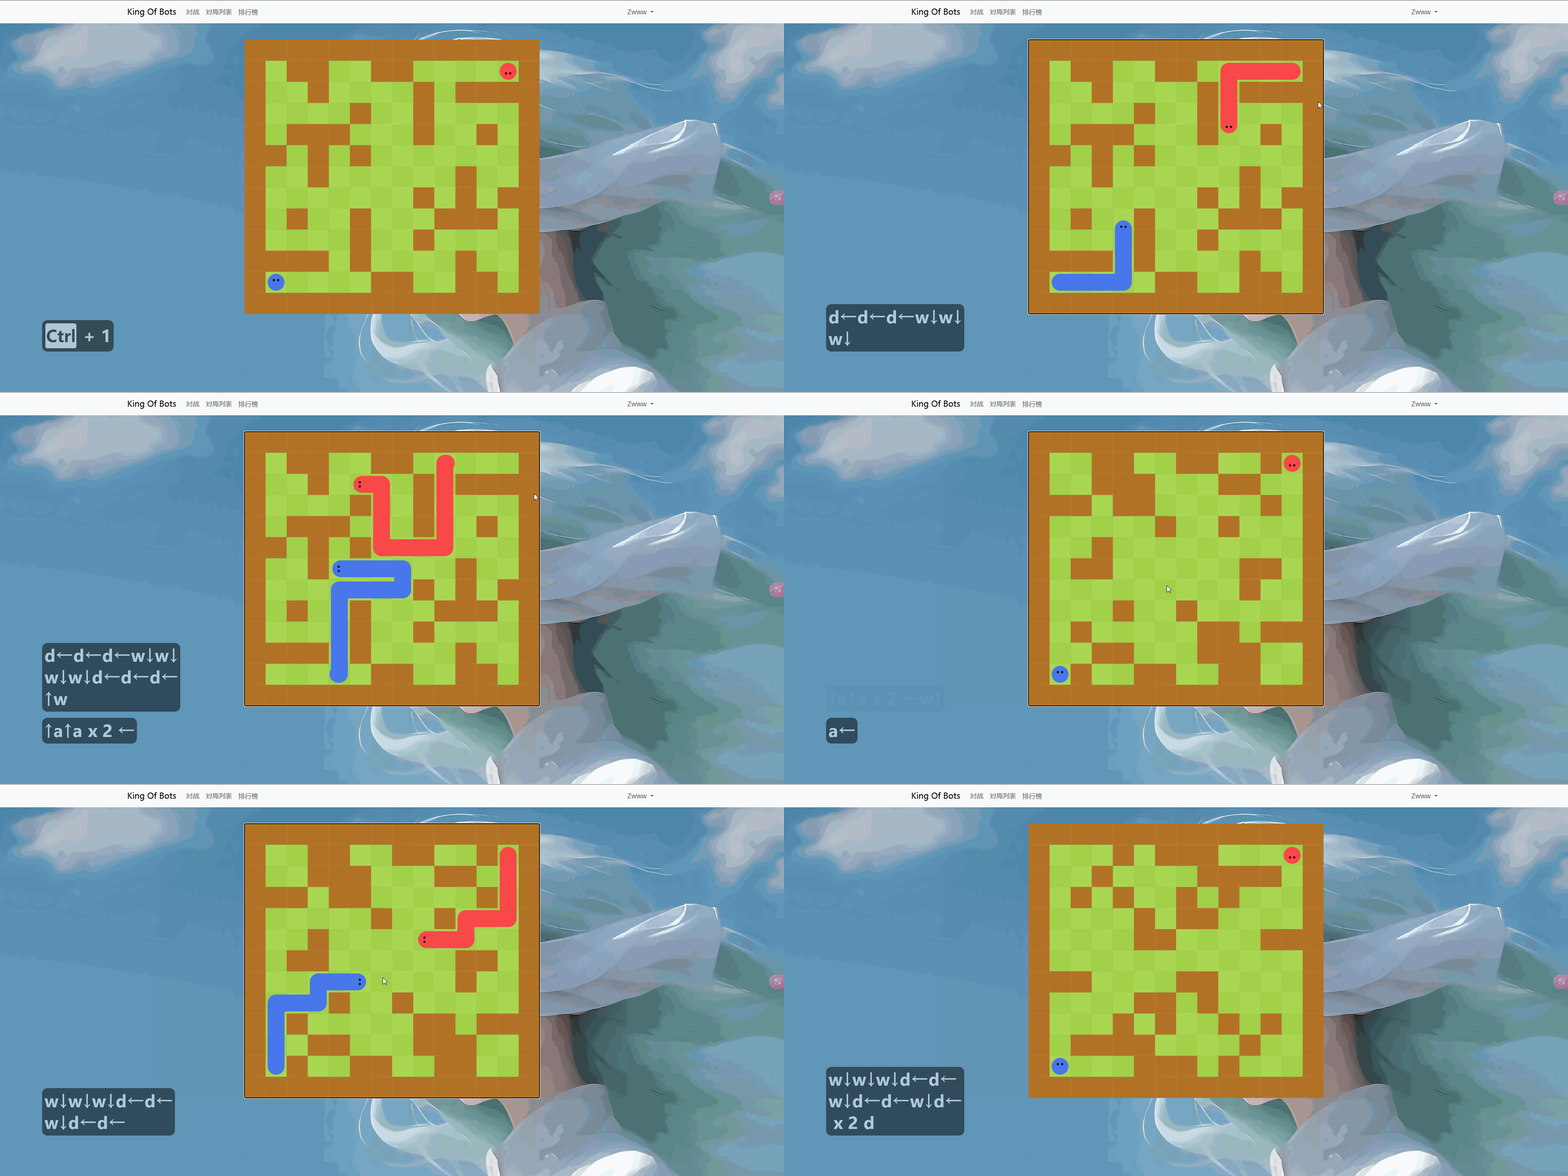
游戏结果播报
在 GameMap.vue 中可以添加一个弹窗组件用来展示游戏的胜利或平局结果
创建结果弹窗组件 GameResult.vue
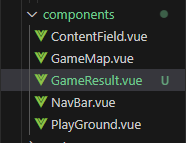
<template>
    <div v-if="show" class="game-result">
      <div class="result-box">
        <h2>{{ resultMessage }}</h2>
        <button @click="restartGame">再来一局!</button>
      </div>
    </div>
</template>


    export default {
        props: {
            winner: {
            type: String,
            required: true,
            },
            show: {
            type: Boolean,
            default: false,
            },
        },
        computed: {
            resultMessage() {
            if (this.winner === "draw") return "平局!";
            return `${this.winner} 胜利!`;
            },
        },
        methods: {
            restartGame() {
            this.$emit("restart");
            },
        },
    };


    .game-result {
    position: absolute;
    top: 0;
    left: 0;
    width: 100%;
    height: 100%;
    display: flex;
    justify-content: center;
    align-items: center;
    background: rgba(0, 0, 0, 0.7);
    }

    .result-box {
    background: white;
    padding: 20px;
    border-radius: 10px;
    text-align: center;
    }
GameMap.vue 中使用 GameResult 组件
<template>
    <div ref="parent" class="gamemap">
        <canvas ref="canvas" tabindex="0"></canvas>

        <GameResult
            v-if="gameOver"
            :winner="winner"
            :show="gameOver"
            @restart="restartGame"
        />

    </div>
</template>


import GameMap from '@/assets/scripts/GameMap';
import { ref, onMounted } from 'vue';
import GameResult from '@/components/GameResult.vue';

export default{

    components: {
        GameResult
    },

    setup(){
        let parent = ref(null);
        let canvas = ref(null);

        let gameMap = ref(null);
        let gameOver = ref(false);
        let winner = ref("");

        onMounted(()=>{
            gameMap.value = new GameMap(canvas.value.getContext('2d'),parent.value);

            // 监听蛇死亡的事件,更新游戏结果
            gameMap.value.onGameOver = (result) => {
                gameOver.value = true;
                winner.value = result;
            };

        });


        const restartGame = () => {
            gameOver.value = false;
            winner.value = "";

            //重新开始游戏 向后端发送重新生成地图的请求 api示例
            /*
            try {
                // 向后端发送请求以获取新的地图数据
                const response = await axios.get('/api/new-map');
                const mapData = response.data;

                // 使用新数据初始化游戏地图
                initializeGameMap(mapData);
            } catch (error) {
                console.error("Failed to restart the game:", error);
                alert("Failed to restart the game. Please try again.");
            }
            };
            */

            // 刷新浏览器页面
            window.location.reload();
        };

        return {
            parent,
            canvas,
            gameOver,
            winner,
            restartGame
        };
    }
};


    div.gamemap{
        width: 100%;
        height: 100%;
        display: flex;
        justify-content: center;
        align-items: center;
        position: relative;
    }
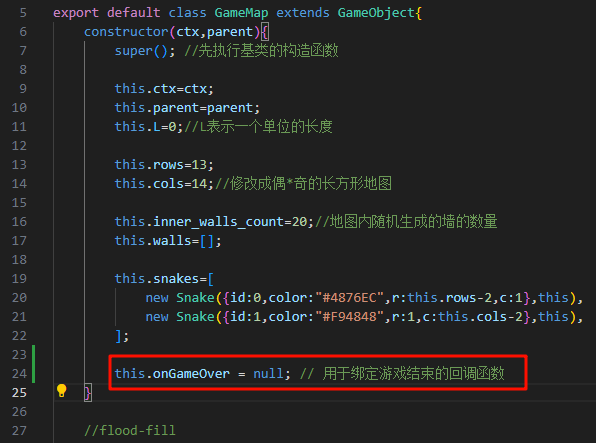
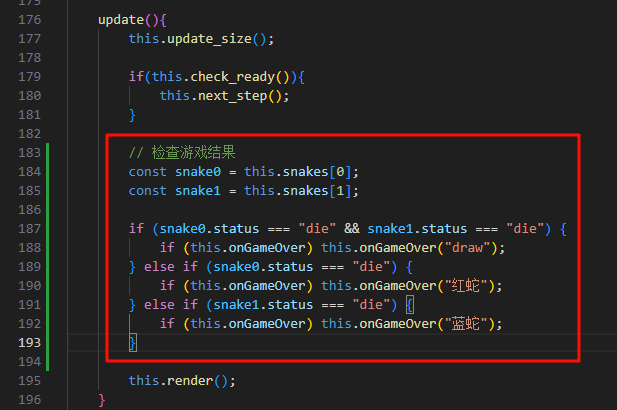
在 GameMap.js 中添加判断游戏结果的逻辑
美化弹窗
<template>
    <div v-if="show" class="game-result">
      <div class="result-box">
        <h2 class="result-message">{{ resultMessage }}</h2>
        <button class="restart-button" @click="restartGame">再来一局!</button>
      </div>
    </div>
  </template>


  export default {
    props: {
      winner: {
        type: String,
        required: true,
      },
      show: {
        type: Boolean,
        default: false,
      },
    },
    computed: {
      resultMessage() {
        if (this.winner === "draw") return "平局!";
        return `${this.winner} 胜利!`;
      },
    },
    methods: {
      restartGame() {
        this.$emit("restart");
      },
    },
  };


  .game-result {
    position: absolute;
    top: 0;
    left: 0;
    width: 100%;
    height: 100%;
    display: flex;
    justify-content: center;
    align-items: center;
    background: rgba(0, 0, 0, 0.7);
    animation: fadeIn 0.5s ease-in-out;
  }

  .result-box {
    background: linear-gradient(135deg, #ffffff, #f0f0f0);
    padding: 30px;
    border-radius: 15px;
    text-align: center;
    box-shadow: 0 8px 16px rgba(0, 0, 0, 0.3);
    animation: popUp 0.4s ease-out;
  }

  .result-message {
    font-family: 'Arial', sans-serif;
    font-size: 28px;
    color: #333;
    margin-bottom: 20px;
  }

  .restart-button {
    padding: 15px 30px;
    font-size: 18px;
    font-weight: bold;
    color: white;
    background: linear-gradient(135deg, #ff416c, #ff4b2b);
    border: none;
    border-radius: 10px;
    cursor: pointer;
    transition: transform 0.2s, box-shadow 0.2s;
  }

  .restart-button:hover {
    transform: translateY(-3px);
    box-shadow: 0 4px 8px rgba(0, 0, 0, 0.2);
  }

  .restart-button:active {
    transform: translateY(0);
    box-shadow: none;
  }

  /* Animation for modal fade in */
  @keyframes fadeIn {
    from {
      opacity: 0;
    }
    to {
      opacity: 1;
    }
  }

  /* Animation for modal pop-up */
  @keyframes popUp {
    from {
      transform: scale(0.8);
      opacity: 0;
    }
    to {
      transform: scale(1);
      opacity: 1;
    }
  }
项目分区导航: 注解(了解) ⬅️ | 00-创建菜单与游戏界面 | ➡️ js-import 和 export 的使用
💬 评论