异步索引构建:落库、向量化与收尾
上一篇我们跟着执行顺序,看完了初始化和切块执行阶段,buildParentBlocks() 返回了一批父块/子块候选结果。这篇接着往下走——后处理、落库、向量化,一直到整个任务结束。
阶段三:切块后处理
回到 handleIndexBuild() 主流程,拿到候选结果后,先做一轮清洗,过滤掉无效的父块:
DocumentAsyncProcessServiceImpl.java — handleIndexBuild()
// 过滤掉无效父块:
// 1. 父块本身不能为空;
// 2. 必须存在 child 列表;
// 3. child 列表里至少有一个文本非空的有效子块。
List<ParentBlockCandidate> finalParentBlockList = parentBlockCandidateList.stream()
    .filter(item -> item != null
        && StrUtil.isNotBlank(item.getText())
        && item.getChildChunks() != null
        && item.getChildChunks().stream()
            .anyMatch(child -> StrUtil.isNotBlank(child.getText())))
    .toList();
然后把内存中的候选对象转换成真正要落库的数据库实体:
// 将内存中的候选结构转换成真正要落库的 parent_block / chunk 实体,
// 同时完成全局 chunk 编号、父子关系、token 估算等衍生字段填充。
ParentChildEntityBundle entityBundle =
    buildParentChildEntities(documentId, taskId, planId, finalParentBlockList);
List<SuperAgentDocumentParentBlock> parentBlockEntityList = entityBundle.parentBlocks();
List<SuperAgentDocumentChunk> chunkEntityList = entityBundle.childChunks();
buildParentChildEntities:候选对象 → 数据库实体
这个方法做的事情不复杂,但细节不少。核心就是遍历每个父块候选,给它和它的子块分配 ID、编号,然后填充各种衍生字段。
DocumentAsyncProcessServiceImpl.java — buildParentChildEntities()
/**
 * 将策略服务产出的父块/子块候选对象转换成数据库实体。
 * <p>
 * 这里会同时完成几件事:
 * 1. 给父块和子块分配全局唯一 ID;
 * 2. 建立 parent_block 与 chunk 的父子关系;
 * 3. 生成全局递增的 chunkNo;
 * 4. 计算字符数、token 估算值、向量初始状态等落库字段。
 * </p>
 *
 * @param documentId 文档 ID
 * @param taskId 当前索引任务 ID
 * @param planId 本次执行所依据的方案 ID
 * @param parentBlockCandidateList 清洗后的父块候选列表
 * @return 父块实体列表与子块实体列表的打包结果
 */
private ParentChildEntityBundle buildParentChildEntities(Long documentId,
                                                         Long taskId,
                                                         Long planId,
                                                         List<ParentBlockCandidate> parentBlockCandidateList) {
    // 分别收集父块实体和子块实体,最后一次性返回给主流程落库。
    List<SuperAgentDocumentParentBlock> parentBlockEntityList = new java.util.ArrayList<>();
    List<SuperAgentDocumentChunk> chunkEntityList = new java.util.ArrayList<>();
    // chunkNo 按整篇文档全局递增,而不是在每个父块内从 1 重新开始。
    int globalChunkNo = 1;

    for (int parentIndex = 0; parentIndex < parentBlockCandidateList.size(); parentIndex++) {
        ParentBlockCandidate parentCandidate = parentBlockCandidateList.get(parentIndex);
        // 父块为空或文本为空时直接跳过,避免生成无意义 parent_block 记录。
        if (parentCandidate == null || StrUtil.isBlank(parentCandidate.getText())) {
            continue;
        }

        // 先构造父块实体,承接 sectionPath、结构节点、规范路径等上游结构化信息。
        SuperAgentDocumentParentBlock parentBlock = new SuperAgentDocumentParentBlock();
        parentBlock.setId(uidGenerator.getUid());
        parentBlock.setDocumentId(documentId);
        parentBlock.setTaskId(taskId);
        parentBlock.setPlanId(planId);
        parentBlock.setParentNo(parentIndex + 1);
        // sourceType 允许上游缺省,缺省时统一按 ORIGINAL 处理。
        parentBlock.setSourceType(parentCandidate.getSourceType() == null
            ? DocumentChunkSourceTypeEnum.ORIGINAL.getCode() : parentCandidate.getSourceType());
        parentBlock.setSectionPath(parentCandidate.getSectionPath());
        parentBlock.setStructureNodeId(parentCandidate.getStructureNodeId());
        parentBlock.setStructureNodeType(parentCandidate.getStructureNodeType());
        parentBlock.setCanonicalPath(parentCandidate.getCanonicalPath());
        parentBlock.setItemIndex(parentCandidate.getItemIndex());
        parentBlock.setParentText(parentCandidate.getText().trim());
        parentBlock.setCharCount(parentCandidate.getText().length());
        // token 数量这里走轻量估算,不依赖真正 tokenizer,主要用于统计和展示。
        parentBlock.setTokenCount(estimateTokenCount(parentCandidate.getText()));
        parentBlock.setStatus(BusinessStatus.YES.getCode());

        // 记录这个父块对应的起始 chunkNo,后面用于回填 startChunkNo / endChunkNo。
        int startChunkNo = globalChunkNo;
        int childCount = 0;
        for (ChunkCandidate childCandidate : parentCandidate.getChildChunks()) {
            // 子块为空或文本为空时不落库,避免无内容 chunk 污染向量索引。
            if (childCandidate == null || StrUtil.isBlank(childCandidate.getText())) {
                continue;
            }
            // 每个 child chunk 都会绑定当前父块 ID,并继承文档/任务/方案三个维度的归属信息。
            SuperAgentDocumentChunk chunk = new SuperAgentDocumentChunk();
            chunk.setId(uidGenerator.getUid());
            chunk.setDocumentId(documentId);
            chunk.setTaskId(taskId);
            chunk.setPlanId(planId);
            chunk.setParentBlockId(parentBlock.getId());
            // chunkNo 在整篇文档内全局递增,便于按原始顺序展示和检索。
            chunk.setChunkNo(globalChunkNo++);
            chunk.setSourceType(childCandidate.getSourceType() == null
                ? DocumentChunkSourceTypeEnum.ORIGINAL.getCode() : childCandidate.getSourceType());
            // 子块若未单独指定 sectionPath,则默认继承父块 sectionPath。
            chunk.setSectionPath(StrUtil.blankToDefault(childCandidate.getSectionPath(), parentCandidate.getSectionPath()));
            chunk.setStructureNodeId(childCandidate.getStructureNodeId());
            chunk.setStructureNodeType(childCandidate.getStructureNodeType());
            chunk.setCanonicalPath(childCandidate.getCanonicalPath());
            chunk.setItemIndex(childCandidate.getItemIndex());
            chunk.setChunkText(childCandidate.getText().trim());
            chunk.setCharCount(childCandidate.getText().length());

            chunk.setTokenCount(estimateTokenCount(childCandidate.getText()));
            // 新生成的 chunk 初始一定处于“待向量化”状态,
            // 真正跑完向量化后再由向量网关回填结果状态。
            chunk.setVectorStatus(DocumentVectorStatusEnum.WAIT_VECTOR.getCode());
            chunk.setVectorStoreType(DocumentVectorStoreTypeEnum.PG_VECTOR.getCode());
            chunk.setStatus(BusinessStatus.YES.getCode());
            chunkEntityList.add(chunk);
            childCount++;
        }

        // 父块回填自己包含的子块数量以及 chunk 编号范围,便于详情页直接展示父子覆盖区间。
        parentBlock.setChildCount(childCount);
        parentBlock.setStartChunkNo(childCount == 0 ? null : startChunkNo);
        parentBlock.setEndChunkNo(childCount == 0 ? null : globalChunkNo - 1);
        parentBlockEntityList.add(parentBlock);
    }

    return new ParentChildEntityBundle(parentBlockEntityList, chunkEntityList);
}
用一张流程图来梳理这个方法的执行过程:
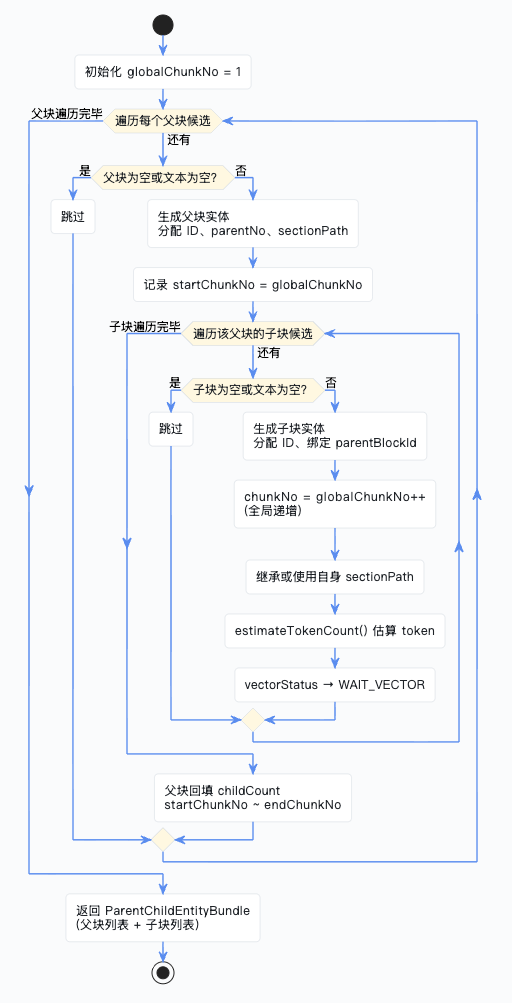
这里有几个值得注意的设计:
- chunkNo 全局递增:不是每个父块内从 1 开始,而是整篇文档统一编号,方便按原始顺序展示
- sectionPath 继承:子块如果没有自己的章节路径,就继承父块的
- token 轻量估算:不依赖真正的 tokenizer,用的是一个简单的估算方法
estimateTokenCount:token 估算
DocumentAsyncProcessServiceImpl.java — estimateTokenCount()
 private int estimateTokenCount(String text) {
    if (StrUtil.isBlank(text)) { return 0; }
    int chineseCount = 0;
    int englishCount = 0;
    // 先统计中文字符数量
    for (char current : text.toCharArray()) {
        if (String.valueOf(current).matches("[\\u4e00-\\u9fa5]")) {
            chineseCount++;
        }
    }
    // 再统计包含英文字母的单词数量
    for (String word : text.split("\\s+")) {
        if (word.matches(".*[A-Za-z].*")) {
            englishCount++;
        }
    }
    // 其余非中文字符按每 4 个字符折算 1 个 token
    return chineseCount + englishCount + Math.max(1, (text.length() - chineseCount) / 4);
}
思路很简单:中文按单字算,英文按单词算,其他字符每 4 个算 1 个 token。不精确,但用来做统计展示足够了。
实体落库
DocumentAsyncProcessServiceImpl.java — handleIndexBuild()
// 先写父块,再写子块,确保 chunk 引用的 parentBlockId 对应实体已经存在。
for (SuperAgentDocumentParentBlock parentBlock : parentBlockEntityList) {
    parentBlockMapper.insert(parentBlock);
}
for (SuperAgentDocumentChunk chunk : chunkEntityList) {
    chunkMapper.insert(chunk);
}
阶段四:向量化
切块数据落库之后,下一步就是把这些 chunk 变成可以被检索的向量。
DocumentAsyncProcessServiceImpl.java — handleIndexBuild()
// 调用向量网关批量生成 embedding,并将向量写入对应的向量存储。
vectorGateway.vectorize(chunkEntityList);

// 如果启用了关键词检索网关,则同步把 chunk 建入关键词检索索引;
// 该能力是可选增强,因此服务不存在时直接跳过即可。
DocumentKeywordSearchGateway keywordSearchGateway = keywordSearchGatewayProvider.getIfAvailable();
if (keywordSearchGateway != null) {
    keywordSearchGateway.indexChunks(chunkEntityList);
}

// vectorGateway 执行后会在内存对象上回填向量状态、向量存储信息等字段,
// 这里再逐条 update,把运行结果持久化回 chunk 表。
for (SuperAgentDocumentChunk chunk : chunkEntityList) {
    chunkMapper.updateById(chunk);
}
接着我们进入 vectorGateway.vectorize() 看看它内部到底怎么做的。
vectorize:批量向量化主方法
DefaultDocumentVectorGateway.java — vectorize()
 public static final int EMBEDDING_BATCH_SIZE_LIMIT = 10;

/**
 * 批量执行 chunk 向量化,并将 embedding 写入 PGVector。
 * <p>
 * 这个方法负责把异步索引链已经落库的 child chunk 转成真正可检索的向量数据:
 * 先过滤空文本 chunk,再按固定批次调用 EmbeddingModel 生成向量,
 * 最后把 chunk 元数据和 embedding 一起 upsert 到 PGVector 表中。
 * </p>
 * <p>
 * 方法返回后,传入的 chunk 实体会被原地回填向量状态、向量 ID 和向量库类型,
 * 调用方再负责把这些状态更新回业务表。
 * </p>
 */
@Override
public void vectorize(List<SuperAgentDocumentChunk> chunkList) {

    if (CollUtil.isEmpty(chunkList)) {
        // 没有任何 chunk 时直接返回,避免无意义地初始化模型和拼装 SQL。
        return;
    }

    // 向量化必须依赖具体的 EmbeddingModel,缺失时直接失败,避免写出半成品状态。
    EmbeddingModel embeddingModel = requireEmbeddingModel();

    // 只保留真正有文本内容的 chunk,空块没有 embedding 意义,也不应写入向量库。
    List<SuperAgentDocumentChunk> validChunkList = chunkList.stream()
        .filter(chunk -> chunk != null && StrUtil.isNotBlank(chunk.getChunkText()))
        .toList();
    if (validChunkList.isEmpty()) {
        // 全部都是空文本 chunk 时,向量链路不应继续执行。
        return;
    }

    // 预先计算本轮执行所需的 SQL、批大小和模型名,便于日志输出与后续 metadata 复用。
    String upsertSql = UPSERT_SQL_TEMPLATE.formatted(DocumentPgVectorConstants.EMBEDDING_TABLE_NAME);
    int batchSize = EMBEDDING_BATCH_SIZE_LIMIT;
    String currentEmbeddingModelName = resolveEmbeddingModelName();
    int totalBatchCount = (validChunkList.size() + batchSize - 1) / batchSize;

    log.info("开始执行文档向量化,chunkCount={}, batchSize={}, batchCount={}, embeddingModel={}",
        validChunkList.size(), batchSize, totalBatchCount, currentEmbeddingModelName);

    for (int startIndex = 0; startIndex < validChunkList.size(); startIndex += batchSize) {
        int endIndex = Math.min(startIndex + batchSize, validChunkList.size());
        List<SuperAgentDocumentChunk> currentBatch = validChunkList.subList(startIndex, endIndex);
        int currentBatchIndex = (startIndex / batchSize) + 1;

        log.info("开始处理 embedding 批次,batchIndex={}/{}, chunkRange=[{}, {}], currentBatchSize={}",
            currentBatchIndex, totalBatchCount, startIndex + 1, endIndex, currentBatch.size());

        // 只把 chunk 文本传给 EmbeddingModel,返回顺序必须与输入顺序严格一一对应。
        List<float[]> embeddingList = embeddingModel.embed(currentBatch.stream()
            .map(SuperAgentDocumentChunk::getChunkText)
            .toList());
        if (embeddingList.size() != currentBatch.size()) {
            throw new IllegalStateException("EmbeddingModel 返回的向量数量与 chunk 数量不一致。");
        }

        // 批量写入 PGVector,并在内存实体上标记本批次成功状态。
        batchUpsert(upsertSql, currentBatch, embeddingList, currentEmbeddingModelName);
        markSuccess(currentBatch);

        log.info("embedding 批次处理完成,batchIndex={}/{}, currentBatchSize={}",
            currentBatchIndex, totalBatchCount, currentBatch.size());
    }

    log.info("文档向量化执行完成,chunkCount={}, batchSize={}, batchCount={}, embeddingModel={}",
        validChunkList.size(), batchSize, totalBatchCount, currentEmbeddingModelName);
}
核心流程就三步:过滤空 chunk → 按批次调用 EmbeddingModel → 写入 PGVector。每批最多处理 10 个 chunk。
batchUpsert:批量写入 PGVector
DefaultDocumentVectorGateway.java — batchUpsert()
private void batchUpsert(String upsertSql, List<SuperAgentDocumentChunk> chunkBatch,
        List<float[]> embeddingBatch, String embeddingModelName) {
    pgVectorJdbcTemplate.batchUpdate(upsertSql, new BatchPreparedStatementSetter() {
        @Override
        public void setValues(PreparedStatement ps, int index) throws SQLException {
            SuperAgentDocumentChunk chunk = chunkBatch.get(index);
            float[] embedding = embeddingBatch.get(index);

            // 在真正落库前,先把内存对象状态切为"向量化中"
            chunk.setVectorStatus(DocumentVectorStatusEnum.VECTORIZING.getCode());
            // metadata 会和向量一起写入 PGVector
            String metadataJson = buildMetadataJson(chunk, embeddingModelName);

            ps.setLong(1, chunk.getId());
            ps.setLong(2, chunk.getDocumentId());
            ps.setLong(3, chunk.getTaskId());
            // ... 中间字段设置省略 ...
            ps.setString(13, chunk.getChunkText());
            ps.setString(17, metadataJson);
            // PGVector JDBC 层以字符串字面量形式接收向量内容
            ps.setString(18, toVectorLiteral(embedding));
            ps.setInt(19, 1);
        }

        @Override
        public int getBatchSize() { return chunkBatch.size(); }
    });
}
这里用的是 Spring JDBC 的 batchUpdate,通过 BatchPreparedStatementSetter 实现批量写入。SQL 用的是 INSERT ... ON CONFLICT DO UPDATE(upsert),这样即使重复执行也不会报错。
markSuccess:标记向量化成功
DefaultDocumentVectorGateway.java — markSuccess()
private void markSuccess(List<SuperAgentDocumentChunk> chunkBatch) {
    for (SuperAgentDocumentChunk chunk : chunkBatch) {
        // 当前实现直接以 chunk 主键作为向量记录 ID
        chunk.setVectorId(String.valueOf(chunk.getId()));
        chunk.setVectorStoreType(DocumentVectorStoreTypeEnum.PG_VECTOR.getCode());
        chunk.setVectorStatus(DocumentVectorStatusEnum.VECTOR_SUCCESS.getCode());
    }
}
vectorGateway 的设计巧妙之处
vectorize()方法不是返回结果,而是直接在传入的 chunk 对象上回填状态。这样调用方只需要再做一次updateById就能把向量化结果持久化回去,不需要额外的数据映射。
buildMetadataJson:构造元数据
DefaultDocumentVectorGateway.java — buildMetadataJson()
 private String buildMetadataJson(SuperAgentDocumentChunk chunk, String embeddingModelName) {
    Map<String, Object> metadata = new LinkedHashMap<>();
    // metadata 既服务于检索过滤,也方便后续排查向量与业务 chunk 的映射关系
    metadata.put("documentId", chunk.getDocumentId());
    metadata.put("taskId", chunk.getTaskId());
    metadata.put("planId", chunk.getPlanId());
    metadata.put("parentBlockId", chunk.getParentBlockId());
    metadata.put("chunkNo", chunk.getChunkNo());
    metadata.put("sourceType", chunk.getSourceType());
    metadata.put("sectionPath", chunk.getSectionPath());
    metadata.put("charCount", chunk.getCharCount());
    metadata.put("tokenCount", chunk.getTokenCount());
    metadata.put("embeddingModel", embeddingModelName);
    try {
        return objectMapper.writeValueAsString(metadata);
    } catch (JsonProcessingException exception) {
        throw new IllegalStateException("序列化 PGVector metadata 失败。", exception);
    }
}
metadata 里存了很多维度的信息,后续做向量检索时可以用这些字段做过滤条件,比如只搜某个文档的 chunk、只搜某个章节下的 chunk 等等。
indexChunks:同步关键词检索索引
上面的 vectorGateway.vectorize(chunkEntityList) 解决的是语义召回:用户问法和原文表达不完全一致时,通过 embedding 相似度把相关 chunk 找出来。
紧接着这段代码:
 // 如果启用了关键词检索网关,则同步把 chunk 建入关键词检索索引;
// 该能力是可选增强,因此服务不存在时直接跳过即可。
DocumentKeywordSearchGateway keywordSearchGateway = keywordSearchGatewayProvider.getIfAvailable();
if (keywordSearchGateway != null) {
    keywordSearchGateway.indexChunks(chunkEntityList);
}
解决的是另一条检索通道:关键词召回。它把刚刚落库并完成向量化处理的 chunk 同步写入 Elasticsearch。
这样后续检索时,系统不仅可以走 PGVector 做语义相似度召回,也可以走 Elasticsearch 做 精确词、章节路径、文档名称、标签、业务分类等字段的关键词匹配。
这里有两个设计点要注意:
keywordSearchGatewayProvider.getIfAvailable()表示关键词检索是可插拔能力。当前环境没有启用 Elasticsearch 关键词检索网关时,主流程不会因为 Bean 不存在而失败。- 一旦
keywordSearchGateway存在,indexChunks()写入失败就会抛出异常,并被handleIndexBuild()外层统一 catch 捕获,最终任务会进入失败收尾。这说明“网关可选”不等于“写入失败可忽略”。
完整实现入口如下。
ElasticsearchDocumentKeywordSearchGateway.java — indexChunks()
/**
 * 将文档切片批量写入 Elasticsearch 关键词索引。
 *
 * <p>这个方法负责把业务库里的 {@link SuperAgentDocumentChunk} 转换成
 * {@link DocumentKeywordIndexRecord},再通过 Elasticsearch Bulk API 一次性写入索引。
 * 写入前会先批量查询切片所属的文档主表信息,因为索引里除了切片正文,还需要冗余文档名称、
 * 知识库范围、业务分类、标签等字段,方便后续关键词召回时按这些字段过滤和加权。</p>
 *
 * @param chunkList 待写入关键词索引的文档切片列表
 */
@Override
public void indexChunks(List<SuperAgentDocumentChunk> chunkList) {
    // 没有待索引的切片时直接返回,避免构造空的 BulkRequest,也避免无意义访问 Elasticsearch。
    if (CollUtil.isEmpty(chunkList)) {
        return;
    }

    // 先按 documentId 批量加载文档主表数据,后续每个 chunk 转索引记录时都可以从 Map 中 O(1) 取到文档元数据。
    Map<Long, SuperAgentDocument> documentMap = loadDocumentMap(chunkList);
    // 构造 BulkRequest:统一指定目标索引,并使用 WaitFor 刷新策略,让写入在刷新可见后再返回,提升后续检索的实时性。
    BulkRequest.Builder bulkBuilder = new BulkRequest.Builder()
        .index(properties.getElasticsearch().getIndexName())
        .refresh(Refresh.WaitFor);

    for (SuperAgentDocumentChunk chunk : chunkList) {
        // 通过 chunk 上的 documentId 关联文档主表;如果文档已被删除或查不到,后面会用空字符串兜底,不阻断 chunk 索引。
        SuperAgentDocument document = documentMap.get(chunk.getDocumentId());
        // 将数据库实体转换成 Elasticsearch 索引结构,完成字段清洗、空值兜底和标签拆分等写入前准备。
        DocumentKeywordIndexRecord indexRecord = toIndexRecord(chunk, document);
        // 每个 chunk 对应一条 index 操作;使用 chunkId 作为文档 id,重复写入同一 chunk 时会覆盖旧索引,保持幂等。
        bulkBuilder.operations(operation -> operation
            .index(index -> index
                .id(indexRecord.getChunkId())
                .document(indexRecord)
            )
        );
    }

    try {
        // 一次性提交所有 index 操作,减少逐条写入 Elasticsearch 的网络开销。
        BulkResponse response = elasticsearchClient.bulk(bulkBuilder.build());
        // Bulk API 可能整体请求成功但部分 item 失败,因此必须显式检查 response.errors()。
        if (response.errors()) {
            // 汇总每个失败 item 的 id 和失败原因,抛出异常时方便定位具体是哪些 chunk 写入失败。
            String errorMessage = response.items().stream()
                .filter(item -> item.error() != null)
                .map(item -> item.id() + ":" + item.error().reason())
                .collect(Collectors.joining("; "));
            throw new IllegalStateException("批量写入 Elasticsearch 失败: " + errorMessage);
        }
        // 记录成功写入的 chunk 数和索引名,便于观察异步文档处理链路是否完成关键词索引同步。
        log.info("文档 chunk 已同步写入 Elasticsearch: chunkCount={}, index={}",
            chunkList.size(), properties.getElasticsearch().getIndexName());
    }
    catch (IOException exception) {
        // 客户端通信、序列化或服务端连接异常统一包装成运行时异常,让上层异步处理链路感知本次索引失败。
        throw new IllegalStateException("写入 Elasticsearch 失败", exception);
    }
}
这段方法可以按执行顺序拆成四步看:
- 空列表直接返回:如果
chunkEntityList为空,说明前面没有生成有效子块,关键词索引没有任何可写内容。 - 批量加载文档主表:chunk 表里有正文、章节路径、父块 ID 等信息,但文档名称、知识库范围、业务分类、标签在文档主表里,所以要先把这些文档信息批量查出来。
- 组装 BulkRequest:每个 chunk 转成一条
DocumentKeywordIndexRecord,再作为一个 Elasticsearchindex操作放进 Bulk 请求里。 - 统一提交并检查失败项:Elasticsearch Bulk API 有一个细节:HTTP 请求成功不代表每一条 item 都成功,所以必须看
response.errors()。如果有失败项,就把失败 chunk id 和原因拼出来,抛给外层任务处理。
其中 Refresh.WaitFor 也很关键。它表示写入请求会等待 Elasticsearch refresh 后再返回,这样关键词索引写完后更快能被检索看见。代价是写入延迟会比完全异步刷新更高,但对“文档索引构建完成后立即可查”这个场景更友好。
接下来继续看 indexChunks() 调用的多层子方法。
loadDocumentMap:一次性加载文档元数据
indexChunks() 的第一层子方法是 loadDocumentMap()。
/**
 * 根据切片列表中的 documentId 批量加载文档主表,并组装成以文档 id 为 key 的 Map。
 *
 * <p>这是 {@link #indexChunks(List)} 的第一层子方法。之所以单独批量查询,是为了避免在
 * for 循环中按 chunk 逐条查询文档,导致 N+1 查询问题;同时索引记录需要文档层面的名称、
 * 知识库范围、业务分类和标签字段,这些信息不在 chunk 表里。</p>
 *
 * @param chunkList 待写入索引的切片列表
 * @return 文档 id 到文档实体的映射;当切片里没有有效 documentId 时返回空 Map
 */
private Map<Long, SuperAgentDocument> loadDocumentMap(List<SuperAgentDocumentChunk> chunkList) {
    // 从所有 chunk 中提取 documentId,过滤空值并去重,确保数据库只查询必要的文档记录。
    List<Long> documentIds = chunkList.stream()
        .map(SuperAgentDocumentChunk::getDocumentId)
        .filter(Objects::nonNull)
        .distinct()
        .toList();
    // 如果所有 chunk 都没有 documentId,就没有文档主表可查,直接返回空 Map 交给后续转换逻辑做空值兜底。
    if (documentIds.isEmpty()) {
        return Map.of();
    }
    // 使用 MyBatis-Plus 的批量主键查询,一次性拿到所有关联文档,避免在 indexChunks 循环中反复访问数据库。
    List<SuperAgentDocument> documents = documentMapper.selectBatchIds(documentIds);
    // 使用 LinkedHashMap 保留查询结果遍历顺序,虽然当前只按 key 读取,但有助于调试时保持输出稳定。
    Map<Long, SuperAgentDocument> documentMap = new LinkedHashMap<>();
    for (SuperAgentDocument document : documents) {
        // 按文档 id 建立索引,后续处理每个 chunk 时可以通过 chunk.documentId 快速拿到文档元数据。
        documentMap.put(document.getId(), document);
    }
    return documentMap;
}
这里的重点不是“查文档”本身,而是避免 N+1 查询。如果一个文档切出了 100 个 chunk,不能在循环里查 100 次文档主表,而是先从 chunk 列表中提取 documentId,去重后一次性查出所有文档,再转成 Map。
转成 Map 以后,主循环里就可以通过:
SuperAgentDocument document = documentMap.get(chunk.getDocumentId());
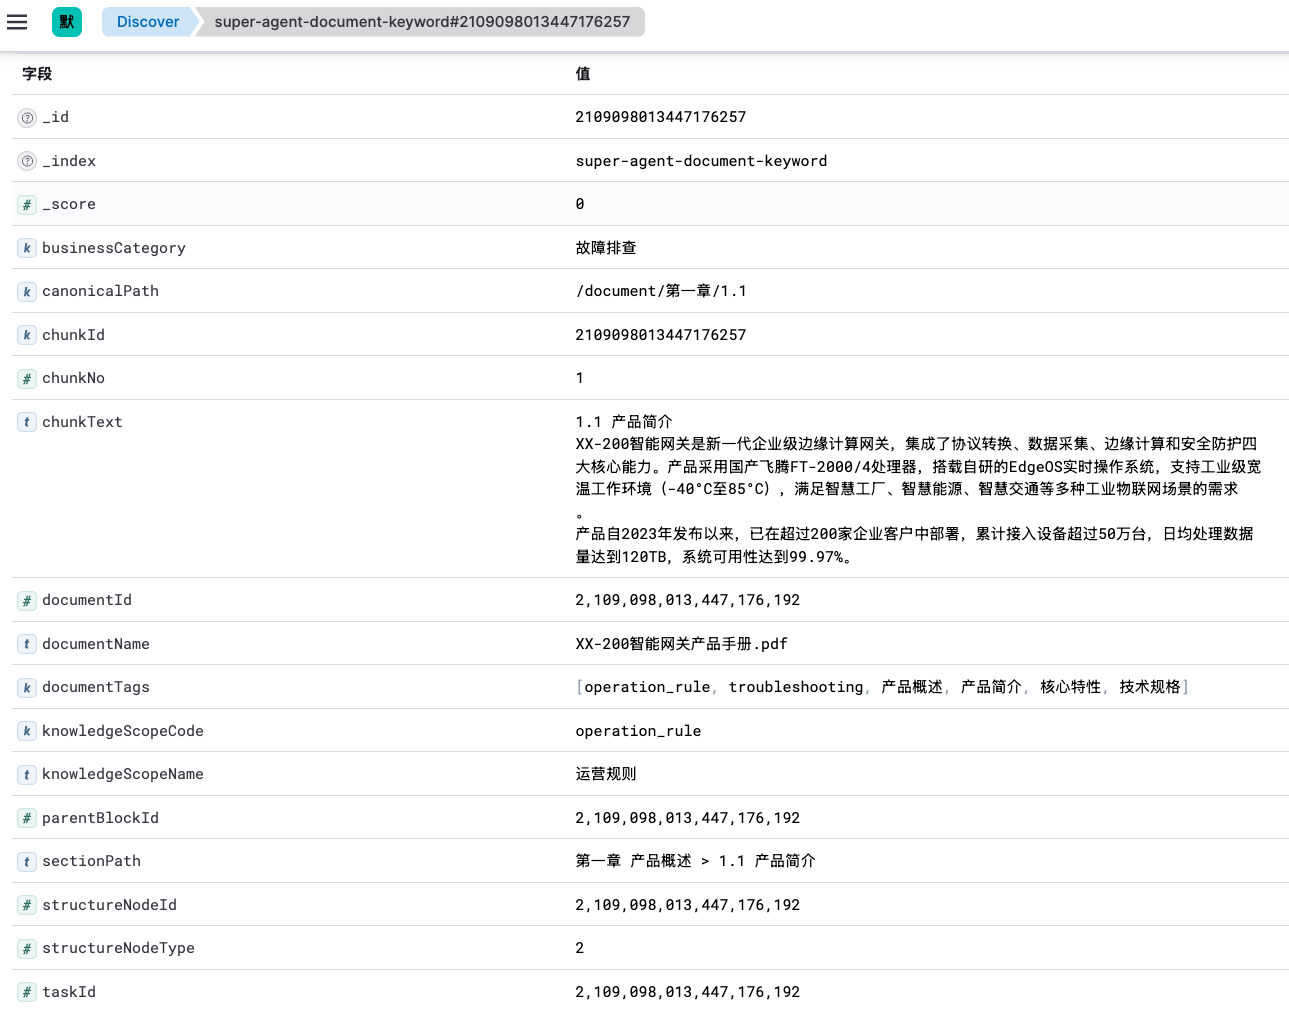
快速拿到文档元数据。这样每条 Elasticsearch 索引记录都可以冗余这些字段:
documentName:用于文档名命中和展示。knowledgeScopeCode/knowledgeScopeName:用于知识范围过滤或加权。businessCategory:用于业务分类召回。documentTags:用于标签匹配。
toIndexRecord:chunk 实体转 Elasticsearch 索引记录
indexChunks() 的第二层子方法是 toIndexRecord(),它是真正决定“写进 Elasticsearch 的文档长什么样”的地方。
/**
 * 将数据库中的文档切片实体转换为 Elasticsearch 关键词索引记录。
 *
 * <p>这是 {@link #indexChunks(List)} 的第二层子方法。索引记录会同时包含 chunk 自身字段
 * 和 document 主表冗余字段:chunk 字段用于定位和展示原文片段,document 字段用于后续关键词检索时做过滤、
 * 权重匹配和结果解释。这里会调用 {@link #safeText(String)} 做空字符串兜底,并调用
 * {@link #splitTags(String)} 把逗号分隔的标签字符串拆成 Elasticsearch 更容易匹配的数组字段。</p>
 *
 * @param chunk 当前要写入 Elasticsearch 的文档切片
 * @param document chunk 所属的文档主表记录;当主表缺失时允许为 null
 * @return 可直接写入 Elasticsearch 的关键词索引记录
 */
private DocumentKeywordIndexRecord toIndexRecord(SuperAgentDocumentChunk chunk, SuperAgentDocument document) {
    // 使用 builder 明确写入索引的字段来源:一部分来自 chunk,一部分来自 document,一部分经过清洗转换。
    return DocumentKeywordIndexRecord.builder()
        // Elasticsearch 文档 id 使用字符串类型;这里由 chunk 主键转换而来,保证同一 chunk 重复写入时覆盖同一条索引。
        .chunkId(String.valueOf(chunk.getId()))
        // documentId/taskId 等数字字段保留原始类型,便于后续 terms filter 精确过滤。
        .documentId(chunk.getDocumentId())
        .taskId(chunk.getTaskId())
        .parentBlockId(chunk.getParentBlockId())
        .chunkNo(chunk.getChunkNo())
        // document 可能查询不到,因此文档层面的文本字段都要先判空,再通过 safeText 统一转成非 null 字符串。
        .documentName(document == null ? "" : safeText(document.getDocumentName()))
        // sectionPath/canonicalPath 用于章节路径过滤和加权匹配,写入前转为空字符串可避免序列化 null 带来的检索分支处理。
        .sectionPath(safeText(chunk.getSectionPath()))
        // 结构化节点信息来自解析后的 chunk,可帮助检索结果回溯到标题、列表项、表格等具体结构位置。
        .structureNodeId(chunk.getStructureNodeId())
        .structureNodeType(chunk.getStructureNodeType())
        .canonicalPath(safeText(chunk.getCanonicalPath()))
        .itemIndex(chunk.getItemIndex())
        // 知识库范围和业务分类属于文档维度信息,冗余到每条 chunk 索引里可以避免检索时再回表关联。
        .knowledgeScopeCode(document == null ? "" : safeText(document.getKnowledgeScopeCode()))
        .knowledgeScopeName(document == null ? "" : safeText(document.getKnowledgeScopeName()))
        .businessCategory(document == null ? "" : safeText(document.getBusinessCategory()))
        // 标签在数据库中是逗号分隔字符串,写入 Elasticsearch 前拆成数组,便于 multi_match 对单个标签命中。
        .documentTags(splitTags(document == null ? "" : document.getDocumentTags()))
        // chunkText 是关键词召回的核心正文内容,统一用 safeText 保证索引记录里没有 null 文本。
        .chunkText(safeText(chunk.getChunkText()))
        .build();
}
这一步可以理解为“把关系型数据库里的两类信息摊平成一条搜索文档”:
- 来自 chunk 的字段:
chunkId、documentId、taskId、parentBlockId、chunkNo、sectionPath、canonicalPath、chunkText等。 - 来自 document 的字段:
documentName、knowledgeScopeCode、knowledgeScopeName、businessCategory、documentTags等。
为什么要把 document 字段冗余到每一条 chunk 索引里?因为 Elasticsearch 检索时最好直接在一条索引文档中完成过滤和打分。如果每次命中 chunk 后还要回数据库查文档名称、分类、标签,再重新参与排序,链路会变长,性能和实现复杂度都会上升。
这里还有一个很重要的幂等设计:
.id(indexRecord.getChunkId())
每条 Elasticsearch 文档的 ID 使用 chunkId。这样同一个 chunk 重复写入时不是新增重复记录,而是覆盖原有记录。异步任务重试、重复执行索引构建时,这个设计可以减少脏数据。
splitTags:标签字符串转标签数组
toIndexRecord() 还会继续调用 splitTags(),这是更下一层的子方法。
/**
 * 将文档标签字符串拆分为去重后的标签列表。
 *
 * <p>这是 {@link #toIndexRecord(SuperAgentDocumentChunk, SuperAgentDocument)} 的下层子方法。
 * 数据库中的 documentTags 以英文逗号拼接存储,而 Elasticsearch 更适合把标签作为数组字段写入,
 * 这样后续关键词检索可以针对单个标签独立匹配和加权。</p>
 *
 * @param documentTags 数据库中逗号分隔的标签字符串
 * @return 清洗、过滤空白并去重后的标签列表
 */
private List<String> splitTags(String documentTags) {
    // 标签为空时直接返回不可变空列表,避免后续 builder 写入 null,也表示该文档没有可检索标签。
    if (StrUtil.isBlank(documentTags)) {
        return List.of();
    }
    // 按英文逗号切分标签,逐个 trim 去掉用户录入或拼接时产生的前后空格。
    return java.util.Arrays.stream(documentTags.split(","))
        .map(String::trim)
        // 过滤掉连续逗号、尾部逗号等情况产生的空标签,避免无意义 token 进入 Elasticsearch。
        .filter(StrUtil::isNotBlank)
        // 去重可以降低索引体积,也避免同一标签重复出现影响后续匹配解释。
        .distinct()
        .toList();
}
数据库里 documentTags 通常是类似这样的字符串:
报销,财务制度,发票, 报销
写入 Elasticsearch 前会被处理成:
[报销, 财务制度, 发票]
这个清洗过程做了三件事:
trim():去掉标签前后的空格。filter(StrUtil::isNotBlank):过滤连续逗号、尾部逗号产生的空标签。distinct():去重,避免同一个标签重复写入。
这样后续关键词检索针对 documentTags 做 multi_match 时,命中会更干净。
safeText:统一处理 null 文本
toIndexRecord() 还会多次调用 safeText()。
 /**
 * 将可能为 null 的文本统一转换为非 null 字符串。
 *
 * <p>这是 {@link #toIndexRecord(SuperAgentDocumentChunk, SuperAgentDocument)} 的下层子方法。
 * 索引写入阶段统一把 null 文本字段转为空字符串,可以让 Elasticsearch 文档结构更稳定,
 * 也能减少检索、元数据组装阶段对 null 的重复判断。</p>
 *
 * @param text 原始文本,允许为 null
 * @return 原始文本本身,或在原始文本为 null 时返回空字符串
 */
private String safeText(String text) {
    // 只处理 null,不额外 trim 或改写内容,避免改变用户文档正文、标题、路径等原始文本语义。
    return text == null ? "" : text;
}
这个方法看起来很小,但它保证了 Elasticsearch 索引结构稳定:文档名、章节路径、规范路径、业务分类、正文等文本字段不会出现 Java 层面的 null。后续检索 DSL 里就不用为了每个字段反复写 null 分支。
注意它只把 null 变成空字符串,并不做 trim()。原因是这些字段有些来自用户原文、有些来自结构化路径,索引层不应该随意改写文本语义。
构建完后的 Elasticsearch 索引结构:
关键词索引和向量索引的关系
到这里,阶段四其实完成了两类索引的构建:
- PGVector 向量索引:由
vectorGateway.vectorize(chunkEntityList)完成,重点是 embedding 相似度,解决语义召回。 - Elasticsearch 关键词索引:由
keywordSearchGateway.indexChunks(chunkEntityList)完成,重点是字段匹配、短语匹配、标签/分类/章节路径命中,解决关键词召回。
它们写入的是同一批 chunk,但服务目标不同:向量索引更擅长“意思相近”,关键词索引更擅长“字面命中”和“结构字段过滤”。
后续检索链路可以把两路结果合并、重排,让用户既能搜到语义相关内容,也能搜到明确包含某个词、某个标题、某个标签的内容。
vectorize() 和 indexChunks() 都执行完毕后,回到 handleIndexBuild() 主流程继续往下走。
阶段五:收尾
所有数据处理完成后,更新各维度的最终状态:
DocumentAsyncProcessServiceImpl.java — handleIndexBuild()
// 方案执行完成后,将策略方案本身标记成已执行
plan.setPlanStatus(DocumentPlanStatusEnum.EXECUTED.getCode());
planMapper.updateById(plan);

// 文档索引状态切到构建成功,并记录最近一次成功索引任务 ID
document.setIndexStatus(DocumentIndexStatusEnum.BUILD_SUCCESS.getCode());
document.setLastIndexTaskId(taskId);
documentMapper.updateById(document);

// 收口任务状态,回写结束时间、耗时和成功标记
finishTaskSuccess(task, DocumentTaskStageEnum.STORE_COMPLETE.getCode(), startTime);
DocumentAsyncProcessServiceImpl.java — finishTaskSuccess()
textjavascripttypescriptcsshtmlbashjsonmarkdownpythonjavaccpprubygorustphpsqlyaml Copy
                private void finishTaskSuccess(SuperAgentDocumentTask task, Integer stage, Date startTime) {
    Date finishTime = new Date();
    task.setTaskStatus(DocumentTaskStatusEnum.SUCCESS.getCode());
    task.setCurrentStage(stage);
    task.setFinishTime(finishTime);
    task.setCostMillis(finishTime.getTime() - startTime.getTime());
    task.setErrorCode(null);
    task.setErrorMsg(null);
    taskMapper.updateById(task);
}
统一错误处理
整个 handleIndexBuild() 方法被一个大的 try-catch 包裹,任何阶段出错都会进入统一的失败处理:
DocumentAsyncProcessServiceImpl.java — handleIndexBuild() catch块
 catch (Exception exception) {
    log.error("异步构建索引失败,documentId={}, taskId={}, planId={}",
        documentId, taskId, planId, exception);

    // 文档层面标记构建失败
    document.setIndexStatus(DocumentIndexStatusEnum.BUILD_FAILED.getCode());
    documentMapper.updateById(document);

    // 对当前任务已经生成过的 chunk 统一补写"向量化失败"状态,
    // 避免库里残留 WAIT_VECTOR 等中间态
    chunkMapper.update(null, new LambdaUpdateWrapper<SuperAgentDocumentChunk>()
        .eq(SuperAgentDocumentChunk::getTaskId, taskId)
        .eq(SuperAgentDocumentChunk::getStatus, BusinessStatus.YES.getCode())
        .set(SuperAgentDocumentChunk::getVectorStatus,
            DocumentVectorStatusEnum.VECTOR_FAILED.getCode())
        .set(SuperAgentDocumentChunk::getVectorStoreType,
            DocumentVectorStoreTypeEnum.PG_VECTOR.getCode()));

    // 方案步骤统一改成执行失败
    updateStepExecuteStatus(planId, DocumentStrategyExecuteStatusEnum.EXECUTE_FAILED.getCode());
    // 任务收口到失败态
    failTask(task, startTime, exception, task.getCurrentStage());
}
DocumentAsyncProcessServiceImpl.java — failTask()
  private void failTask(SuperAgentDocumentTask task, Date startTime,
        Exception exception, Integer currentStage) {
    Date finishTime = new Date();
    task.setTaskStatus(DocumentTaskStatusEnum.FAILED.getCode());
    task.setCurrentStage(currentStage);
    task.setFinishTime(finishTime);
    task.setCostMillis(finishTime.getTime() - startTime.getTime());
    task.setErrorCode("TASK_FAILED");
    task.setErrorMsg(exception.getMessage());
    taskMapper.updateById(task);
}
错误处理的关键点
失败时不仅要更新任务状态,还要把已经生成的 chunk 标记为
VECTOR_FAILED。这是为了避免数据库里残留WAIT_VECTOR这种中间态——如果不处理,后续排查问题或者重新执行时,这些"半成品"数据会造成混乱。
完整链路回顾
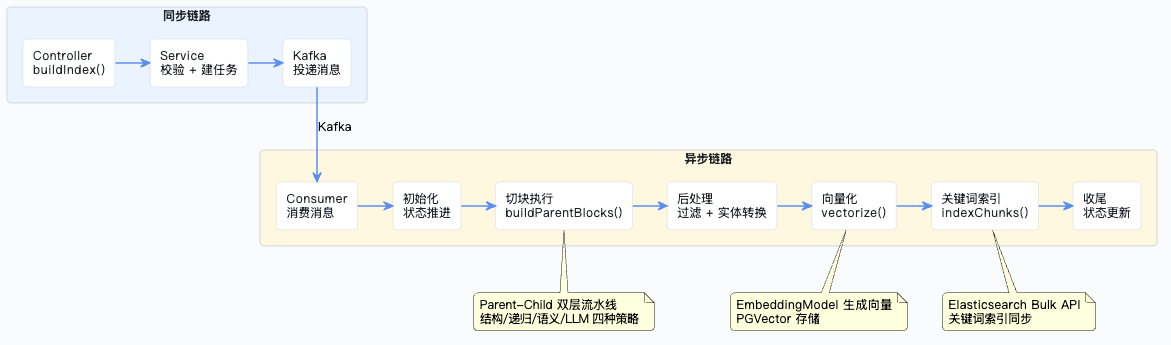
最后用一张图把从 Controller 到索引构建完成的完整链路串起来:
企业级项目导航:⬅️ 05-异步索引构建:初始化与切块执行 | 06-异步索引构建:落库、向量化与收尾 | ➡️ 07-构建索引
💬 评论